HowTo: Downgrade Scosche Rhythm+ Firmware

REVISED 20180116

In my previous article, HowTo: Upgrade Scosche Rhythm+ Firmware, I showed how to update Scosche Rhythm+ firmware via their Fitness Utility iOS app. Some people have had issues with the 3.01 firmware installed by the latest V2 Fitness Utility, notably incompatibility with certain apps, and/or flaky readings.

I contacted Scosche via live chat, and they told me that there was no way to downgrade from 3.01, except for sending the unit back to them. The V2 Fitness Utility no longer has a Firmware Update button, so there’s no way to use it to install any firmware other than v3.01. Instead of sending mine back to them, I decided to try to get a hold of an older version of Fitness Utility, in order to downgrade the firmware. It turned out to be a very laborious and time consuming procedure. I was hoping that I could share the IPA file of Fitness Utility 1.4.1 so everyone else could save a lot of time, but as reader Hap noted in the comments below, IPA files are tied to specific Apple IDs.

If you want to downgrade your firmware yourself, rather than send it back to Scosche, follow the rather lengthy and complicated procedure below.

To obtain the older version of Fitness Utility, I loosely followed the procedure from How to legally download any previous version of an App Store app through iTunes, but it was somewhat outdated, so I will summarize my own procedure below. I am not going to explain the nuts and bolts of what each step does, since that’s covered in the linked article.

Current versions of iTunes no longer support app installs, so you need to downgrade to an older version. The linked article states that there’s yet another hurdle, in that as of iTunes 12.5, Apple is using certificate pinning, which nullifies the ability of Fiddler to snoop HTTPS traffic. I tried an older version of iTunes, but it was no longer able to communicate with the App Store (Apple just LOVES to put up hurdle after hurdle for us!). After much searching, I discovered that in December 2017, Apple quietly released iTunes 12.6.3 for enterprise users who still need the ability to do app installs. Because it uses certificate pinning, I had to devise a procedure to get around that.

Note for Mac users: You can probably follow the same basic procedure using Charles Proxy, but I don’t have the ability to walk you through that.

WARNING: THE PROCEDURE BELOW IS PROVIDED AS A RESULT OF MY OWN FINDINGS. THERE IS ABSOLUTELY NO WARRANTY, AND THERE IS A SMALL POSSIBILITY THAT YOUR DEVICE CAN BECOME BRICKED DURING A FIRMWARE UPDATE. MAKE SURE THAT YOUR DEVICE IS FULLY CHARGED BEFORE STARTING. IN FOLLOWING THE INSTRUCTIONS BELOW, YOU AGREE TO RELEASE ME FROM ALL LIABILITY, AND PROCEED AT YOUR OWN RISK.

How to download Fitness Utility 1.4.1 and use it to downgrade your Rhythm+ to firmware 2.62:

    1. Find your current iTunes folder, and rename it to iTunes.sav, or just move it to a new location. On Windows 10, it’s located at C:\Users\<yourusername>\Music\iTunes. (Don’t worry, after you’re done, you can reinstall the latest iTunes, and restore your old iTunes folder).
    2. Download and install iTunes 12.6.3
    3. Download and install Fiddler. DO NOT START FIDDLER YET
    4. Launch iTunes 12.6.3 and download any random app. iTunes will prompt you to log in with your Apple ID. This is the loophole we use to get around the certificate pinning. It turns out that iTunes 12.6.3 only checks the certificate during the login process, and doesn’t detect when we later swap in Fiddler‘s fake root certificate so that it can snoop HTTPS traffic.
    5. Before proceeding, it’s best to kill any programs on your computer that access the web, because they will pollute your Fiddler capture. If you have your web browser open in order to read this article, kill all of your other tabs that might be accessing the web in the background.
    6. Launch Fiddler.
    7. In Fiddler, go to the File menu and uncheck File->Capture Traffic
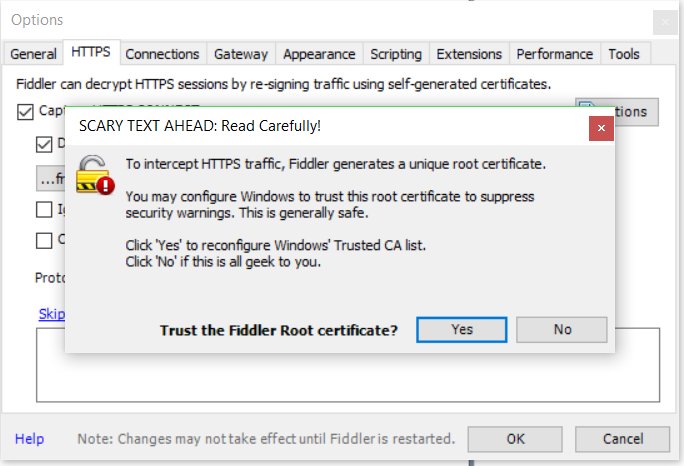
    8. From the Fiddler menu, go to Tools->Options->HTTPS. Check the Capture HTTPS CONNECTs and Decrypt HTTPS traffic checkboxes. A dialog box will pop up asking if you want to Trust the Fiddler Root certificate. Select Yes to it, and all of the ensuing dialog boxes. Don’t worry, after we’re done, we will remove the fake certificate, and restore your original.
    9. In Fiddler, go to the menu to check Rules->Automatic Breakpoints ->Before Requests
    10. Launch iTunes and search for Fitness Utility in the App Store
    11. In Fiddler, go to the File menu and check File->Capture Traffic
    12. In iTunes, click the button to download Fitness Utility
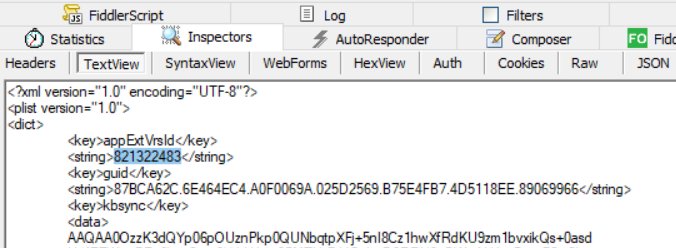
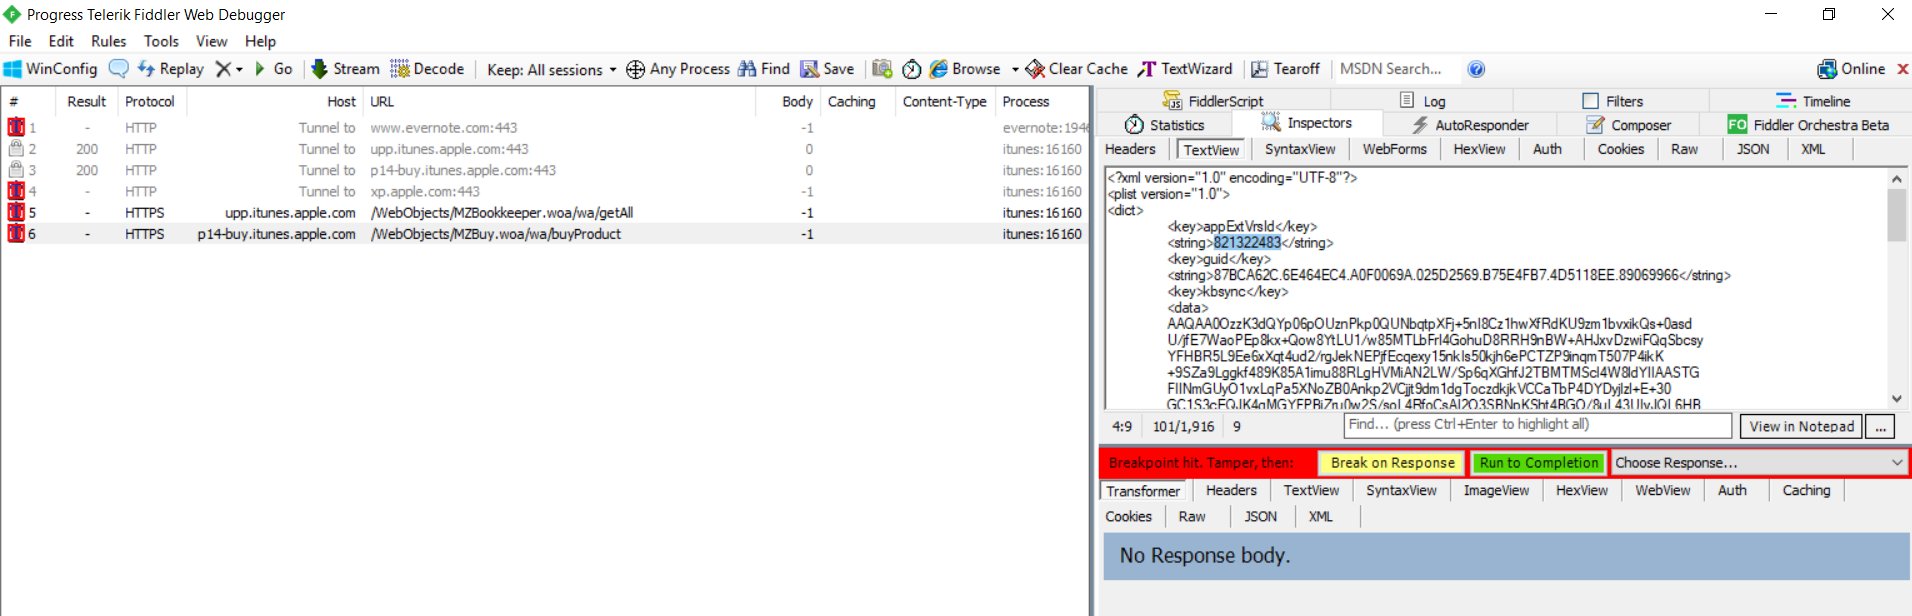
    13. A few requests with red icons on the left will appear in the Fiddler capture pane. Select
      HTTP Tunnel to upp.itunes.apple.com:443  and click the green Run to Completion button in the right pane. Next, select
      HTTP Tunnel to p14-buy.itunes.apple.com:443 in the left pane, and click the green Run to Completion button in the right pane
    14. A new request should appear in the Fiddler capture pane: HTTPS p14-buy.itunes.apple.com /WebObjects/MZBuy.woa/wa/buyProduct  Select it in the capture pane, and then in the right pane, click the TextView tab, look for

      <plist version=”1.0″>
      <dict>
      <key>appExtVrsId</key>
      <string>821322483</string>

      and replace 821322483 with 813634417.

    15. In Fiddler, go to the menu to check Rules->Automatic Breakpoints ->Disable
    16. Make sure the HTTPS p14-buy.itunes.apple.com /WebObjects/MZBuy.woa/wa/buyProduct request is selected in the Fiddler capture pane, and click the green Run to Completion button.
    17. After iTunes shows that Fitness Utility is downloaded, verify that you have the Fitness Utility 1.4.1.ipa file in C:\Users\<yourusername>\Music\iTunes\iTunes Media\Mobile Applications
    18. Connect your iOS device to your computer, and use iTunes 12.6.3 to install the Fitness Utility 1.4.1 to your iOS device, or use iFunBox instead as described below in Update 20170112
    19. Launch Fitness Utility 1.4.1 on your iOS device and turn on your Rhythm+. WARNING: MAKE SURE YOUR RHYTHM+ IS FULLY CHARGED BEFORE UPGRADING THE FIRMWARE. IF IT DIES DURING A FIRMWARE UPGRADE, IT MAY BE RENDERED UNUSABLE.
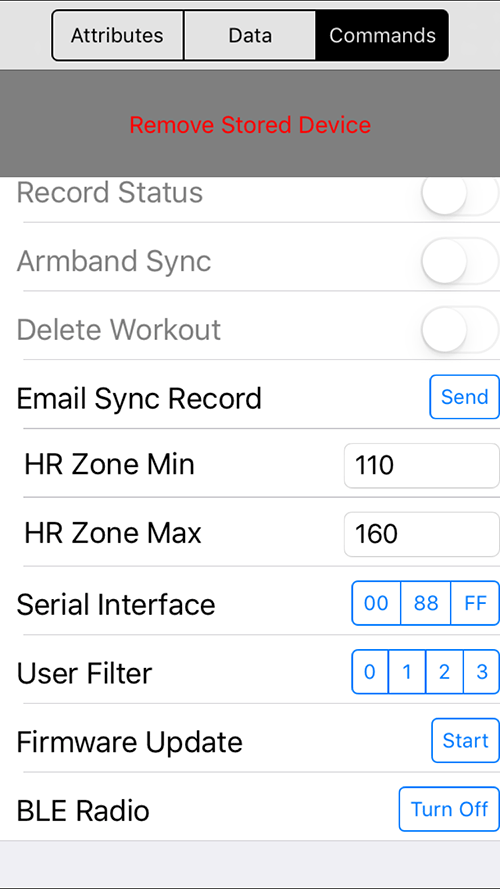
    20. Tap the Commands button at the top right of the screen, and then tap the Start button next to Firmware Update.
    21. After the update is completed, power cycle your Rhythm+
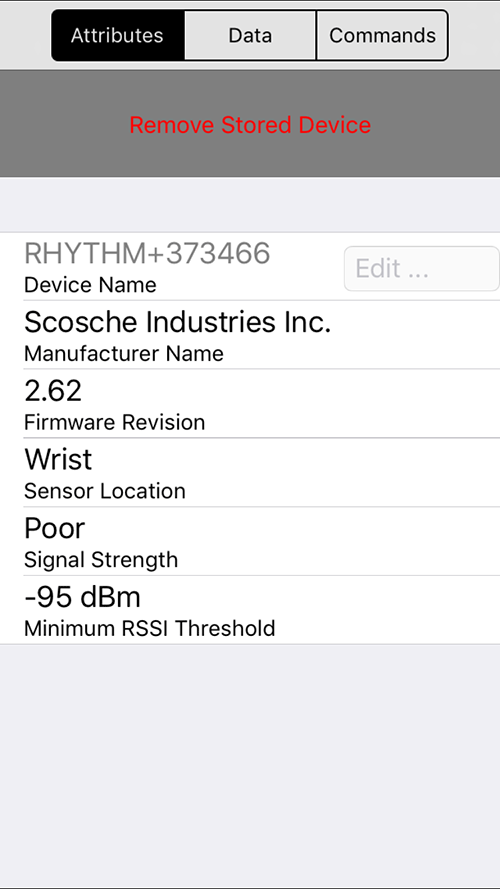
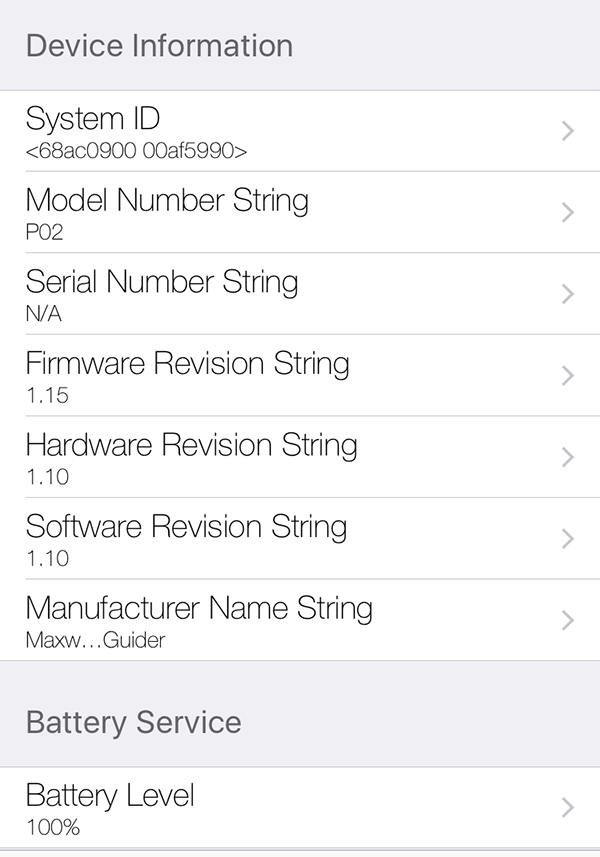
    22. You can check that the firmware version is now 2.62 by tapping the Attributes button at the top left of Fitness Utility.
    23. VERY IMPORTANT: Once you verify proper operation of Fitness Utility, on your computer, have Fiddler restore your original root certificate with Tools->Options->HTTPS->Actions->Reset All Certificates.
    24. Copy your Fitness Utility 1.4.1.ipa file somewhere so that you can reuse it in the future if you wish.
    25. Delete the new iTunes folder, restore your old iTunes folder by renaming iTunes.sav to iTunes, uninstall iTunes 12.6.3, and reinstall your original version of iTunes.

Now that you have your own copy of Fitness Utility 1.4.1.ipa, you are free to try any future firmware upgrades from Scosche, because it’s easy to go back to a working version if you don’t like the new one. If you use iFunBox, you don’t even have to mess with swapping out iTunes versions.

If you prefer to downgrade to firmware v2.4, you can use Fitness Utility 1.4.1 and follow the procedure below:

*** WARNING: DOWNGRADING TO FIRMWARE V2.4 DISABLES THE ABILITY TO UPDATE FIRMWARE VIA FITNESS UTILITY. IF YOU LATER CHANGE YOUR MIND, AND WANT TO INSTALL A DIFFERENT VERSION, YOU WILL HAVE TO SEND THE UNIT BACK TO SCOSCHE. ***

  1. download firmware 2.4 and unzip it.
  2. send the unzipped HEX file to an e-mail address accessible from your iOS device
  3. open the e-mail you sent on your iOS device, tap the attachment, and then scroll through the on screen icons until you find Copy to Fitness Utility, and tap the icon.
  4. Turn on your Rhythm+ and follow steps 19-22 above.

The above method actually works with any version of firmware HEX file that you are able to obtain.


Update 20180112: I tried installing Fitness Utility 1.4.1.ipa with iFunBox instead of iTunes, and it also works. Launch iFunBox with your phone connected to your computer, and install the app by clicking the Install App(*.ipa) from the main screen. Firmware 2.4: scosche-rhythmplus-2_4.zip


Downloads:
iTunes 12.6.3 (allows App installs): https://support.apple.com/en-us/HT208079


Previous article: HowTo: Upgrade Scosche Rhythm+ Firmware

HowTo: Clean Hydration Bladder Hose/Tubing

If you use a hydration pack, sooner or later, your hose is going to get gunked up with disgusting biofilms or other residues. Biofilms tend to be resistant to disinfectants such as bleach and hydrogen peroxide, so how can you clean the junk out of your hose? I didn’t feel like spending the $$ for a Camelbak cleaning kit, so I found a simple and cheap solution. Simply use a pair of shoelaces.

The shoelaces have to be longer than the length of your hydration hose/tubing. Make sure to use round laces, rather than flat laces. The diameter of the laces has to be smaller than the inside diameter of your hose, in order for them to easily pass through. I happened to have a pair of dress shoe laces I got from a $.99 store.

Small diameter paracord will work, as well, but it doesn’t have the nicely finished ends, which are easier to thread. If you use paracord, wrap the end with a bit of tape to simulate the plastic end of a shoelace, and it will pass through your hose more easily.

First, soak your hose until the gunk inside it softens up. Next, get out the excess water by holding the hose on one end, and cracking it like a whip. Tie the shoelaces together with a knot that’s small enough to pass through the hose, but big enough to be a tight fit to scrub the walls of the tube clean:

img_8719

In the photo above, the knot has white slime on it, because I’ve already used it to scrub out my hose. I just used a basic overhand knot. Next, thread one end of a shoelace through the tube:

img_8718

You may need to remove the attachments from the ends of your hose, in order to get access (especially on the bite valve end). Often, the attachments are very difficult to separate from the hose. Simply dip end of the hose and attachment into hot water to soften up the hose. When the hose is sufficiently softened, you should be able to easily pull off the attachment.

It’s easiest to thread the shoelace through the hose if you clamp the hose between your legs, straighten the hose vertically, and let gravity help you push the shoelace through the top. Finally, just alternately pull ends of the shoelaces to work the knot back and forth through the tube, wiping the junk out of the hose. Wash the gunk off the knot and repeat the process until the hose is clean. Wash the shoelaces, and then soak the hose and shoelaces in some water with a bit of bleach, in order to kill the bacteria and mold.

If you find it hard to get the knot to fit through the hose, try a square knot, which is a bit smaller: http://www.netknots.com/rope_knots/square-knot

You can also get away with using just 1 shoelace. Just tie an overhand knot at one end. However, you will have to re-thread the shoelace through the hose after each pull.

I find that hanging the hose to air dry doesn’t work very well, even if I leave it for a few days. The quickest way to dry it is to first crack it like a whip to expel as much water as possible, and then use forced air to dry out the remaining moisture. I have sleep apnea, so I use my CPAP to blow air through the hose:

img_8720

If you have a fish pump, you can attach the air hose to the hydration tube, and use that to blow air through until it’s completely dry.

Hacking a Proform 12.0TT Treadmill with iFit Live

I recently bought a Proform 12.0TT treadmill from Costco. One of the major reasons I picked this particular treadmill was because it supports iFit Live, which is supposed to allow you to make custom workouts with google maps. Unfortunately, iFit Live has turned out to be complete garbage. My first frustrations started when I tried to connect my treadmill to my iFit account. I spent a couple of hours and got nowhere, because it kept complaining that it wasn’t able to contact the iFit server. I thought maybe it was that my WiFi wasn’t configured correctly, even though the treadmill was able to obtain a valid IP address. I tried submitting a support ticket, and was completely appalled by the horrible total lack of support. They didn’t even bother to respond to my ticket for more than a week, and by that time, I’d figured out that there server had gone down for a few days… one day, it finally just started talking to their server.

iFit Live, which is the only way to make custom workouts is quite expensive, and the treadmill doesn’t even come with so much as a free trial. It costs $9.99/mo or $99/yr. I was thinking of trying it out, but with their crappy support, I don’t want to give them my money. The worst part is that there’s this really cool iFit app that runs on iOS and Android that lets you visualize your workouts in realtime, but it only works on a handful of treadmills, and mine is not included on the list. Of course, they don’t tell you this, so I didn’t figure it out until I’d already bought the treadmill. Doing the workouts on the treadmill’s rather ugly and primitive display isn’t nearly as cool as via google Street View, or at least tracking it on a live google map.

The treadmill’s controller is garbage, too. It doesn’t let you customize the built-in workouts, and doesn’t even let you input things such as age/gender/weight, so the calorie calculations are completely worthless. I started thinking about hacking my own controller for the treadmill, but then decided to first see what could be done via software.

It turns out the treadmill has a built in telnetd, and if you telnet to its IP number, you can log in as root without using any password. ssh is also supported, but it requires the root password. Once you telnet in, it’s readily apparent that it’s running embedded Linux of some sort on an ARM processor. The treadmill control stuff is all in directory /icon/bin. Here is a list of the running processes:

# ps
PID Uid VSZ Stat Command
1 root 652 S init
2 root SWN [ksoftirqd/0]
3 root SW< [events/0]
4 root SW< [khelper]
5 root SW< [kthread]
16 root SW< [kblockd/0]
19 root SW< [khubd]
50 root SW [pdflush]
51 root SW [pdflush]
52 root SW [kswapd0]
53 root SW< [aio/0]
666 root SW [sdioeventd]
667 root SW [sdiod0]
669 root SW [mtdblockd]
709 root SW [nandeventd]
710 root SW [nandthread]
713 root SW< [scsi_eh_0]
739 root 3148 S /usr/bin/syslogd -S -b 10 -D -s 32 -O /tmp/logfile.tx
753 root 2292 S /usr/bin/dropbear
783 root SW [RtmpTimerTask]
784 root SW [RtmpMlmeTask]
785 root SW [RtmpCmdQTask]
786 root SW [RtmpWscTask]
792 root 3124 S /usr/bin/httpd -f -p 8080 -h /icon/bin/html
793 root 3020 S sslwrap -cert /usr/bin/sslwrap.cert -accept 443 -port
794 root 2880 S ./utwatch
795 root 652 S init
796 root 652 S init
798 root 652 S init
800 root 652 S init
810 root 2740 S utaudio
811 root 6476 S utcompete
812 root 2864 S utcontrol
813 root 2744 S utdevcom
814 root 2764 S utinput
815 root 2740 S utlog
816 root 6940 S utnetstatus
817 root 2200 S utuserlog
819 root 2740 S utvalues
820 root 2888 S utwifi
826 root 2872 S utwpl
827 root 2272 S utdisplay
828 root 2740 S utworkout
831 root 4640 R N web_serv
928 root 652 S udhcpc -i apcli0 -a -n -t 4
974 root 664 S telnetd
7348 root 764 S /bin/sh
26665 root 764 S /bin/sh
14635 root 656 R ps
14636 root 648 R sh -c iwconfig
#

From dmesg, I found that it’s running on a NuMicro NUC950 MCU running at 200MHz with 32MB RAM and 130MB of NAND flash. Here is the entire output of dmesg after bootup:

# dmesg
Linux version 2.6.17.14 (sbarton@sbarton-VirtualBox) (gcc version 4.2.1) #95 PREEMPT Thu Nov 21 10:08:23 MST 2013
CPU: ARM926EJ-Sid(wb) [41069265] revision 5 (ARMv5TEJ)
Machine: NUC950
Memory policy: ECC disabled, Data cache writeback
On node 0 totalpages: 8192
DMA zone: 8192 pages, LIFO batch:1
CPU NUC950 (id 0x02900910 system clock:200MHZ)
CPU0: D VIVT write-back cache
CPU0: I cache: 8192 bytes, associativity 4, 32 byte lines, 64 sets
CPU0: D cache: 8192 bytes, associativity 4, 32 byte lines, 64 sets
Built 1 zonelists
Kernel command line: root=/dev/ram0 console=ttyS0,115200n8 initrd=0xa00000,4000000 mem=32M
PID hash table entries: 256 (order: 8, 1024 bytes)
Console: colour dummy device 80×30
selected clock e4e1c0 quot 7
Dentry cache hash table entries: 4096 (order: 2, 16384 bytes)
Inode-cache hash table entries: 2048 (order: 1, 8192 bytes)
Memory: 32MB = 32MB total
Memory: 26440KB available (1676K code, 309K data, 80K init)
Calibrating delay loop… 99.73 BogoMIPS (lpj=498688)
Mount-cache hash table entries: 512
CPU: Testing write buffer coherency: ok
checking if image is initramfs…it isn’t (no cpio magic); looks like an initrd
Freeing initrd memory: 3906K
NET: Registered protocol family 16
********************************************
* You selcet NUC950,Start Init NUC950EVB *
********************************************
SCSI subsystem initialized
usbcore: registered new driver usbfs
usbcore: registered new driver hub
NET: Registered protocol family 2
IP route cache hash table entries: 256 (order: -2, 1024 bytes)
TCP established hash table entries: 1024 (order: 0, 4096 bytes)
TCP bind hash table entries: 512 (order: -1, 2048 bytes)
TCP: Hash tables configured (established 1024 bind 512)
TCP reno registered
NetWinder Floating Point Emulator V0.97 (double precision)
io scheduler noop registered (default)
NUC900 uart driver has been initialized successfully!
nuc900-uart.0: nuc900_serial0 at MMIO 0xb8000000 (irq = 7) is a NUC900
nuc900-uart.1: nuc900_serial1 at MMIO 0xb8000100 (irq = 8) is a NUC900
nuc900-uart.2: nuc900_serial2 at MMIO 0xb8000200 (irq = 9) is a NUC900
RAMDISK driver initialized: 16 RAM disks of 8192K size 1024 blocksize
loop: loaded (max 8 devices)
Card0 Detect !!!
NUC900 SD driver has been initialized successfully!
CFI: Found no nuc900nor device at location zero
probe failed
NUC900 USB host driver has been initialized successfully!
nuc900-ehci nuc900-ehci: Nuvoton nuc900 EHCI Host Controller
nuc900-ehci nuc900-ehci: new USB bus registered, assigned bus number 1
nuc900-ehci nuc900-ehci: irq 15, io mem 0xb0005000
nuc900-ehci nuc900-ehci: USB 2.0 started, EHCI 0.95, driver 10 Dec 2004
usb usb1: configuration #1 chosen from 1 choice
hub 1-0:1.0: USB hub found
hub 1-0:1.0: 2 ports detected
nuc900-ohci nuc900-ohci: Nuvoton nuc900 ohci Host Controller
nuc900-ohci nuc900-ohci: new USB bus registered, assigned bus number 2
nuc900-ohci nuc900-ohci: io mem 0xb0007000
usb usb2: configuration #1 chosen from 1 choice
hub 2-0:1.0: USB hub found
hub 2-0:1.0: 2 ports detected
Initializing USB Mass Storage driver…
usb 1-2: new high speed USB device using nuc900-ehci and address 2
usb 1-2: configuration #1 chosen from 1 choice
usbcore: registered new driver usb-storage
USB Mass Storage support registered.
ts: Compaq touchscreen protocol output
i2c /dev entries driver
nuc900-i2c-p0 nuc900-i2c-p0: bus frequency set to 100 KHz
nuc900-i2c-p0 nuc900-i2c-p0: i2c-0: nuc900 I2C port0 adapter
client [NAU882] registered with bus id 0-001a
NUC900 Audio driver has been initialized successfully!
TCP bic registered
NET: Registered protocol family 1
NET: Registered protocol family 17
RAMDISK: Compressed image found at block 0
VFS: Mounted root (romfs filesystem) readonly.
Freeing init memory: 80K
selected clock e4e1c0 quot 7
gnand: module license ‘Nuvoton’ taints kernel.
NAND: nand_init!!!!!
1. ===> write SMCSR
scsi0 : Nuvoton NUC900 GNAND DRIVER!
nand card init
1. ===> write SMCSR
Card0 Removed
card reset4. ===> write SMCSR
6. ===> write SMCSR
fmiCheckInvalidBlock pSM0->uLibStartBlock=2
Valid P2LN 577, block 1022

===> nand total sectors 253696 <size 129892352>
Vendor: NUVOTON Model: GNAND DRIVER Rev: 2.00
Type: Direct-Access ANSI SCSI revision: 00
SCSI device sda: 253696 512-byte hdwr sectors (130 MB)
sda: Write Protect is off
sda: Mode Sense: 03 00 00 00
sda: got wrong page
sda: assuming drive cache: write through
SCSI device sda: 253696 512-byte hdwr sectors (130 MB)
sda: Write Protect is off
sda: Mode Sense: 03 00 00 00
sda: got wrong page
sda: assuming drive cache: write through
sda: sda1 sda2 sda3 sda4 < sda5 >
sd 0:0:0:0: Attached scsi removable disk sda
EXT2-fs warning: mounting unchecked fs, running e2fsck is recommended
rtusb init rt3070AP —>
=== pAd = c2804000, size = 778504 ===

RTMPAllocTxRxRingMemory, Status=0
RTMPAllocAdapterBlock, Status=0
usbcore: registered new driver rt3070AP
(Efuse for 3062/3562/3572) Size=0x2d [2d0-2fc]
RTMP_TimerListAdd: add timer obj c2893b98!
RTMP_TimerListAdd: add timer obj c2861ed0!
RTMP_TimerListAdd: add timer obj c2861eb8!
RTMP_TimerListAdd: add timer obj c2861ea0!
RTMP_TimerListAdd: add timer obj c28081a8!
RTMP_TimerListAdd: add timer obj c2807dc4!
RTMP_TimerListAdd: add timer obj c280818c!
RTMP_TimerListAdd: add timer obj c2808414!
RTMP_TimerListAdd: add timer obj c2808394!
RTMP_TimerListAdd: add timer obj c280b240!
RTMP_TimerListAdd: add timer obj c280ae5c!
RTMP_TimerListAdd: add timer obj c280b224!
RTMP_TimerListAdd: add timer obj c280b4ac!
RTMP_TimerListAdd: add timer obj c280b42c!
RTMP_TimerListAdd: add timer obj c280e2d8!
RTMP_TimerListAdd: add timer obj c280def4!
RTMP_TimerListAdd: add timer obj c280e2bc!
RTMP_TimerListAdd: add timer obj c280e544!
RTMP_TimerListAdd: add timer obj c280e4c4!
RTMP_TimerListAdd: add timer obj c2811370!
RTMP_TimerListAdd: add timer obj c2810f8c!
RTMP_TimerListAdd: add timer obj c2811354!
RTMP_TimerListAdd: add timer obj c28115dc!
RTMP_TimerListAdd: add timer obj c281155c!
RTMP_TimerListAdd: add timer obj c2814408!
RTMP_TimerListAdd: add timer obj c2814024!
RTMP_TimerListAdd: add timer obj c28143ec!
RTMP_TimerListAdd: add timer obj c2814674!
RTMP_TimerListAdd: add timer obj c28145f4!
RTMP_TimerListAdd: add timer obj c28174a0!
RTMP_TimerListAdd: add timer obj c28170bc!
RTMP_TimerListAdd: add timer obj c2817484!
RTMP_TimerListAdd: add timer obj c281770c!
RTMP_TimerListAdd: add timer obj c281768c!
RTMP_TimerListAdd: add timer obj c281a538!
RTMP_TimerListAdd: add timer obj c281a154!
RTMP_TimerListAdd: add timer obj c281a51c!
RTMP_TimerListAdd: add timer obj c281a7a4!
RTMP_TimerListAdd: add timer obj c281a724!
RTMP_TimerListAdd: add timer obj c28380c0!
RTMP_TimerListAdd: add timer obj c2837cdc!
RTMP_TimerListAdd: add timer obj c28380a4!
RTMP_TimerListAdd: add timer obj c283832c!
RTMP_TimerListAdd: add timer obj c28380dc!
RTMP_TimerListAdd: add timer obj c28380f8!
RTMP_TimerListAdd: add timer obj c2838114!
RTMP_TimerListAdd: add timer obj c286a7e4!
RTMP_TimerListAdd: add timer obj c286a854!
RTMP_TimerListAdd: add timer obj c286a7fc!
RTMP_TimerListAdd: add timer obj c283864c!
RTMP_TimerListAdd: add timer obj c28056c8!
RTMP_TimerListAdd: add timer obj c2808760!
RTMP_TimerListAdd: add timer obj c280b7f8!
RTMP_TimerListAdd: add timer obj c280e890!
RTMP_TimerListAdd: add timer obj c2811928!
RTMP_TimerListAdd: add timer obj c28149c0!
RTMP_TimerListAdd: add timer obj c2817a58!
RTMP_TimerListAdd: add timer obj c2838378!
RTMP_TimerListAdd: add timer obj c28623d0!
–>RTUSBVenderReset
RTUSBVenderReset
Key1Str is Invalid key length(0) or Type(0)
Key2Str is Invalid key length(0) or Type(0)
Key3Str is Invalid key length(0) or Type(0)
Key4Str is Invalid key length(0) or Type(0)
1. Phy Mode = 9
2. Phy Mode = 9
NVM is Efuse and its size =2d[2d0-2fc]
(Efuse for 3062/3562/3572) Size=0x2d [2d0-2fc]
3. Phy Mode = 9
MCS Set = ff 00 00 00 01
SYNC – BBP R4 to 20MHz.l
RTMP_TimerListAdd: add timer obj c28620e8!
Main bssid = ac:a2:13:2b:a4:c4
== rt28xx_init, Status=0
0x1300 = 00064320
selected clock e4e1c0 quot 7
RTMP_TimerListAdd: add timer obj c28a97a0!
RTMP_TimerListAdd: add timer obj c28a9944!
/home/user/2011_0517_RT5370_RT5372_RT5390U_Linux_AP_V2.6.0.0_DPA_1/MODULE/os/linux/../../ap/ap_data.c:3731 assert pEntry->Aid == pRxWI->WirelessCliIDfailed
RTMP_TimerListAdd: add timer obj c28bd0ec!
Rcv Wcid(1) AddBAReq
Start Seq = 00000003
RTMP_TimerListAdd: add timer obj c28be500!
ra0 (WE) : Driver using old /proc/net/wireless support, please fix driver !

There are a bunch of shell scripts in there to do various things. When the machine boots up, it runs go.sh, which in turn runs loadapp.sh, and then runapp.sh. This loads a bunch of utXXX processes, which are all ELF binaries, unfortunately, and run the core functions of the treadmill. download.sh downloads the latest scheduled workout in your iFit account into /icon/bin/iFit/download/wpl2. It uses http downloads from iFit’s server, machines.iconfitness.com. The server host name is stored in the IFIT_SERVER environment variable, so it’s quite easy to redirect it to download from a different server. I envision writing a local http server to emulate some of the iFit server’s functionality. It’s easy to follow what the script does by just typing bash -x download.sh in the shell. The server uses SOAP for its API (templates contained in /icon/bin/iFit/network), and downloads are handled via a binary called soap_get.
It turns out that the workouts are consist of 2 files: layout.fit, and a file with .wpl extension, which is the actual workout data. the name of the .wpl file is the first field in layout.fit. Unfortunately, wpl is a proprietary binary format, so it will take some effort to figure it out, but once that is done, it will be possible to create your own custom workouts without using ifit.com! The built-in workouts are all stored in /icon/bin/iFit/builtin/builtin.xx where xx is a number.

To get the files off of the machine for easy examination, all you have to do is launch the built-in ftpd command to get an anonymous ftp server. Even though it’s already configured in inetd.conf, the server won’t start unless you launch it manually on the command line:

# tcpsvd -vE 192.168.1.111 21 ftpd /
tcpsvd: listening on 192.168.1.111:21, starting

Substitute your treadmill’s IP number where I have 192.168.1.111. I dumped out the whole /icon/bin directory for perusal. I used the Filezilla ftp client on MS Windows.

One final thing… download_firmware.sh checks for and downloads the latest firmware. The firmware updates are in the form of a .tgz file. You can take a look at the contents by looking at /icon/restore/app.tgz, which is a copy of the firmware that’s probably for recovering from a botched update..

That’s all for now. I’m surprised that iFit left the system so wide open. It’s possible that when they find out that people are hacking their systems that they will close the telnet backdoor, so if you want to play, it’s probably a good idea not to update your firmware.

If you play around with your iFit, please share your discoveries in the comments below.


Update 2016-04-04: Thanks to Stefano Livi’s uber hacking skillz, I’ve created a github repo: iFitWPL. Using information provided by Stefano, I wrote a C++ program to (mostly) decode WPL files. I have not yet had time to write code to create new WPL files, but there is a file where Stefano shows code in an obscure programming language to create a new WPL: Notes_on_wpl.txt. Please contribute to the github repo, and feel free to discuss any progress in the comments below.

Update 2017-01-10: My Proform treadmill’s motor crapped out. The treadmill never lived up to my expectations, and Costco is letting me return it, so I’m not going to be doing any more hacking on this. Believe it or not, Costco sent a truck to pick up the treadmill, even though I’d had it over a year. Now looking for a better quality treadmill to replace it!

HowTo: Upgrade Scosche Rhythm+ Firmware

rhythmplus

The Scosche Rhythm+ is an optical BLE/ANT+ armband heart rate monitor that’s highly recommended by DC Rainmaker. There are many posts around the Internet which claim that it doesn’t have updateable firmware, but that’s not always the case. Prior to firmware V2.5, the Rhythm+ had to be sent back to Scosche for firmware updates, but if you’re lucky to have firmware 2.5+ installed, you can update the firmware yourself with your phone and Scosche’s Fitness Utility.

*** WARNING WARNING READ BEFORE UPDATING: Read all of the updates at the bottom of this article before attempting a firmware update. Sometimes, a unit has gotten bricked by the procedure, but apparently, it has been fixed in Version 2 of the app. Also, read the comments left by other users. It seems that the data in the newer firmware 3.0+ also causes issues with data corruption in certain apps.  Before starting a firmware update, make sure that your device is fully charged, because it can be rendered unusable if the battery dies during the procedure ***

The procedure is quick and easy. Pair the Rhythm+ to your phone and launch the Fitness Utility. You will be presented with the Attributes screen, which lists the current firmware version:

IMG_4795

If you have Firmware Revision 2.5 or higher, tap the Commands button, and you’ll be presented with this screen:

IMG_4794

Tap the Firmware Update Start button, and the utility will update you to the latest firmware.

I got a nice new feature when I upgraded mine to firmware 2.62. Now, after setting my HR Zone Min and HR Zone Max via the Fitness Utility, the LED on the Rhythm+ blinks blue when my HR is below HR Zone Min, purple when I’m between HR Zone Min & Max, and red when I’m above HR Zone Max. I guess if you only use ANT+, and want to save some battery life, you can turn off the BLE Radio as well, but I haven’t tried playing with any of the other functions yet, and I have no idea how you would turn BLE on again, since the app communicates via BLE.

Update 2016-07-11: Reader Atle posted below that v2.62 adds another function for iOS users … click the button on the unit once to start/stop music, and double click to advance tracks in the playlist. I wonder if this works on Android, as well.

*** 20170327: WARNING: I HAVE RECEIVED MULTIPLE REPORTS OF THEIR UNITS WITH NEWER FIRMWARE GETTING BRICKED BY APPLYING THE FIRMWARE UPDATE. IF YOU HAVE A UNIT WITH NEWER FIRMWARE >2.62, APPARENTLY, THE UTILITY IS BADLY DESIGNED, OR HASN’T BEEN UPDATED IN A LONG TIME, AND CAN CORRUPT UNITS WITH NEWER FIRMWARE. AT THIS TIME, I *DO NOT* RECOMMEND UPDATING YOUR UNIT IF IT HAS NEWER FIRMWARE. IF YOUR UNIT GETS BRICKED, CONTACT SCOSCHE CUSTOMER SUPPORT … IT IS THEIR FAULT IF THEIR SOFTWARE BRICKS YOUR UNIT ***

** 20170509: A reader below said: “If you see blinking Red-blue led so seems like bricked but don’t be upset just put on charge unit and the device will be reset.” Please leave a comment below if it works to resurrect your bricked unit ***

Update 2017-06-16: As reader Occamsrazor states below, the Fitness Utility has been updated to Version 2. The description on iTunes shows that it has some new features, but it’s rather cryptic. I was able to use it to update my 2.62 FW to 3.01. You no longer have to press a firmware upgrade button. If your unit is eligible for updating the firmware, it will automatically prompt you when you connect your device. The new app has several new undocumented functions. I tried to enter my birthday, height, etc, but it doesn’t seem to work. If anyone figures out the advanced features, please post below. Apparently, it’s possible to record a workout in the band itself, and then export a CSV file, but I can’t get any of the functionality to work. Also, there are some reports that the new version is a lot less likely to brick your unit, but YMMV. It worked OK for me.

Update 2018-01-09: 1) I’m not absolutely certain, but I feel that my Rhythm+ has gotten flaky since updating to v3.01 firmware. The heart rate is often very low or very high. I decided to try downgrading my firmware. If you are having issues, and want to try a different version of firmware, I have documented how to downgrade in a new article: HowTo: Downgrade Scosche Rhythm+ Firmware. 2) I was wrong above. You don’t need v2.62 firmware to get the feature that setting the Min & Max heart rates make your LED flash purple/blue/red when the heart rate is below Min/in between Min & Max/Max HR. v2.4 firmware actually supports that feature.


Next article: HowTo: Downgrade Scosche Rhythm+ Firmware

Review: Mobility Rev Bluetooth Heart Rate Monitor

I recently discovered the PCD Mobility Rev Bluetooth HRM on Amazon.com, for the ridiculously low price of $7.95 including shipping (currently also available on eBay for $9.95). This is a Bluetooth 4.0 (Bluetooth Smart/Bluetooth Low Energy) HRM with strap, for half the price of a replacement strap for a Garmin or Polar HRM! Despite the 1 star reviews on Amazon, I figured that if the HRM was total trash, I would still have a decent spare HRM strap. It arrived a few days ago, and I put it through its paces on a couple of workouts. I wasn’t expecting much, given the bad reviews, and was pleasantly surprised to find that it’s actually a decent piece of hardware.

Specifications

  • strap length: 70-120cm
  • battery life: 1800 hrs (5 yrs x 1 hr/day)
  • battery: CR2032
  • range: ~10 meters
  • waterproof: IPX7
  • operating temperature: -10C – 50C
  • weight: 47g (transmitter+strap)
  • SKU: LHX0021Q

The company seems to be out of business, as their website is dead: http://www.pcdphones.com

The receiver is a bit chunkier and clunky looking compared to my Garmin HRM:

hrmfront

Note how it uses industry standard metal snaps, spaced that the standard distance, so the receiver and strap are compatible with Garmin/Polar/Wahoo/etc.

hrmback

The Mobility Rev uses a CR2032 battery (included). The battery door has a rubber o-ring to seal out moisture from your sweaty chest. I don’t know how water resistant it is, however, and am not going to try immersing it. Unlike the Garmin, which requires a small Philips screwdriver to replace the battery, the Mobility Rev’s battery cover easily comes off with a twist of a coin.

The Mobility Rev strap (bottom) is the same quality and of similar design to my Polar strap (top):

hrmstrapfronthrmstrapback

I use the Polar strap with my Garmin HRM, because the fancy strap that it came with has rather sharp and hard edges that chafe during a long workout.

So far, I have taken the Mobility Rev HRM out for a 1.5 hour bike ride and a 3.5 mi trail run, using the Wahoo Fitness app on an iPhone 6, and it has worked quite well. Here are the metrics I use for evaluating wireless heart rate monitors:

  1. accuracy: Since this is a cheapo HRM, I’m not going to do detailed testing with graphs. At steady state, the heart rate reading is identical to that from my fingertip SpO2 meter. On my 1.5 hour bike ride, I didn’t bother to bring another HRM to compare against, but the heart rate readings looked consistent with my experience, and there were no dropouts or spikes, even when I was riding over very bumpy pavement. On my 3.5 mi trail run, I brought along my Garmin HRM, and did concurrent recordings. I was disappointed to find that during the first minute of recording, the Mobility Rev spiked up abnormally to 144 bpm before stabilizing at my true HR of 109 bpm. This phenomenon, however, is a regular occurrence with my optical HRM’s (Wahoo Rhythm+ and Garmin Forerunner 225 built-in). Since I was wearing two heart rate straps, making the sensor placement less than ideal, it’s possible that this glitch was due to poor contact with my chest. After this initial spike, it settled down, and had identical readings to the Garmin during the rest of the workout, deviating by 1 bpm on occasion, even when my heart rate was fluctuating, due to my switching back and forth between hiking and running. My Pyle strap often spikes up to unrealistically high HR’s when there is intense vibration from my running. The Mobility Rev displayed no such aberrant behavior. For the most part, I was impressed by the accuracy and consistency of its readings.
  2. signal stability: During use, the signal was rock solid and never dropped out.
  3. range: my iPhone 6 was able to reliably receive the signal 40 feet away from the HRM even while indoors.
  4. overall fit and finish: The plastic casing seems of decent quality, and the strap is of comparable quality to the Polar HRM strap.
  5. reliability: Since I have only had it for a day, I don’t yet know if it will crap out after just a few uses. I will update this article after more testing.

Using the free LightBlue Explorer iOS app, I found that it identifies itself as BLUETOOTH SMART HRM, and reports the following device information:

bthrminfo

The manufacturer string is Maxwell Guider. It’s a nice touch that it seems to support reporting of battery status, but I don’t have any partially dead batteries to test with, so I don’t know if it actually outputs anything besides 100% [Update: see below, it always outputs 100% even with bad batteries].

One caveat of the Mobility Rev HRM is that it only outputs heart rate, so you can’t use it for HRV analysis, which requires R-R interval data. I tried to use it with the Elite HRV app on my iPhone, and it wasn’t able to read any HRV data. As a cross check, I took a look at the raw heart rate data output, and found that it indeed only reports 8-bit heart rate and nothing else.  Most people, however, are only interested in heart rate, and won’t find this to be a problem.

I have only had the Mobility Rev BT HRM for a day, so I don’t yet know if it will stop working after only a short period of use. If there are any changes to its performance, I will update this article. Even if it does fail, I’ll still be happy to have an extra $8 Garmin/Polar/Wahoo/etc compatible strap.

Update 2015-11-24: After only 3 days of use, it died. I tried putting several new CR2032’s into it, and it was still dead. I was ready to write it off as a piece of junk until I finally found one that works. Now, it’s working perfectly again. I think the people who are reporting on Amazon that it connects inconsistently or fails after a couple of days are just suffering from weak cells. This device seems to need a higher voltage than others in order to function properly. The functional cell has an open circuit voltage of 3.25V, while another that reads 3.21V doesn’t work. This makes me question the manufacturer’s claim of 1800hrs battery life. Also, during this testing, I found that the Battery Level service is fake, and always outputs 100%. Some of the weak cells would actually operate it for a few seconds at at time before cutting out, and it still outputted a Battery Level of 100%.


Update 2015-12-03: I’ve used the Mobility Rev HRM for at least 8 hours of cycling and running workouts now, and the readings have been absolutely rock solid. No spiking up of HR during the start of a workout, no spiking up of HR during running, and no dropouts. The HR readings are totally glitch free. One problem I’ve had, however, is that sometimes, it’s a bit difficult to get the unit to wake up. I wetting the strap contacts usually helps. One time, I had it mounted upside down on the strap, and it woke up when I inverted it. I’m surprised that it seems to be sensitive to L/R, but unit is actually labeled for left & right sides on the back. In the meantime, the price dropped to $6 on Amazon, so I ordered a 2nd one to keep as a spare.

Pyle PSWGP405BK GPS Watch Software and Firmware Updates

Today, I discovered that the New Balance NX990 GPS Cardio Trainer Watch, like the Pyle PSWGP405BK, is just another Latitude Limited Nav Master II clone.  Following my hunch, I searched for the NX990’s accompanying software, and lo and behold, it’s just rebranded version of GPS Master! Best of all, it’s an updated version, v2.0.16.124, vs the older v1.2 version that I got from Pyle. Besides the red background, it has a much improved interface, showing a google map of your track, and a zoomable graph with user selectable data that tracks your stats live on the map.

nbgpsmaster

So for instance, you can select the point on the graph where your heart rate is highest, and see where you were located on the map.

Best of all is the new Data Transfer->AGPS menu item. A-GPS (Assisted GPS) lets you use the Internet to download GPS satellite almanac data. Your GPS watch can download the almanac data directly via the satellites, but it is a very slow procedure. By connecting your watch to GPS Master once a week and downloading new AGPS data, you can get a hot GPS fix a lot faster. I wasn’t sure if my Pyle firmware had A-GPS support built in, so I took a risk, and used Setting->Watch firmware update to update my Pyle watch to the latest New Balance firmware. I’m happy so say that my watch did not get bricked! [DISCLAIMER: YMMV. I AM NOT RESPONSIBLE IF YOU DECIDE TO INSTALL THE NEW BALANCE FIRMWARE ON YOUR WATCH, AND IT TURNS INTO A PAPERWEIGHT] The New Balance v1.20 firmware appears to have all of the functions of my Pyle firmware. The most obvious difference is just that the screen fonts are more squared off looking. Some of the menus look slightly different, too. I took my watch outside after updating the AGPS data, and it got a GPS fix basically instantly!!

Another great discovery is that unlike my GPS Master 1.2, NB 990 GPS’s exported GPX track files now contain heart rate data! This means when upload your GPX track files to web sites such as RunKeeper, your heart rate data will be saved and displayed, as well. Meaning that you don’t have to use the csv2gpx/csv2tcx utilities that I wrote yesterday in order get your HRM data into other platforms.

All and all, I am very happy with both the software and firmware updates. I took my watch and HRM out for a workout today, and they worked flawlessly with the new firmware.

Downloads:

NX990 GPS Master PC Software
NX990 GPS Master User Manual
NX990 User Manual

Update 2015-03-15:

Here are some open source goodies for the watch:

Crane GPS Watch Client : command line utility. Most notably, it exports TCX files, which is important if you like to use the watch with the GPS turned off, since GPX files that contain HRM data w/o GPS data aren’t valid.

kalenji-gps-watch-reader : exports a multitude of formats, including Garmin FIT. Also performs elevation corrections via Google Elevation API.

GPX and TCX output from GPS Master Software

A couple of years ago, I bought a Pyle PSWGP405BK GPS watch with Heart Rate Monitor.

PSWGP405BK

It’s been a great device, though it’s big, and a bit ugly. The battery far outlasts my wife’s Garmin watches, and I love the customizable screens. My main problem has been the lack of a useful way to extract heart rate data. The problem is that the GPS Master software offers only two ways to export heart rate data: 1) TKL format, which is an undocumented file format used only by GPS Master, and 2) CSV format, which isn’t compatible with any web sites or software that I use.  Although GPS Master can directly export GPX files, they do not include the heart rate data.

I finally got sick of it today, and after wasting some time looking for an easy way to adapter existing converter software to work w/ GPS Master’s CSV files, I gave up, and decided to write my own programs. So, I give you csv2gpx, and csv2tcx. csv2gpx takes a GPS Master CSV file as input, and outputs a GPX file with heart rate data embedded. csv2tcx takes a GPS Master CSV file as input, and outputs a TCX file with heart rate data. Both programs have a simple command line interface. I have supplied full source code on github, so anyone can compile them to run on their own platforms. For Windows users, I have supplied EXE files. The command line syntax is quite simple:

csv2gpx workout.csv

or

csv2tcx workout.csv

The output will automatically be generated as workout.gpx and workout.tcx, respectively.

Here is a sample session:

C:\git\csv2gpx\test>csv2gpx 20150125074851.csv
Lincomatic GPS Master CSV to GPX Converter v0.2

Converting 20150125074851.csv -> 20150125074851.gpx
Avg HR: 131
Max HR: 159
Trackpoints 2398

Note that the output file is the same as the input file, but with GPX extension. csv2tcx works in a similar fashion.

I think csv2gpx and csv2tcx should work with any other watches that work with GPS Master, as well. Runtastic’s watch looks identical to my Pyle, as well as several other models that I’ve seen. For instance, the New Balance NX990 also uses GPS Master, and looks identical. As I’ve stated in a previous article, the watch is built by Latitude Limited, and the OEM calls it the Nav Master II.

Update 2015-01-27: Argh! I just confirmed that the fancy new updated version of GPS Master bundled with the New Balance NX990, aka NB 900 GPS, now exports HRM data inside its GPX files! So I wasted my time writing the utilities above yesterday! It has some nice UI enhancements, as well. Highly recommended! You can read my detailed description: Pyle PSWGP405GK Software and Firmware Updates.

Downloads: csv2tcx and csv2gpx executables for Windows

Quickie Hack: Turn Your Bicycle Into A Party Machine

I was looking for a way to play tunes while biking the other day, and was too lazy to get out the CAD program and design something to print on my RepRap. Here’s a dirt cheap & quick hack to get some decent quality sound while riding your bike. All you need is 4 zip ties:

party1

party2

party3

party4


The only tricky part is that I criss-crossed the ties that attach it to the bike.. that is, I took the end of one tie and inserted it into the other tie, instead of its own end. This added some stability, and prevents the speaker from getting damaged due to rubbing against the handlebars. Be sure to rotate the speaker to the proper orientation for you to access its controls before tightening it up.

The speaker I used is a cheap Chinese fake Beats by Dr Dre speaker. I bought it on AliExpres for $13.88 including shipping from China. It’s also known as the “S11 bluetooth speaker,” and is available on eBay, as well. It has a built-in lithium-ion battery, Bluetooth connectivity, including speakerphone (the microphone is crap, though), and even has pause and track skipping buttons. It also has a cable for connecting it via a headphone jack, and even sports a microSD slot, so you can use it completely standalone. Not only is it loud, but the sound is actually better than lots of speakers I’ve tried that cost a lot more. The black model has a rubberized casing, which helps avoid damage from rough handling. It also comes in a rainbow of colors, some with metal casing, instead.

Now, I just keep my iPhone in my pocket, and pause/skip tracks using the buttons on the speaker. The speaker doesn’t have a volume control, but I can easily reach in my pocket and hit the volume buttons w/o looking at it. I took it on a 50 mile bike ride the other day, and the speaker didn’t vibrate off.


Accuracy of Pyle PSWGP405BK vs RunKeeper Revisited

This morning, I repeated my Eaton Canyon loop with the Pyle PSWGP405BK and RunKeeper on the iPhone 4S.  This time, both of them were quite a bit more accurate than on the last hike.

Pyle PSWGP405BK

pyle

This time round, the Pyle tracks the shapes of the switchbacks fairly accurately, albeit with an offset.  There is a fair amount of overshoot, however, in the last switchback.

RunKeeper on iPhone 4S

rk

RunKeeper on the iPhone 4S again does much worse than the Pyle, but still much better than in my previous recording.  Out of the various iPhone tracking apps I’ve tried, I still find RunKeeper to be the most accurate.  I would like to try this route with an Android phone sometime, to see if it does a better job with outputting accurate location data. Here’s the tabular data:

Distance (mi) Calories
RunKeeper 3.47 491
Pyle PSWGP405BK 3.31 593
Pyle PSWGP405BK track on RunKeeper.com 3.43 475

Interestingly, the disparity between RunKeeper’s distance calculation of its own track vs its calculation of the Pyle’s track was much smaller today, but this can be explained by the fact that RunKeeper didn’t meander as badly today, so the tracks lined up more closely.

On the other hand, disparity between the results I got today and my previous post show how GPS accuracy can vary, even in similar weather conditions, at a similar timeof day on the same route.  I would conjecture that the increased accuracy today has to do with a more optimal geometry of the satellites in the sky. Unfortunately, since the devices I used don’t output detailed satellite signal and skyview data, there is no way to verify for sure.

This evening, I again pitted RunKeeper against the Pyle, walking on a very flat route, composed mostly of straight lines. Here are the surprising results:

rkpyle

Distance (mi) Calories
RunKeeper 3.38 381
Pyle PSWGP405BK 3.22 355
Pyle PSWGP405BK track on RunKeeper.com 3.27 354

Like this morning, the RunKeeper and Pyle tracks were a lot more similar than on previous days. RunKeeper’s distance was .11mi longer than its calculation of Pyle’s track, which makes sense, because its track was more wiggly, as usual, which adds distance.  But what’s inexplicable is that on this track, the difference between the Pyle’s own distance calculation versus RunKeeper’s calculation of its track is only .05mi, only 1.5%.  Contrast that to this morning’s hike, where the difference was .12mi or 3.6%.

Previous Related Post:  Accuracy of Strava vs RunKeeper vs Pyle PSWGP405BK vs Garmin Forerunner 10


Accuracy of Strava vs RunKeeper vs Pyle PSWGP405BK vs Garmin Forerunner 10

I went out for a hike today, with Strava and RunKeeper simultaneously running on my iPhone 4S, and the Pyle PSWGP405BK on my wrist.  Unfortunately, my wife had the Garmin Forerunner 10, so I have to use an old track, recorded last week, at approximately the same time of day. I know that it’s not an ideal comparison, but it will have to suffice for this article.  The route was in mountainous terrain, through a canyon … a much more challenging for a GPS than the flat route that I used in my last comparison.  Here’s RunKeeper’s take on the track: rk2 Strava’s take, running simultaneously on the iPhone with RunKeeper: strava Strava’s exported GPX file, imported to RunKeeper.com: stravaonrk What’s revealing is that given the same data, RunKeeper.com and Strava calculate essentially identical distances. This becomes important when we compare them to the Pyle. Strangely, RunKeeper.com shows a 13 second shorter duration, but identical average pace. The data downloaded from the Pyle and displayed in GPS Master are identical to what displayed on the watch: gpsmaster I used the Pyle’s included wireless heart rate monitor on this hike, and its connectivity was flawless during the entire recording.  I didn’t have to moisten the contacts in order to get a good reading, which was also nice. GPS Master shows my average heart rate was 121, and the max was 155.  The plots above are speed, altitude, and heart rate. The GPX file exported from GPS Master and uploaded to RunKeeper.com: pylerk A comparison table gleaned from the above data:

Distance (mi) Calories
Strava 3.7 N/A
Strava track on RunKeeper.com 3.71 600
RunKeeper 3.53 422
Pyle PSWGP405BK 3.27 526
Pyle PSWGP405BK track on RunKeeper.com 3.40 555

Once again, the Pyle PSWGP405BK and GPS Master displayed identical data, and the calculated distance was shorter than RunKeeper’s calculation using the Pyle’s exported GPX data.  I am convinced that the Pyle’s distance calculation is too conservative… 3.27mi vs 3.40mi calculated by RunKeeper.com on the same data.  Strava calculated 3.7 mi, which is too long, due to its poor filtering of the iPhone’s noisy data stream.  The Google Earth plots below will reveal more information.  Here is a Google Earth plot of Strava (green), RunKeeper (red), Pyle (blue), and Garmin FR10 (yellow) in the most challenging part of the track: all Strava (green) vs RunKeeper (red) stravark Viewing the track reveals why Strava calculated the longest distance.  Strava’s filtering algorithm is clearly inferior to RunKeeper’s in handling the iPhone’s poor quality location data stream. Pyle (blue) vs Garmin (yellow) fr10pyle Again, not an entirely valid comparison, since the Garmin track was recorded on a different outing, but it’s quite obvious that the Garmin outperforms the Pyle in accuracy.  The Garmin is the only device that was able to trace all of the switchbacks on the trail. Even in the less challenging parts of the track, the Pyle wanders a bit.  Still, the Pyle’s accuracy far exceeds that of the apps running on the iPhone. I am very disappointed that several reviewers said that the Pyle is very accurate.  Clearly, they didn’t do their homework.  The Pyle PSWGP405BK consistently calculates distances too short.  The Forerunner 10 kicks Pyle’s ass.  But the Pyle has a compass, navigation, and heart rate monitor for about the same price, and is not that bad, as long as you don’t mind the fact that it miscalculates distance, and have to use other software in order to extract the correct distances from its track. If you want to play with my data, you can download the tracks an view them in Google Earth yourself: eckml.zip Strava doesn’t export KML, but Google Earth can easily import its KML file.  I have also included full size image files of the screen shots I showed above.  In case you decide to compare the gory details of the tracks, when I got to the top of the winding trail above, I took a little break to fix my socks in a tree-covered area.  The FR10 track doesn’t show me deviating from the trail, because I didn’t take the detour during that outing.

Previous Related Post: Garmin Forerunner 10 vs Pyle PSWGP405BK

Next Related Post:  Accuracy of Pyle PSWGP405BK vs RunKeeper Revisited