Last year, I bought a Rainforest EMU-2 energy monitor. It wirelessly talks via zigbee to the smart energy meter that SCE installed at my house a couple of years ago. Unfortunately, its logging capabilities are rather primitive. All it does is give you a crude bar graph of the current and previous day’s usage. SCE actually has fairly detailed logs on their website, which you can access without buying your own energy monitor, but it’s cumbersome to log into their website and navigate down to the pages. Fortunately, a nice feature of the EMU-2 is that it has a USB port which behaves exactly like the Rainforest RAVEn, so you can read out the data into a computer and log it. I decided to hook up the EMU-2 to a Raspberry Pi, and log the data to ThingSpeak with node.js.
Step 1: Install node.js on Raspberry Pi
Unfortunately, the version of node.js that installs via apt-get on the Adafruit Occidentalis distro that I run on my Raspberry Pi is rather old (v 0.6.19), and won’t work with our code. I had to manually install from the nodejs repository:
wget http://nodejs.org/dist/v0.10.22/node-v0.10.22-linux-arm-pi.tar.gz
tar xzf node-v0.10.22-linux-arm-pi.tar.gz
cp -R node-v0.10.22-linux-arm-pi/bin /usr/local
cp -R node-v0.10.22-linux-arm-pi/lib /usr/local
cp -R node-v0.10.22-linux-arm-pi/share /usr/local
echo export NODE_PATH=/usr/local/lib/node_modules:/usr/local/lib/node_modules/npm/node_modules >> ~/.bashrc
source ~/.bashrc
I’m using node.js v0.10.22 because it works, and that’s the version that I’m using on my Debian development machine. I tried to install the latest, v0.11.11, but ran into all sorts of errors.
Step 2: Install node.js libraries
My RAVEn logging script depends on some libraries, serialport, thingspeakclient, and xml2js, which we can install via npm:
npm install -g serialport thingspeakclient xml2js
Step 3: node.js code
The RAVEn XML API is fairly simple. To make things even simpler, I found that stormboy had already written a node.js library to decode it and github: stormboy/node-raven. node-raven reads data from RAVEn and uploads it to an MQTT server, so I had to modify the code to upload to ThingSpeak. Below is my script:
[code language=”java”]
/**
* Reads energy data from a smart meter via a RAVEn RFA-Z106 dongle (http://www.rainforestautomation.com/raven) and uploads to ThingSpeak.
hacked from stormboy’s node-raven https://github.com/stormboy/node-raven
by Sam C. Lin
*/
var serialport = require("serialport"),
ThingSpeakClient = require(‘thingspeakclient’),
xml2js = require(‘xml2js’);
process.on(‘uncaughtException’, function(err) {
// handle the error safely
console.log(err);
});
var TRACE = true;
// RAVEn’s serial port
var ravenSerialPath = ‘/dev/ttyUSB0’;
// thingspeak parameters
var channelId = YOUR-THINGSPEAK-CHANNELID;
var apiKey = ‘YOUR-THINGSPEAK-WRITE-API-KEY’;
var tsclient = new ThingSpeakClient();
tsclient.attachChannel(channelId, { writeKey:apiKey});
// date offset for RAVEn which presents timestamp as seconds since 2000-01-01
var dateOffset = Date.UTC(2000, 0, 1);
var dailyNet = 0;
var dailyNetSentDate = 0;
var Raven = function(serialPath) {
var self = this;
// configure the serial port that the RAVEn USB dongle is on.
this.serialPort = new serialport.SerialPort(serialPath, {
baudrate: 115200,
databits: 8,
stopbits: 1,
parity: ‘none’,
parser: serialport.parsers.readline("\r\n")
});
this.serialPort.on("open", function() {
openHandler(self);
});
};
/**
* Get the connection status between the USB device and the power meter
*/
Raven.prototype.getConnectionStatus = function() {
var queryCommand = "<Command><Name>get_connection_status</Name></Command>\r\n";
this.serialPort.write(queryCommand);
};
/**
* Get information about the device
*/
Raven.prototype.getDeviceInfo = function() {
var queryCommand = "<Command><Name>get_device_info</Name></Command>\r\n";
this.serialPort.write(queryCommand);
};
/**
* Query the amount of energy used or fed-in.
*/
Raven.prototype.getSumEnergy = function() {
var queryCommand = "<Command><Name>get_current_summation_delivered</Name></Command>\r\n";
this.serialPort.write(queryCommand);
};
/**
* Get the power currently being used (or fed-in)
*/
Raven.prototype.getSumPower = function() {
var queryCommand = "<Command><Name>get_instantaneous_demand</Name></Command>\r\n";
this.serialPort.write(queryCommand);
};
Raven.prototype.getMessage = function() {
var queryCommand = "<Command><Name>get_message</Name></Command>\r\n";
this.serialPort.write(queryCommand);
};
Raven.prototype.getTime = function() {
var queryCommand = "<Command><Name>get_time</Name></Command>\r\n";
this.serialPort.write(queryCommand);
};
Raven.prototype.getCurrentPrice = function() {
var queryCommand = "<Command><Name>get_current_price</Name></Command>\r\n";
this.serialPort.write(queryCommand);
};
Raven.prototype.close = function() {
this.serialPort.close();
};
// handle serial port open
function openHandler (self) {
var parser = new xml2js.Parser();
var buffer = ""; // read buffer.
if (TRACE) {
console.log(‘serial device open’);
}
// add serial port data handler
self.serialPort.on(‘data’, function(data) {
buffer += data.toString() + "\r\n"; // append to the read buffer
if ( data.toString().indexOf(‘</’) == 0 ) { // check if last part of XML element.
// try to parse buffer
parser.parseString(buffer, function (err, result) {
if (err) {
console.log("err: " + err);
console.log(‘data received: ‘ + buffer);
}
else if (result.InstantaneousDemand) {
var timestamp = parseInt( result.InstantaneousDemand.TimeStamp );
timestamp = new Date(dateOffset+timestamp*1000);
var demand = parseInt( result.InstantaneousDemand.Demand, 16 );
demand = demand < 0x80000000 ? demand : – ~demand – 1;
if (TRACE) {
console.log("demand: " + timestamp.toLocaleString() + " : " + demand);
}
var tsData = new Object();
tsData = { field1: demand };
tsclient.updateChannel(channelId,tsData);
}
else if (result.CurrentSummationDelivered) {
var timestamp = parseInt( result.CurrentSummationDelivered.TimeStamp );
timestamp = new Date(dateOffset+timestamp*1000);
var used = parseInt( result.CurrentSummationDelivered.SummationDelivered, 16 );
var fedin = parseInt( result.CurrentSummationDelivered.SummationReceived, 16 );
var curDate = timestamp.getDate();
var net = used – fedin;
if (dailyNet == 0) {
dailyNet = net;
dailyNetSentDate = curDate;
}
if (TRACE) {
console.log("sum: " + timestamp.toLocaleString() + " : " + used + " – " + fedin);
}
var tsData = new Object();
tsData = { field2: net,field3: used,field4: fedin};
// only send daily net once a day
if (curDate !== dailyNetSentDate) {
tsData.field5 = net – dailyNet;
dailyNet = net;
dailyNetSentDate = curDate;
}
tsclient.updateChannel(channelId,tsData);
}
else if (result.ConnectionStatus) {
if (TRACE) {
console.log("connection status: " + result.ConnectionStatus.Status);
}
}
else {
if (TRACE) {
console.dir(result); // display data read in
}
}
});
buffer = ""; // reset the read buffer
}
});
}
var raven = Raven(ravenSerialPath);
[/code]
Before you can run the script, you must ravenSerialPath, channelId, and apiKey to match your own configuration. Node that the code contains several getters which I don’t use, because by default, my EMU-2 sends out the data via the USB serial port at regular intervals.
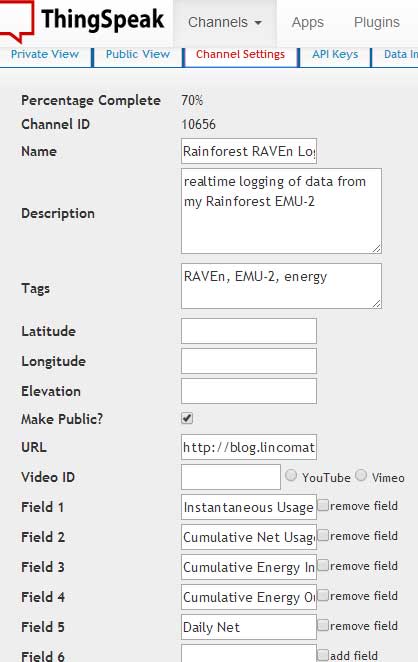
Step 4: ThingSpeak Channel Configuration
Next, you must create a new ThingSpeak channel with 5 fields:
Step 5: Run our node.js script
node raven-log.js &
Below are the live data from my ThingSpeak channel: Rainforest RAVEn Logging Demo
