Quickie Hack: Turn Your Bicycle Into A Party Machine

I was looking for a way to play tunes while biking the other day, and was too lazy to get out the CAD program and design something to print on my RepRap. Here’s a dirt cheap & quick hack to get some decent quality sound while riding your bike. All you need is 4 zip ties:

party1

party2

party3

party4


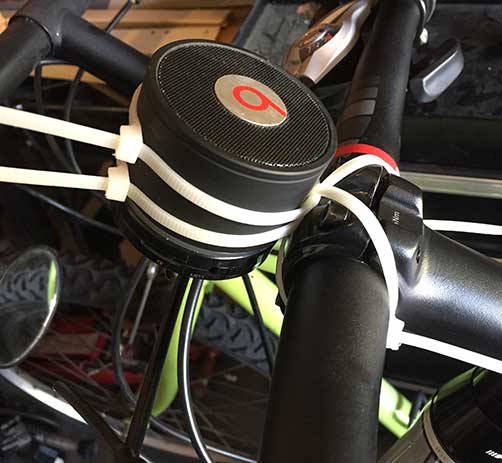
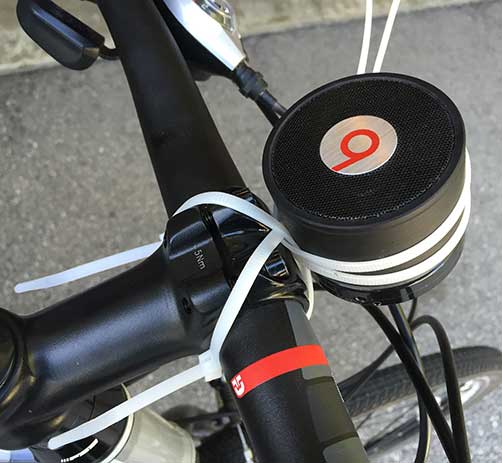
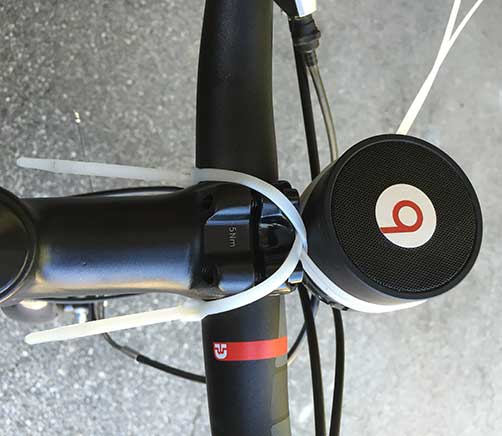
The only tricky part is that I criss-crossed the ties that attach it to the bike.. that is, I took the end of one tie and inserted it into the other tie, instead of its own end. This added some stability, and prevents the speaker from getting damaged due to rubbing against the handlebars. Be sure to rotate the speaker to the proper orientation for you to access its controls before tightening it up.

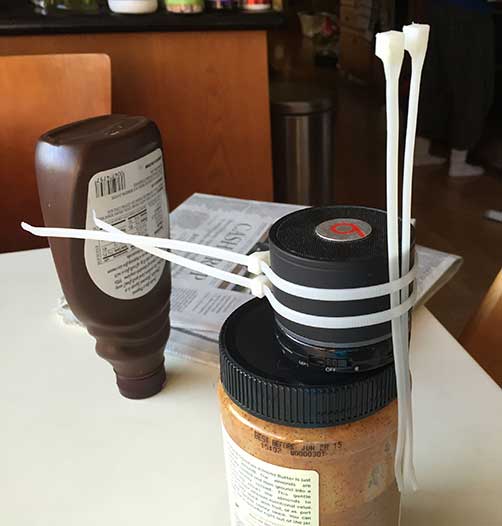
The speaker I used is a cheap Chinese fake Beats by Dr Dre speaker. I bought it on AliExpres for $13.88 including shipping from China. It’s also known as the “S11 bluetooth speaker,” and is available on eBay, as well. It has a built-in lithium-ion battery, Bluetooth connectivity, including speakerphone (the microphone is crap, though), and even has pause and track skipping buttons. It also has a cable for connecting it via a headphone jack, and even sports a microSD slot, so you can use it completely standalone. Not only is it loud, but the sound is actually better than lots of speakers I’ve tried that cost a lot more. The black model has a rubberized casing, which helps avoid damage from rough handling. It also comes in a rainbow of colors, some with metal casing, instead.

Now, I just keep my iPhone in my pocket, and pause/skip tracks using the buttons on the speaker. The speaker doesn’t have a volume control, but I can easily reach in my pocket and hit the volume buttons w/o looking at it. I took it on a 50 mile bike ride the other day, and the speaker didn’t vibrate off.


OpenWrt: Cross-compiling libmicrohttpd for TL-WR703N

Recently, I’ve been developing embedded webapps using node.js. Unfortunately, node.js is a bit bloated for resource-constrained platforms, such as the TL-WR703N running OpenWrt. Not only is it too large to fit into flash memory, requiring an external USB drive to run EXTROOT, but I’ve even encountered circumstances where I’ve been running out of RAM. Thus, I’ve been looking for a lean & mean HTTP library written in C. Right now, my top two candidates are axTLS and libmicrohttpd. Since it’s impractical to host a toolchain on the TL-WR703N, we have to cross-compile everything, which can be a bit of a chore to set up. The first step is to download and unpack the source code:

% wget http://ftp.gnu.org/gnu/libmicrohttpd/libmicrohttpd-0.9.38.tar.gz
% tar xzvf libmicrohttpd-0.9.38.tar.gz

If you don’t already have an OpenWrt toolchain set up, you can download and install it as follows:

% wget http://downloads.openwrt.org/attitude_adjustment/12.09/ar71xx/generic/OpenWrt-Toolchain-ar71xx-for-mips_r2-gcc-4.6-linaro_uClibc-0.9.33.2.tar.bz2
% bzip2 -dc OpenWrt-Toolchain-ar71xx-for-mips_r2-gcc-4.6-linaro_uClibc-0.9.33.2.tar.bz2 | tar xvf –

Next, we need a build script. Save the bash script below as build_libmicrohttpd_mipsbe.sh:

[code language=”bash”]
#!/bin/bash
#
# compile libmicrohttpd for ar71xx (mipsbe)
#

export BASEDIR=$(pwd)

### begin configuration

# node src directory
export SRCDIR=libmicrohttpd-0.9.38

#adjust STAGING_DIR and TOOLDIR below based on location of your toolchain
#ToolChain
export STAGING_DIR=${BASEDIR}/OpenWrt-Toolchain-ar71xx-for-mips_r2-gcc-4.6-linaro_uClibc-0.9.33.2/toolchain-mips_r2_gcc-4.6-linaro_uClibc-0.9.33.2
#export STAGING_DIR=${BASEDIR}/openwrt/attitude_adjustment/staging_dir

export TOOLDIR=${STAGING_DIR}/toolchain-mips_r2_gcc-4.6-linaro_uClibc-0.9.33.2

### end configuration

export TARGET_PATH=${BASEDIR}/${SRCDIR}-mipsbe
export PREFIX=${TOOLDIR}/bin/mips-openwrt-linux-
export LIBPATH=${TOOLDIR}/lib/

# MIPS cross-compile exports
export CC=${PREFIX}gcc
export CXX=${PREFIX}g++
export AR=${PREFIX}ar
export RANLIB=${PREFIX}ranlib
export LINK=${PREFIX}g++
export CPP="${PREFIX}gcc -E"
export STRIP=${PREFIX}strip
export OBJCOPY=${PREFIX}objcopy
export LD=${PREFIX}g++
export OBJDUMP=${PREFIX}objdump
export NM=${PREFIX}nm
export AS=${PREFIX}as
export PS1="[${PREFIX}] \w$ "
export LDFLAGS=’-Wl,-rpath-link ‘${LIBPATH}

rm -rf ${TARGET_PATH}
mkdir ${TARGET_PATH}
cd ${SRCDIR}
make clean
make distclean
./configure –prefix=${TARGET_PATH} –host=mips-openwrt-linux-uclibc –without-snapshot –with-mips-float-abi=soft
make
make install
[/code]

If your toolchain is in a different place from the STAGING_DIR specified in the script, adjust it to point to the proper location. Finally, execute the build script:

% sh build_libmicrohttpd_mipsbe.sh

After the build is complete, you can test it out by transferring one of the example files to your TL-WR703N running OpenWrt. A good candidate would be src/examples/fileserver_example. In addition to the executable, you also need to get the shared library onto your OpenWrt machine. It is built into a strange location: src/examples/microhttpd/.libs/libmicrohttpd.so.10. Put the file in /usr/lib/libmicrohttpd.so.10 on your target machine. Finally, you should be able to execute fileserver_example on the target machine.

TL-WR703N: Attaching USB Serial Adapters – FTDI/CP2102/PL2303/CH340G

Although the TL-WR703N has a built in UART, as I have shown in my previous article, it’s rather difficult to access, and is useful as a serial console in OpenWrt. For the support of your own apps, it is far more convenient to simply plug in a cheap USB to serial adapter — this can be done without even opening the case. Since the TL-WR703N only has one USB port, if you are using EXTROOT, both the serial adapter and the USB flash drive can be attached to a USB hub: usbserialThe TL-WR703N can easily supply the required current, so an unpowered hub may be used. To add support for USB to serial hardware, use opkg to install the appropriate modules. Basic USB to serial support:

opkg install kmod-usb-serial

FTDI (FT232) support:

opkg install kmod-usb-serial-ftdi

Silicon Laboratories CP210x (CP2102) support:

opkg install kmod-usb-serial-cp210x

Nanjin QinHeng Electronics CH341 (CH340G):

opkg install kmod-usb-serial-ch341

Prolific PL2303 support:

opkg install kmod-usb-serial-pl2303

Additionally, OpenWrt has packages for a slew of other USB serial adapters that I’m not familiar with. If you are using Attitude Adjustment (12.09) and its official repository, here are the other supported adapters:

kmod-usb-serial-ark3116 kmod-usb-serial-belkin -- Belkin
kmod-usb-serial-cypress-m8
kmod-usb-serial-ipw
kmod-usb-serial-keyspan
kmod-usb-serial-mct -- Magic Control Technology
kmod-usb-serial-mos7720
kmod-usb-serial-motorola-phone
kmod-usb-serial-oti6858
kmod-usb-serial-qualcomm
kmod-usb-serial-sierrawireless
kmod-usb-serial-ti-usb
kmod-usb-serial-visor -- Handspring Visor/Palm m50x/Sony Clie

After you install the appropriate kernel modules, your USB to serial converter will show up as /dev/ttyUSBx

[ 489.990000] usb 1-1.3: new full-speed USB device number 5 using ehci-platform
[ 490.100000] ch341 1-1.3:1.0: ch341-uart converter detected
[ 490.120000] usb 1-1.3: ch341-uart converter now attached to ttyUSB0