INTRODUCTION
For wireless control of WS2812B (NeoPixel) LEDs, I initially played with Bluetooth SPP (Serial Port Profile), due to the simplicity of setting up the host software… from the host’s software’s point of view, the connection just looks like a physical serial port. Unfortunately, the flakiness of my Windows 8.1 PCs’ Bluetooth SPP support caused me to abandon that solution.
WIFI CONTROLLER HARDWARE
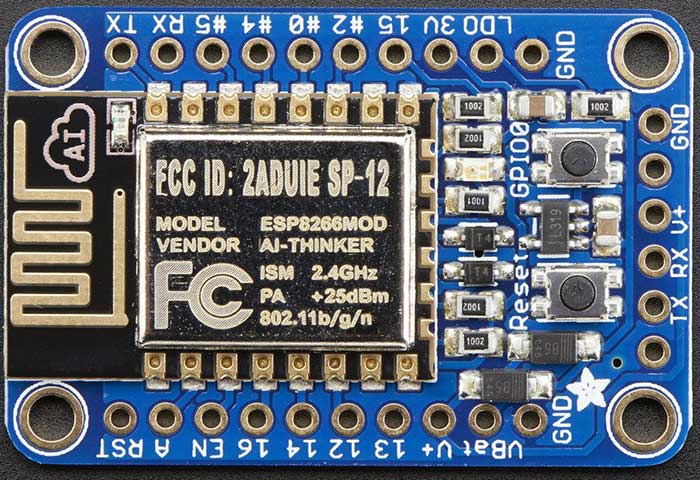
ESP8266 modules provide a very low cost method of interfacing WS2812Bs to WiFi. Adafruit’s Huzzah module costs $9.95, but on eBay, NodeMCU clones, such as the LoLin NodeMCU board can be had for ~$3 shipped from China. This makes it even cheaper than the Arduino/Bluetooth combination!
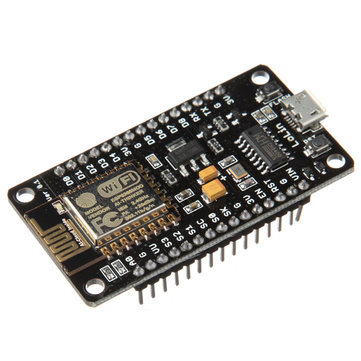
What’s more, the LoLin board has a CH340G onboard, so it doesn’t require a FTDI cable to connect it to your host computer for programming. I ordered a few of the LoLin boards, but in the meantime, I started playing with the Adafruit Huzzah boards I had on hand.
With the addition of ESP8266 support via the Board Manager, Arduino becomes an easy to use platform for code development. Also, there are easily obtainable libraries for both WiFi configuration and control of the WS2812Bs.
One extra complexity of using an ESP8266 to control WS2812Bs is that the ESP8266 is a 3.3V device, while the WS2812B is a 5V device, (usually) necessitating level shifting. The WS2812B datasheet shows a threshold of >= 0.7VDD for logic HIGH, and <= 0.3VDD for logic LOW. The allowed VDD ranges from +3.5-5.3V. Interestingly, some WS2812Bs can actually work when powered by 3.3V, and driven by 3.3V logic, even though it’s out of spec, but many cannot. On the other hand, it’s totally within spec to be powered by 3.7V and driven by 3.3V logic. So, if you use a 3.7V LiPo battery to power the WS2812B strand, the WS2812B data line can be connected directly to the ESP8266 without any level shifting! If you choose to go this route, power the Huzzah from its VBat terminal, so that the 3.7V will be regulated down to 3.3V to power the ESP8266. More details are available in Adafruit’s NeoPixel Uber Guide.
Since I want to be able to drive long strands of LEDs, I elected to go the 5V power with level shifter route. Also, I have lots of 5V power supplies laying around. There are many different ways to do level shifting, either passive or active. The WS2812B has tight timing requirements, and runs at 800KHz, so care has to be taken in order to avoid signal distortion. One of the most reliable methods is to use a 74AHCT125 level shifter IC. I decided to first try a simple diode and pullup resistor circuit (credit: RPi GPIO Interface Circuits):
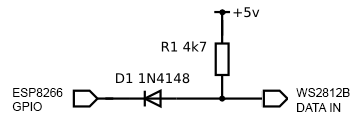
The circuit is currently working flawlessly for me, driving my 5m long strand of 150 LEDs.
WIFI COMMUNICATION PROTOCOL
In order to send data to our WS2812Bs over WiFi, we need some sort of IP protocol. Art-Net is a royalty-free protocol, which sends DMX data embedded in UDP packets. I decided to go with Art-Net because it is an industry standard that is supported by a variety of Pro software, and Jinx! and Glediator can talk to it.
ARDUINO FIRMWARE
I will not go into how to set up Arduino to compile sketches for the ESP8266, as that is discussed elsewhere. To compile for the Huzzah, select it as the compile target from the Tools pulldown menu:
Tools -> Board -> Adafruit HUZZAH ESP8266
I created a sketch, which is a mashup of a few different projects from github. The code is in my github repo: WS2812ArtNet. I stripped the Adafruit NeoPixel library down to the bare metal, and added a captive portal for configuring the WiFi connection. Also, it supports a hardware pin to erase the WiFi settings. Configuration is done via a few defines in WS2812ArtNet.ino. See the #defines for PIXEL_CNT, PIN_DATA, PIN_LED, and PIN_FACTORY_RESET. At a minimum, PIXEL_CNT must be set to the number of LEDs in your strand.
PIN_DATA is used to select the pin that’s used to drive the data to the LED strand.
PIN_LED is used to select the a pin which blinks an LED every time an Art-Net packet is received. This makes it easy to tell if the board is receiving data. In addition, the LED is initially off at boot-up, and turns solid red when the ESP8266 connects successfully to a WiFi AP. By default, PIN_LED = 0, which makes it control the onboard red LED on the Huzzah.
PIN_FACTORY_RESET wipes out any saved settings and clears the EEPROM when it’s grounded for 2 sec.
To load the WS2812ArtNet sketch into the ESP8266, first press the GPIO0 and Reset buttons simultaneously, and then let go of the Reset button. The red LED will then glow dimly, indicating that the bootloader is active. Once the sketch is loaded, when the ESP8266 initially boots up, it will create a WiFi AP with SSID WS2812ArtNet_hh-h. Use a computer, phone, etc to connect to the AP. Upon connection, it should automatically present a captive portal for configuration:
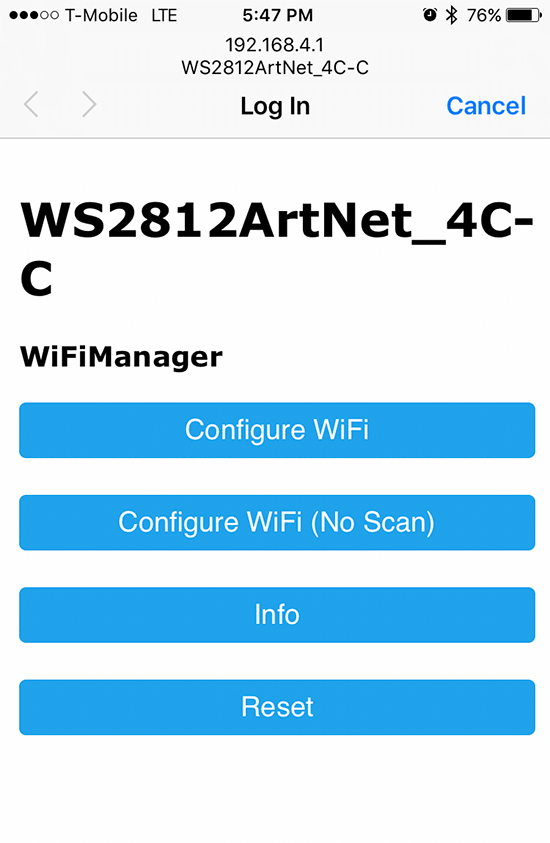
If the captive portal doesn’t automatically launch, open a web browser, and point it to http://192.168.4.1. Tap on Configure WiFi, and the ESP8266 will automatically scan for available APs:
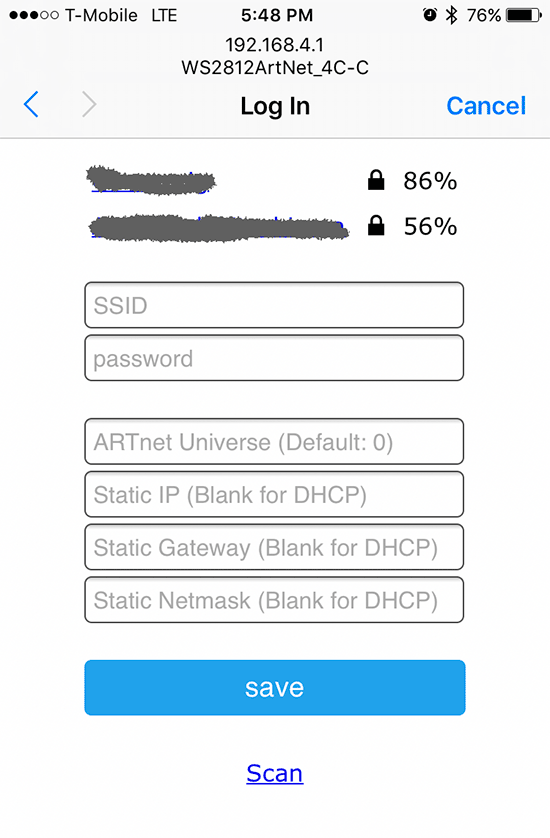
Tap the desired AP’s SSID, and type in the passphrase. Additionally, you can also choose a starting Art-Net universe, and configure a static IP. After you tap save, the ESP8266 will reboot. If it connects successfully to your AP, the onboard red LED will light. Then, the LED strand will go into the startup test sequence of lighting up red, green, and blue, and then turning off. Once Art-Net data is received, the LED still start blinking with every packet it receives. If you have trouble during setup, you can see debug messages by opening the ESP8266’s serial port in a terminal set to 115200,N,8,1.
When configuring Jinx!/Glediator, select GRB as the pixel data format.
Prev: WS2812B LED (NeoPixel) Control: Part 1 – Serial Control via 8-bit ATmega (Arduino)
Hello
very nice work.
I just finished editing with a esp-07, everything works well except a small problem. I have to reconfigure the network plus the universe as if after sa save esp do not save in the eeprom.
a little idea?
good continuation
It’s probably a configuration problem.. wrong flash size during compilation? This might help:
https://github.com/tzapu/WiFiManager/issues/91
Hello there,
First of all thank you very much for the code.
This code would be more stable to use with an ethernet card, what you need to do to make this change. Esp not with the en28j60 card, for example, and with arduino nano.
Thank you.
Is there such a work you know or have done before? I am very pleased to help you in this regard.
Sorry, the code I wrote was really just for ESP8266. The Arduino nano really is under powered for your application.
Hello, I was just wondering if you have an example code of the wifi library without all the Neo pixel stuff? Is the wifi library the same as tzapu?
Been looking for a wifi library that allows dhcp or static
It’s not that hard to just strip out my ArtNet stuff. Yes, apparently, it’s tzapu code, but I don’t know how heavily modded it is
hi. i have succes upload sketch to nodemcu and setting. where can i find your video to setting jinx?thanks
I didn’t make a video on Jinx setup. It’s pretty straightforward. Just set it as stated in the article.
thanks for sharing. i have made it
Cool! Glad you were able to get it to work. I would appreciate it if you could link the article in your video description.
Thanks.
ok. i could link the article in my video description. thanks
I have my LEDS on pin D6 (12). I have it set up in the code for pin 12 and was able to get the D1 Mini connected to my wifi with your code. I have also set up 3 universes in Jinx and have the IP set. I am driving 440 pixels and I know it works with other code, so It’s not my set up. I just don’t know what I have missed.
Some of the pins have reserved functions. I would suggest that you try it with the pins that I used first, and if that doesn’t work, try it with a Huzzah. Sorry, I don’t know what’s wrong with your setup.
Hi dear I am also 1 universe set up but u got set up 3 universes , congratulations. can u share with me? It’s possible
hi i can find the eagle_soc.h library anyware can anybody help
I don’t understand, is that a compile error? you probably don’t have the esp compiler set up correctly
i tried on another pc and that worked
thanks for your code, works really well!
however, my controller keeps resetting if I set the number of pixels greater than 255. is there any way to be able to use more than 255 leds?
what do you mean resets? it actually reboots itself? i don’t see anything in the code that limits to 255 leds, except the fill() function, which i just fixed and pushed to github
yeah, rebooted itself.
indeed, the limit was due to uint8_t. thanks!
mine is flickering a lot.
check your connections and make sure your LED’s are getting enough power. Most likely, your LED power supply isn’t enough
Dear, thanks for your good option code.
But how can I do 3 universe set up.
Sorry, I don’t know much about Art-Net, but I think probably the easiest way is to build 3 of these, one universe on each ESP8266
Hello, how many universes does this project support?
only 1
Was able to get the esp flashed but something is amiss. At the moment, no AP is showing up. IDE finished upload without error. I took the eagle_soc from the esp sdk and copied it into my lib folder.
Right now I can’t continue down the rabbit whole as the access point ssid isnt showing up for me to cofigure further. Any ideas on possible troubleshooting?
Have you tried looking at serial debugging output? Just hook it up to your computer and open up a serial terminal at 115200 baud and take a look at the messages it spits out at boot
Hey so check this out, got it to work well for my projects but I ran into some strange activity. I made a lot of lighting for warehouse parties my associates arrange, the lights look great but there are a lot of hiccups (dropped frames I believe) with a room of 300+ people (lots of meat/cell phones). I turned off the ssid of my router and a major latency problem was almost completely eliminated. I’m still getting dropped frame/stutter issues though. I noticed that the esp’s all have an active ssid. Maybe turning off the SSID on the esp’s would resolve this as they wouldnt be ping’ed a million times over? Do you know how I could go about doing that by chance?
Turning off the AP from the esp worked. Made it fairly seamless in operation.
That’s really a great find, Lance! How exactly did you turn off the AP on the ESP? I haven’t had time to figure out where to insert the code, yet, but
it’s been on my TODO list.. I noticed that all of my ESP projects are currently still acting as zombie AP’s
WiFi.enableAP(0);
before starting your wireless client. I put mine above the IPAddress definitions.
There are other ways I guess but this is the one that I found worked for me.
Hi. in your code I was getting compile errors for undefined HTTP_HEAD. Seems to be a couple of _HTTP_HEAD typos. When I changed them all to HTTP_HEAD worked fine.
Can you provide any insight on ART-NET on MAC with Gladiator? Everything on my mac is current versions
that’s really strange how you were getting compile errors! I compiled it on my machine. Let me check the repo. I don’t use Macs but what’s the problem you’re having w/ Gleddiator?
OK, I investigated the HTTP_HEAD compile errors, you must be using an old version of the ESP8266 compiler, so it flagged my bug. There was a clash w/ a newer version of the library, which already has HTTP_HEAD defined as an enum in an include file. I changed my local HTTP_HEAD to _HTTP_HEAD, but didn’t change all the references to it, so it silently compiled my new bug in. I’ve fixed my error, and changed _HTTP_HEAD to MYHTTP_HEAD for clarity. Thanks for the heads up!
It is not possible to construct NodeMCU ESP 8266 c Jinx. I upload the sketch, but they just light up white. Don’t know what to do?
when you power it up, do you see the LEDs flash red-green-blue-black before you connect it to Jinx?
no, they don’t light up, just bright white. On the NodeMCU board itself, a blue diode flashes. Did I label the data in the sketch correctly? Connection diagram as shown in the picture.
https://yadi.sk/d/qzd9iGDljAqWXw
hey, thanks for taking your time to create and share your work, please could i ask how to add the files .h files to the ide? thanks and hope its not to much of a stupid question lol
just copy the files to the same directory where your .ino file resides
hey, nice work .. why not add the input form for the number of led .. it will be awesome ..
You have to compile it, anyway. It’s easy to just change PIXEL_CNT before you compile