My first step in loading Marlin RepRap firmware into the Printrboard is to get Arduino to play nicely with it. The method I am going to describe in this article for programming a Printrboard with Arduino will work with the Teensylu or any other device that uses the AT90USB1286 and has an ICSP connector. The programmer we are going to use is a USBtinyISP or compatible. Since the AT90USB1286 isn’t officially supported by Arduino, it takes a bit of setting up to get things working properly.
I first looked at the instructions on Teensylu’s page in the RepRap wiki, but found them very confusing, and I didn’t like the idea of having to send the HEX file to the MCU using an external utility instead of doing everything within the Arduino IDE. So, I set out to streamline the process and document it as I went. If you follow my method below, you’ll be able to compile and download your firmware all within the Arduino IDE.
Step 1: Download and install Teensyduino
Teensyduino was created by PJRC for their Teensy line of boards. Teensy is a great alternative to Arduino if you want an ultra compact board with built in USB. The Teensy++ happens to also use the AT90USB1286, so it’s compatible w/ Printrboard/Teensylu. Follow PJRC’s instructions for installation from the download link.
If you only plan to program for RepRap, you don’t need to install any of the libraries. On Windows, you will be prompted to install the serial driver. Select yes. You don’t have to worry when Windows complains that the driver is unsigned… it’s just an INF file to tell Windows to use one of its own built-in drivers.
Step 2: Modify Teensyduino Configuration for use with USBtinyISP
Download at90usb1286txt.zip.
Navigate to where your Arduino files are located. On my computer, I have them in d:\arduino-0022. We will call this <arduinofolder>. Now, find the subfolder where the Teensyduino library was installed:
<arduinofolder>\hardware\teensy
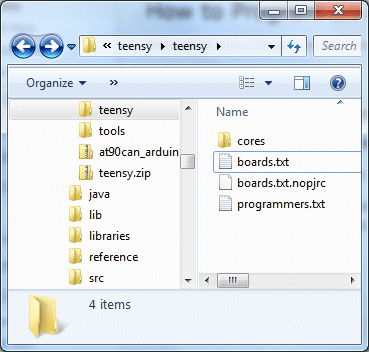
If you are in the correct folder, you should already see a boards.txt and a subfolder called core in there. Drop the files from at90usb1286txt.zip into that folder, overwriting the existing boards.txt. You should see something like this:
If you don’t plan to develop with any of PJRC’s Teensy or Teensy++ boards, you can keep them from showing up in your Arduino menu by copying boards.txt.nopjrc over boards.txt.
Now, when you start Arduino, you should see some new configurations in the Tools->Board menu. The important ones are:
[usbtinyisp]AT90USB1286
[usbtinyisp]Teensylu/Printrboard
[BootloaderCDC]AT90USB1286
[BootloaderCDC]Teensylu/Printrboard
To use a USBtinyISP programmer, select either [usbtinyisp]AT90USB1286 or [usbtinyisp]Teensylu/Printrboard. The only difference between the two configurations is that I took the extra useless options out to make things simpler when programming Teensylu/Printrboard. The Teensylu/Printrboard option is the same as the AT90USB1286 option with USB Type = Serial and CPU Speed = 16MHz.
At this point, you can plug in your USBtinyISP and into your AT90USB1286/Teensylu/Printrboard and start programming!
So what are the [BootloaderCDC] configurations for? They allow you to download sketches into your target board directly through a USB connection to your host, without the USBtinyISP programmer. See my next article for details on how to do that.
Update 20140909: I have uploaded a copy of Arduino 1.0.5-r2 for Windows to github, which is already modified to work with the AT90usb1286, so you don’t have to modify it as above. Simply go to https://github.com/lincomatic/arduino-1.0.5-r2-at90usb1286 and click the Download Zip button, and then extract the contents to your PC. My distribution also supports the USBasp in addition to the USBtinyISP.
