Interfacing a TFT_320QVT LCD/Touchscreen/SD to a Teensy 3.0

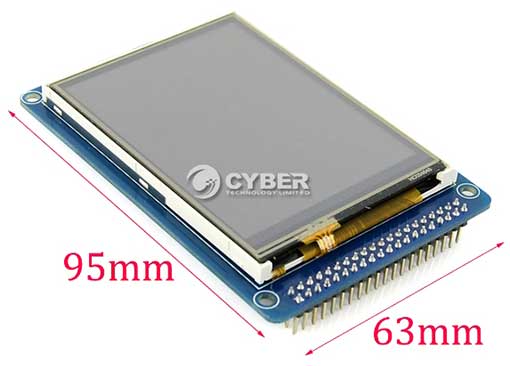
I’m working on a project which needs a touchscreen LCD. After searching eBay for a while, I noticed that many vendors were selling basically the same 3.2″ 320×240 TFT with resistive touchscreen and SD card reader. Though there were slight variations in the silkscreens, they all had the same model number – TFT_320QVT. I bought mine from digitalzone88 for $12.29. TK0466-1-digitalzone88 TK0466-4-digitalzone88 
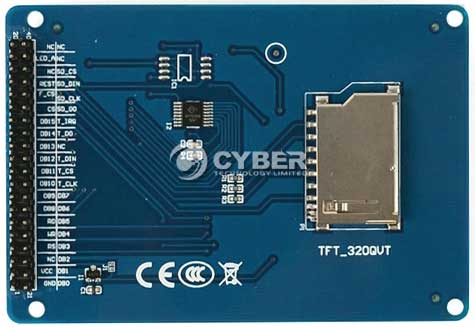
The board uses a SSD1289 LCD driver IC, and runs on 3.3V. The 3.3V voltage is incompatible with the typical Arduino, which runs at 5V (some vendors have created shields to interface it to an Arduino Mega). However, I purchased the TFT_320QVT with the intention of interfacing it to a Teensy 3.0, which runs at 3.3V. I noticed that there were not enough through-hole I/O pins on Teensy 3.0 to simultaneously interface to the LCD, touchscreen, and SD card. This necessitated the usage of the Teensy 3.0’s additional I/O pins, accessible only via solder pads on its underside: teensy3b 
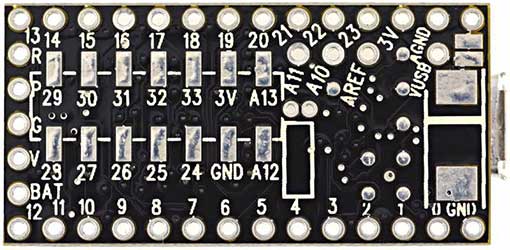
To facilitate access to the 14 solder pads, I attached some header pins to piece of stripboard, and soldered 40AWG wire-wrap wire to between the pads and headers: extender
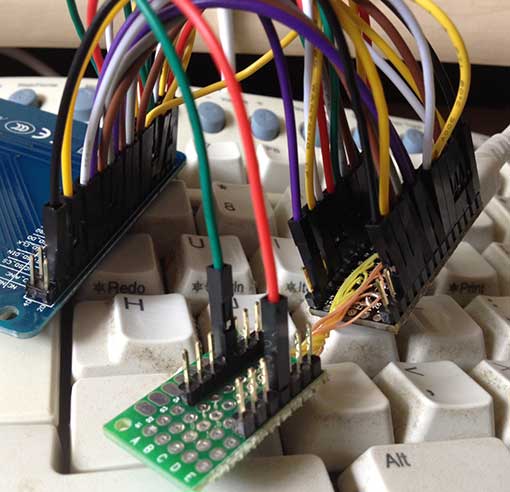
The Teensy 3.0 runs on PJRC’s specially modified version of Arduino – Teensyduino. The task was to find compatible Arduino libraries. First order of business was the LCD. I searched the web, and found that dawnmist had spent a considerable effort in modifying Henning Karlson’s UTFT to work with the Teensy 3.0. Unbeknownst to me at the time, dawnmist’s modified UTFT is actually bundled with Teensyduino!

Next, was to get the touch screen working. It turns out that the current version of Henning Karlson’s UTouch is compatible with the Teensy 3.0.

For the SD slot, I tried the version of the Arduino SD library that’s bundled with Teensyduino. Unfortunately, though the SD library works with the TFT_320QVT’s SD reader, it stops working if you instantiate a UTFT object in the sketch. I tried sdfatlib, and found that not only does it work w/ the Teensy 3.0, but it coexists fine with UTFT. The only catch I found is that it works only with SPI_HALF_SPEED. When I set it to SPI_FULL_SPEED, it stops working.

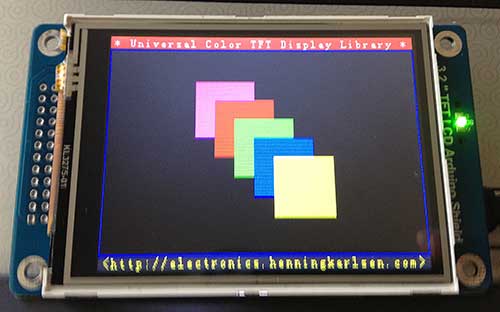
Here is the Teensy 3.0 running UTFT‘s demo sketch on the TFT_320QVT: utft

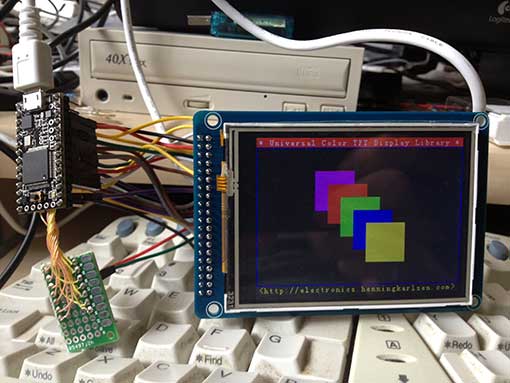
Below is the step-by-step procedure to getting the TFT_320QVT up and running with Teensy 3.0:

Step 1: Install the libraries

1. UTFT: Run the Teensyduino installer, and when the Libraries to Install dialog is displayed, check the box next to UTFT in the Choose Additional Libraries to Install combobox. (Note: Henning Karlson’s latest UTFT also works with Teensy 3.0, but my discussion below will show how to interface to the UTFT that’s bundled with Teensyduino 1.18).

2. UTouch: Download UTouch.rar. Use WinRar or 7-zip to extract the enclosed UTouch folder. From the Arduino IDE pull-down menu, use Sketch->Import Library->Add Library… to install the extracted UTouch folder. Alternatively, you can just copy Utouch/ to your arduinosketchbook/libraries directory.

3. sdfatlib: Download the latest version of sdfatlib. From the Arduino IDE pull-down menu, use Sketch->Import Library->Add Library… to install the downloaded sdfatlibyyyymmdd.zip file. You can alternatively just extract the SdFat/ folder into your arduinosketchbook/libraries directory.

Step 2: Wire it up

1. LCD: dawnmist‘s modified UTFT library that’s bundled with Teensyduino has a configuration file: arduinofolder\libraries\UTFT\hardware\arm\HW_Teensy3.h. Inside HW_Teensy3.h, there are 3 options for the LCD pin assignments: USE_B_D_PORTS, USE_C_D_PORTS, and USE_USER_PORTS. By default, the file has

#define PORTS USE_B_D_PORTS

enabled. USE_B_D_PORTS gives the best performance when your sketch needs to use SPI (which is needed for the SD card slot). USE_C_D_PORTS gives the fastest performance, but is incompatible with SPI. USE_USER_PORTS allows you to configure arbitrary pins (by changing the DB_0-DB_16 #defines), but results in the slowest performance. I elected to use the default USE_B_D_PORTS setting.

2. SD card reader: The SD card reader works via SPI, so it needs to use SD_DIN->DIN (MOSI – 11), SD_DO->DOUT (MISO – 12), SD_CLK->SCK (13), and one of the chip select pins, CS0-CS4 (10,9,20,21, or 15). I chose to use SD_CS->CS4 (15).

3. Touchscreen: The touchscreen uses 5 pins, T_DIN/T_DO,T_CS/T_CLK/T_IRQ, which can be assigned to any arbitrary free GPIO pins.

Below is a chart of my pin assignments:

Teensy_pin = TFT_320QVT_pin
0 = LCD_DB4
1 = LCD_DB5
2 = LCD_DB8
3 = LCD_LED_A (backlight)
5 = LCD_DB15
6 = LCD_DB12
7 = LCD_DB10
8 = LCD_DB11
9 = LCD_REST (RESET)
11 = SD_DIN (MOSI)
12 = SD_DO (MISO)
13 = SD_CLK (SCK)
14 = LCD_DB9
15 = SD_CS
16 = LCD_DB0
17 = LCD_DB1
18 = LCD_DB3
19 = LCD_DB2
20 = LCD_DB13
21 = LCD_DB14
22 = LCD_WR
23 = LCD_RS
24 = T_CLK
25 = LCD_DB7
26 = T_CS
27 = T_DIN
28 = T_DO
29 = T_IRQ
32 = LCD_DB6

LCD_RD needs to be pulled up to 3.3v

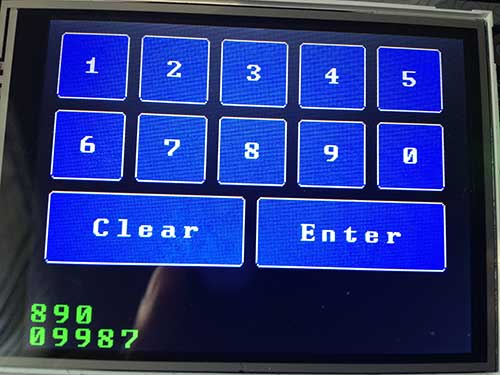
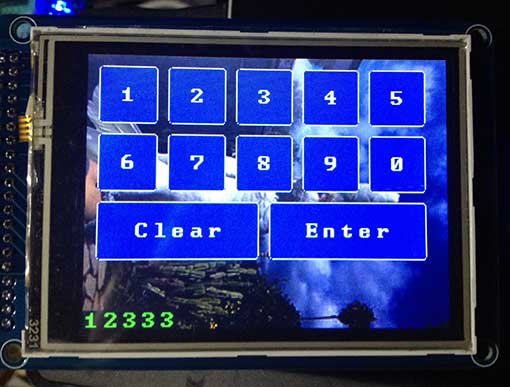
I have created a sketch, UTFT_UTouch_SdFat_teensy3, that simultaneously demonstrates the LCD, touchscreen, and SD card by modifying the UTouch demo sketch. Below are the lines which are critical to configuring it to work with the above pin connections:
[code language=”c”]
#include <UTFT.h>
#include <UTouch.h>
#include <SdFat.h>

// bitmap file to load as background.
// must be 320×240 and in format output by ImageConverter565
char bkgRaw[] = "ade.raw";

uint8_t sdCS = 15; // SD_CS – chip select
SdFat sd;
SdFile inFile;

uint8_t lcdRS = 23;
uint8_t lcdWR = 22;
uint8_t lcdCS = 4;
uint8_t lcdReset = 9;
uint8_t lcdBacklight = 3; // must be a PWM pin for variable brightness
uint8_t lcdBacklightBrightness = 255; // 0-255
UTFT myGLCD(SSD1289, lcdRS, lcdWR, lcdCS, lcdReset);

// Initialize touchscreen
uint8_t t_Clk = 24;
uint8_t t_CS = 26;
uint8_t t_DIn = 27;
uint8_t t_DOut = 28;
uint8_t t_IRQ = 29;
UTouch myTouch(t_Clk, t_CS, t_DIn, t_DOut, t_IRQ);
[/code]

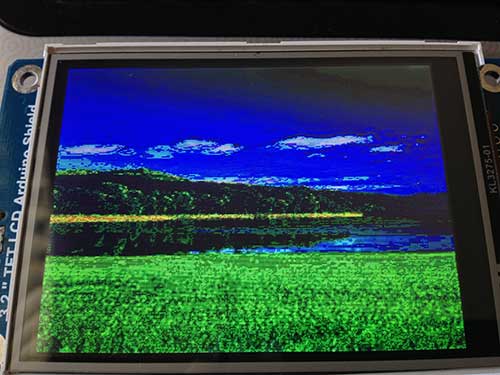
The file displays a bitmap, ade.raw, as the background. Before running the sketch, copy ade.raw to a FAT-formatted SD card, and insert it into the TFT_320QVT’s SD card slot.

You can also substitute your own bitmap file. To create a .raw file, first create a 240×320 pixel jpg, png, or GIF file. Run it through either imageconverter565.exe (bundled with UTFT) or the online ImageConverter 565 make sure to select Convert to .raw file and Target Platform Arduino (AVR).

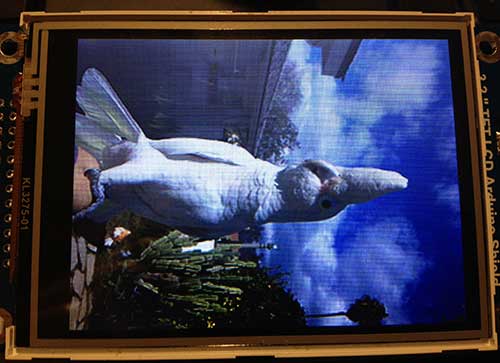
Here’s what UTFT_UTouch_SdFat_teensy3 looks like when it’s running:
btntest

Many thanks to dawnmist, and the others who figured out how to get UTFT working with the Teensy 3.0.

Downloads:
UTFT_UTouch_SdFat_teensy3
UTFT_demo_tft_320qvt_teensy3

Links:
I obtained much of the information I needed from these pages:
dawnmist – screen working … finally
Teensy 3.0 – driving an SSD1289 with utft

UCTronics 3.2″ TFT LCD Arduino Shield with Touchscreen

Updated 2014-03-14

I’ve been looking for a way to add a touchscreen UI to my projects.  To this end, I purchased a UCTronics 3.2″ TFT LCD Arduino Shield.  Most of the cheap TFT touchscreens that I found need about 38 pins, and therefore, need to interface with an Arduino Mega.  What makes this UCTronics shield unique is that it uses an onboard latch to convert the onboard SSD1289 TFT driver data bus from 16-bits to 8-bits.  This allows it to connect to an Arduino Duemilanove or UNO.  The board I received is a RevB board, and it looks somewhat different from the board pictured in the UCTronics product description.  The resistive touch panel on top of the TFT very similar to the touch panel used in the Nintendo DS.  Below is the board running UTFT’s demo (UTFT_Demo_320x240):

front

When I purchased this display, I had to use a specially modified version of UTFT downloaded from UCTronics: 3inch2_RevB.zip. This is because at the time, UTFT only supported the SSD1289 in 16-bit mode. However, as of 2014/14/03, the shield now works with the official UTFT distribution. The key is to supply the correct parameters to the UTFT constructor:

[code lang=”c”]

UTFT myGLCD(SSD1289_8,A1,A2,A0,A3);

[/code]

SSD1289_8 specifies that we’re using an SSD1289 controller in 8-bit mode. The rest of the parameters are the pin assignments.

When compiling for an Arduino Duemilanove or UNO, the IDE will complain that the sketch is too big, unless you comment out all of the #define DISABLE_xxx except for #define DISABLE_SSD1289 in UTFT’s memorysaver.h.

While UCTronics’ version of UTFT comes preconfigured, it is based on an older version of UTFT, which is slower. On my Duemilanove, the UTFT_Demo_320x240 sketch takes 57.7 sec to execute with UCTronics’ UTFT, and 48.6 sec with the official UTFT library.  This is mainly because the latest UTFT has a new function called _fast_fill_8(), which speeds up certain fills. However, the sketches built with the newer UTFT library are bigger. With UCTronics’ UTFT, UTFT_Demo_320x240 compiles to 27248 bytes, and 30092 bytes with official UTFT.

Here is a bottom view of the shield:

shield

At right is the integrated micro SD card reader, which is handy for storing bitmap data to load into the screen.

UCTronics supplies ArduCAM_Touch to support the touchscreen. However, I decided to just use UTouch, instead. Below is the UTouch_ButtonTest example sketch:

btndemo

To use UTouch, you must configure the following lines in the sketch:

[code lang=”c”]
UTFT myGLCD(SSD1289_8,A1,A2,A0,A3);
UTouch myTouch(13,10,11,12,9);
[/code]

I was able to operate the buttons by pressing firmly with my fingers. Note that the touchscreen is resistive, not capacitive, so it works by pressure. A stylus gives you considerably more control. The touchscreen is very similar to the one found in a Nintendo DS.

At first, I was disappointed by the bitmap display.  This is the output of the UTFT_Read_BMP demo sketch supplied by UCTronics:

bmp

There is severe quantization of the colors. This is the way due to the way that UCTronics implemented the UTFT::dispBitmap() function in their modified UTFT library. I wrote my own function, dispRaw(), to instead display .raw files generated by UTFT’s ImageConverter 565:

[code language=”c”]
// display a raw bitmap that was processed with ImageConverter565

#include <UTFT.h>
#include <SD.h>
#include <Wire.h>

#define SD_CS 8

//UTFT(byte model, int RS, int WR,int CS,int RD)
UTFT myGLCD(SSD1289_8,A1,A2,A0,A3);

void dispRaw(UTFT *utft,File inFile)
{
char VH,VL;
int i,j = 0;
cbi(utft->P_CS, utft->B_CS);
for(i = 0; i < 320; i++)
for(j = 0; j < 240; j++) {
VL = inFile.read();
VH = inFile.read();
utft->LCD_Write_DATA(VL,VH);
}
sbi(utft->P_CS, utft->B_CS);
utft->clrXY();
}

void setup()
{
myGLCD.InitLCD();
if (SD.begin(SD_CS))
{
char VH,VL;
File inFile;
inFile = SD.open("ade.raw",FILE_READ);
if (! inFile)
{
while (1); //if file does not exsit, stop here.
}
dispRaw(&myGLCD,inFile);
inFile.close();
}
}

void loop(){}
[/code]

The output looks a lot better:

ade

The display is actually much higher quality than the photo above.  The photo contains screening and moire patterns that you don’t see with the naked eye.  To create a RAW file, first create a 240×320 pixel jpg,png, or GIF file.  Run it through either imageconverter565.exe or the online ImageConverter 565 make sure to select Convert to .raw file and Target Platform Arduino (AVR). Copy it to a FAT-formatted uSD card, and insert it into the uSD slot.

It takes about 6 seconds to load a fullscreen RAW file. I’m think the bottleneck is the reading of the data from the SD card. Clearing the screen takes almost 1 second. The speed is acceptable when running UTFT_Demo_240x320.  This is board is no speed demon, but the speed seems adequate for implementing a graphic touchscreen control panel. If you need a fast display, look elsewhere.

Resources:

User Guide
UCTronics Customized UTFT library

UTFT
UTouch

LiquidTWI2 v1.1.0 Released

For the Adafruit RGB LCD Shield (MCP23017), I changed the GPIO writing from 16-bit to 8-bits. This increased the library size by 14 bytes, but it’s well worth it, because writing a 47-character string has sped up from 99ms to 76ms on my Arduino Duemilanove – that’s about a 25% increase!  This is vs Adafruit’s RGB LCD library, which is 1.4K bigger, and takes 322ms.

Download: LiquidTWI2

Related Post: LiquidTWI2 – A Lean, High Performance I2C LCD Library for Arduino

LiquidTWI2 – A Lean, High Performance I2C LCD Library for Arduino

I have released LiquidTWI2, a lean, high speed I2C LCD Library for Arduino. This library is an extension of the great work done by FalconFour on his LiquidTWI library.  Notable additions to LiquidTWI:

LiquidTWI2 also supports the Adafruit I2c Backpack (MCP23008-based) in I2C mode.  The library is a drop-in replacement for both the Adafruit LiquidCrystal Library (for the I2C backpack) and the Adafruit RGB LCD Shield Library.  By replacing either of Adafruit’s libraries with LiquidTWI2, memory use will decrease, and writing to the LCD will become blazingly fast.

Installation:

  1. download LiquidTWI2 from github.
  2. copy the LiquidTWI2 folder to <arduinosketchbook>/libraries/LiquidTWI2

Usage:

I2C Backpack or compatible MCP23008-based module

#include <Wire.h>
#include <LiquidTWI2.h>
LiquidTWI2 lcd(0); // 0 = i2c address
void setup() {
lcd.setMCPType(LTI_TYPE_MCP23008); // must be called before begin()
lcd.begin(16,2);
lcd.setBacklight(HIGH); // only supports HIGH or LOW
}
void loop() {
lcd.print(“Hello World!”);
delay(500);
lcd.clear();
delay(500);
}

RGB LCD Shield or compatible MCP23017-based module

#include <Wire.h>
#include <LiquidTWI2.h>
LiquidTWI2 lcd(0);

void setup() {
lcd.setMCPType(LTI_TYPE_MCP23017); // must be called before begin()
lcd.begin(16,2);
lcd.setBacklight(WHITE); // see LiquidTWI2.h for color options
}
void loop() {
lcd.print(“Hello World!”);
delay(500);
lcd.clear();
delay(500);
uint8_t btns = readButtons();
}

Note that you must call setMCPType() with the correct module type prior to the first call to begin().  The module type can be switched at any time during runtime by merely calling setMCPType() and begin() again. This allows you to create a single firmware which can run with either module, and store the module type in EEPROM.

When working in a memory-constrained environment, you can save memory by disabling the unneeded support.  Edit LiquidTWI2.h and comment out the #define for either MCP23008 or MCP23017.

For further speed gains, you can tweak the speed of the I2C bus.  See the included i2c_perftest example sketch.

Download: https://github.com/lincomatic/LiquidTWI2/downloads

Related Post: LiquidTWI2 v1.1.0 Released

Cheap 16×2 LCD Comparison

HD44780-compatible 16×2 LCD’s are cheap (<$4), and easy to use with Arduino via the LiquidCrystal library. To reduce the pin count considerably, the Adafruit LCD backpack is a nice little add-on that converts them to work via a two-wire I2C or SPI interface.

I bought two types to compare for use with OpenEVSE and LeafCAN. One has white lettering over a blue background, and the other one has black lettering over a yellow background. Here is an indoor comparison:

My camera can’t take good photos of the blue LCD indoors. The blue background is actually a good bit darker than in the photo, and the contrast is much better than it appears. Factoring that in, I guess I would still give the yellow LCD a slight edge indoors.

Now, here they are outdoors, in direct sunlight:

Again, the blue LCD didn’t photograph well. It looked slightly better than depicted in the photo. However, it’s a clear win for the yellow LCD. It works as a reflective LCD in direct sunlight, with very high contrast.