AVR CAN Bus Project – Status Update 1

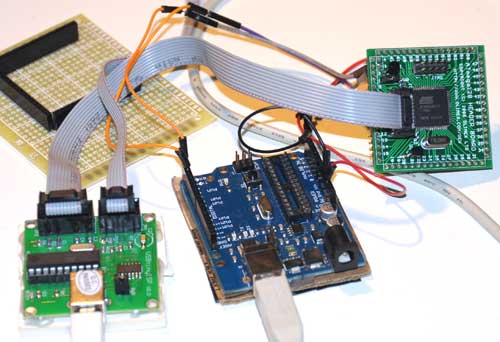
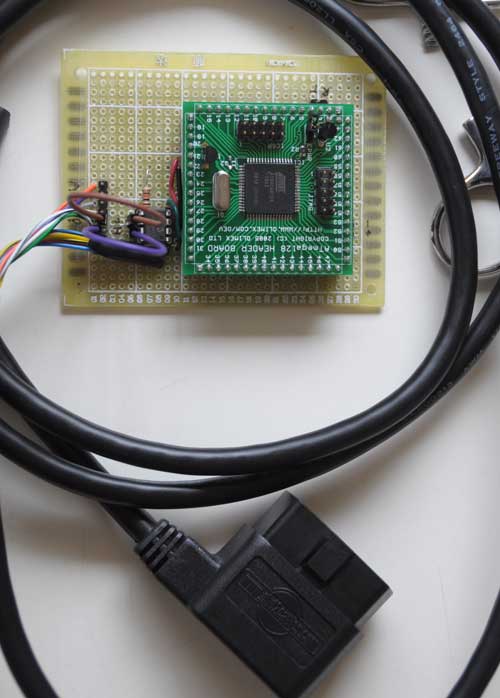
I got the circuit wired up yesterday:

The 6-pin jumper on the left lets me select one of the 3 CAN buses on the Nissan Leaf accessible via the OBD-II connector.

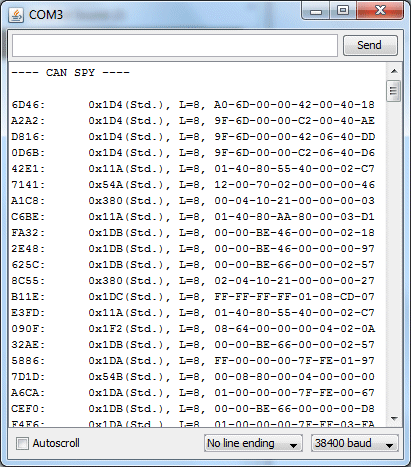
I hacked up some code quickly, and was pleasantly surprised that it actually worked! Woohoo! The part I thought was going to be most difficult – getting the CAN interface firmware working – turned out to be the easiest. Here’s my first capture of live data from the EV CAN bus:

Schematic and source code will follow.

Previous: AVR CAN Bus Project – Step 2: Programming Low Fuse
Next: AVR CAN Bus Project – Step 3: CANSpy CAN Bus Monitor

AVR CAN Bus Project – Step 2: Programming Low Fuse

One of the basic functions that the CAN Bus project needs is to be able to communicate with a PC via a serial port.  For modern PC’s the most straightforward way is to connect the AT90CAN128 header board to the host via a Serial->USB converter.  The most common type is the ubiquitous FTDI Cable, which is a USB cable with an embedded FT232R chip inside. Since I have a couple of spare Arduinos, I like to just use the embedded FT232R in the Arduino, rather than investing in a FTDI cable.  To use an Arduino as a serial cable, simply remove the ATmega328P MCU, and then connect the the TxD, RxD, and GND pins between the Arduino and the external device.

The AT90CAN128 has two USART’s.  The first one, on pins RXD0(2) and TXD0(3), is accessed via the Serial object in Arduino.  The second one, on pins RXD1(27) and TXD1(28), is accessed via the Serial1 object in Arduino.

To test serial communications with the host PC, I connected the first USART to the Arduino board with MCU removed as follows:

AT90CAN128 RXD0 pin 2 -> Arduino Digital 0 (RX)
AT90CAN128 TXD0 pin 3 -> Arduino Digital 1 (TX)
AT90CAN128 GND pin 53 -> Arduino GND

Then I wrote a quick sketch to simply read characters from USART0 and echo them back to the PC:

void setup()
{
Serial.begin(38400);
}

void loop()
{
while (Serial.available()) {
int c = Serial.read();
Serial.write(c);
}

To instead test the 2nd USART, substitute RXD1 for RXD0, TXD1 for TXD0, and Serial1 for Serial.

After burning the sketch, I simply opened the Arduino Serial Monitor, and typed characters to test the connection.  Much to my chagrin, the AT90CAN128 was echoing garbage back to the host.  I spent hours trying various things, checking and rechecking my wiring, to no avail.  I started to suspect that maybe the at90can files I got from SuperCow were inproperly configured.  One thing that raised this suspicion is that I found that the delay() function was running much slower than it should.  User evnow of the MyNissanLeaf forum pointed me to a HEX file of a similar serial echo program that Olimex posted on their site for the AVR-CAN board.  I burned the file into the AT90CAN128 using avrdude:

avrdude -c usbtiny -p at90can128 -U flash:w:avr-can_UART.hex

Once again, the board was corrupting the serial data.  This test showed that the culprit probably wasn’t SuperCow’s at90can files, since this hex file has been tested and working by other users.

Finally, it dawned on me that perhaps the fuses weren’t properly programmed.  I got a crash course on fuses from Adafruit’s avrdude tutorial.  Adfruit’s tutorial also linked to a great AVR fuse calculator.  First, I read out the fuses to 3 files:

avrdude -c usbtiny -p at90can128 -U lfuse:r:lfuse:h
avrdude -c usbtiny -p at90can128 -U hfuse:r:hfuse:h
avrdude -c usbtiny -p at90can128 -U efuse:r:efuse:h

The 3 commands above read the low, high, and extended fuses respectively, and output them as text files lfuse, hfuse, and efuse.  I found that the values were lfuse=0x4f, hfuse=0x19, efuse=0xff.  Using the Embedded Atmel AVR Fuse Calculator, I noticed that when lfuse=0x4f, that CKDIV8 (Clock divide by 8)  is enabled.  This didn’t seem right, and might account for the fact that the delay() function seemed to be running about 8x too slow.  Not knowing much about fuses, I decided to just use the value that Arduino uses for the ATmega328P, lfuse=0xFF, which turns off CKDIV8.

avrdude -c usbtiny -p at90can128 -U lfuse:w:0xFF:m

Bingo!  No more corrupted serial data, and the delay() function now runs at normal speed.  I have a feeling I’ll have to play with the other fuse bits at a later date, but since the board is working OK I’ll leave them be for now.  If you want to copy all of my current fuse settings, use this command:

avrdude -c usbtiny -p at90can128 -U lfuse:w:0xFF:m -Uhfuse:w:0x1F:m -U efuse:w:0xFF:m

Previous:  AVR CAN Bus Project – Step 1: Programming AT90CAN128 with Arduino
Next: AVR CAN Bus Project – Status Update 1

AVR CAN Bus Project – Step 1: Programming AT90CAN128 with Arduino

Last month, I bought a Nissan Leaf EV.  It’s pretty cool driving around in an all-electric car.  Luckily, there’s a great forum called MyNissanLeaf, where Leaf owners can learn a lot, and share information.  I’m currently collaborating with one of the forum members to design and build a Level 2 EVSE.  I will document that project on this blog at a later date.  Having a serious case of project ADHD, I discovered that forum members had set about hacking the Leaf’s CAN buses, and couldn’t resist joining the fray.

Being most familiar with ATmel AVR microcontrollers and Arduino, I decided to use that platform for this project.  ATmel has a subtype of the AVR with CAN bus capabilities, the AT90CANxxx.  I found an interesting development board containing an AT90CAN128 and headers for access to all the pins on the MCU.  I ordered one from Sparkfun for $29.95.  They also sell another board, the AVR-CAN, but it contains things that I don’t need, such as an RS-232 interface, and can be programmed only via JTAG – I only have a USBtinyISP, which is an ICSP programmer.  Unlike the AVR-CAN, the AT90CAN128 Header Board doesn’t contain a CAN Bus transceiver.  I decided to go with the Microchip MCP2551, since that’s what the AVR-CAN uses.

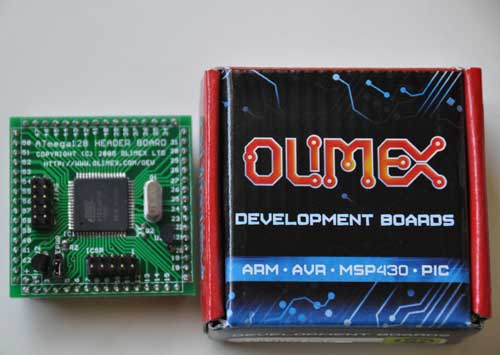
The AT90CAN128 header board is from Olimex, and comes in a cute little box:

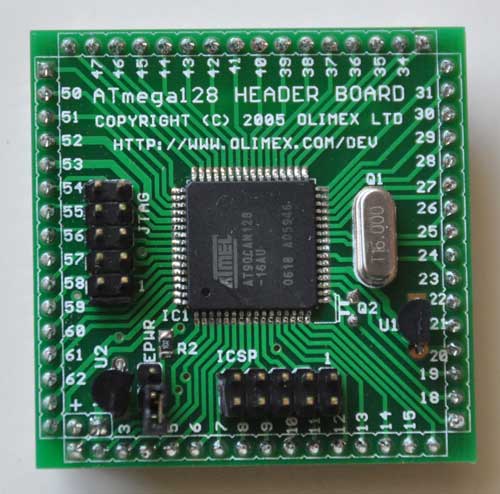
Here’s a closeup of the front:

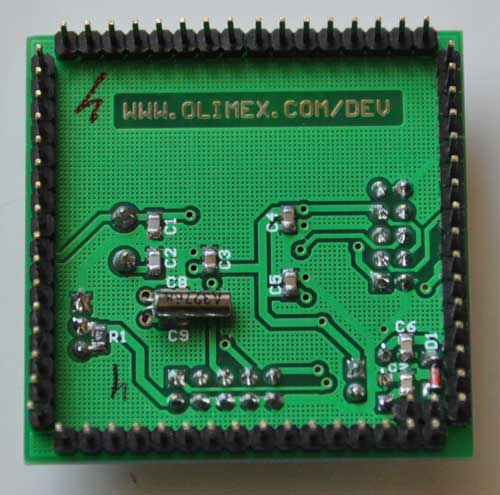
and the back:

I decided to try to get this board working with Arduino, since it’s a lot easier to set up than WinAVR.  The first problem to solve is how to adapt the Arduino IDE to work with the AT90CAN128 and my USBtinyISP.  After much Googling, I found SuperCow had already done the dirty work and posted it to the Arduino forum.  He packaged the core files, bootloader, and a couple of examples into a handy zip file (which has since been taken offline). Since he used an unknown JTAG programmer, I had to adapt his files to work with the USBtinyISP and JTAG ICE mk1.  Also, I modified them to work with Arduino 1.x+.

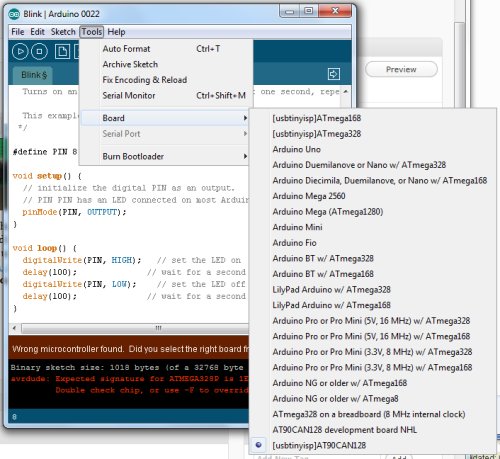
You can download the latest version from github: https://github.com/lincomatic/AT90CAN  To install it, simply unzip the atcan90 directory into <your arduino directory>/hardware/at90can.  Next time you restart Arduino, you can select it from Tools->Board->[usbtinyisp]AT90CAN128.

If you have a JTAG ICE mk1 programmer instead, select [JTAG ICE mk1]AT90CAN128.

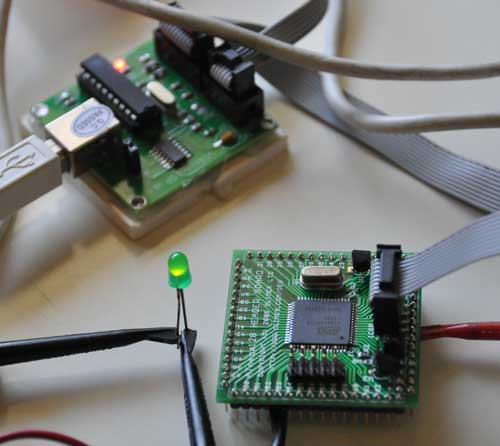
I connected up my USBtinyISP via the 10-pin ICSP header, burned the Blink sketch, hooked up an LED, and bingo!  It’s working flawlessly.

In at90can/cores/at90can, I found can_lib.h and can_lib.cpp, which appear to be all we need to interface to the CAN bus.  Since I currently know ZERO about CAN bus, I have a lot of reading to do before I can commence programming.  SuperCow’s original zip file contains a couple of rudimentary examples.

Before I start programming, I need to build a little interface board containing the MCP2551 CAN bus transceiver, which should arrive next week.  I already have an OBD-II cable to tap into the Leaf CAN bus via the OBD-II connector.  Currently, obdcables.com is having a special on the 9-ft model.


Downloads:  https://github.com/lincomatic/AT90CAN

Next: AVR CAN Bus Project – Step 2: Programming Low Fuse


Restoring AddressBook.sqlitedb to iPhone – A Simplified Procedure

In my previous article, I described how to restore contacts from a backup to an iPhone.  The infuriating thing about restoring AddressBook.sqlitedb to an iPhone is that one can’t just drop in a replacement file, because after you reboot, the new file gets overwritten with an empty one.  I traced the overwriting of the addressbook to a process called dataaccessd.  This process can’t be killed easily, because launchd will automatically restart it if it dies.  After some testing, I have now devised a procedure which is simpler than the one described in my previous article:

This procedure assumes that you have already obtained a copy of AddressBook.sqlitedb which contains the contacts you want to restore.

1. Using iFunBox, navigate to Raw File System/Library/LaunchDaemons and copy com.apple.AddressBook.plist and com.apple.dataaccess.dataaccessd.plist to your computer.

2. Using iFunBox, delete com.apple.AddressBook.plist and com.apple.dataaccess.dataaccessd.plist from your iPhone.

3. Power off and restart your iPhone

4. Using iFunBox, copy your AddressBook.sqlitedb into the iPhone at Raw File System/var/mobile/Library/AddressBook

5. Using iFunBox, copy the com.apple.AddressBook.plist and com.apple.dataaccess.dataaccessd.plist from your computer back to the Raw File System/Library/LaunchDaemons folder in your iPhone.

6. Power off and restart the iPhone, and enjoy your restored contacts.


Related articles:

How to Restore Lost Contacts to Your iPhone

How to Fix a Broken GSM Signal Strength Meter in iOS 4.3.2

After using Sn0wBreeze 2.6 to update my iPhone from iOS 4.0.2 to 4.3.2, my GSM signal strength meter completely stopped working.  No matter how strong my cellular signal was, it would display no signal bars.  I suspected that the problem was that Sn0wbreeze preserved my 01.59.00 baseband from iOS 4.0.2, and that the old baseband was somehow incompatible with the signal strength meter in iOS 4.3.2.  I googled around, and sure enough, lots of people experiencing broken signal strength meters when using older basebands with iOS 4.3.x.  Fortunately, there’s an easy fix.  Installing djayb6‘s version of ultrasn0w fixer restores the functionality of the signal strength meter.  Hackstor has detailed instructions for installing ultrasn0w fixer via Cydia.  I’m not sure if the unlock works, because I don’t have another carrier’s SIM card to try, but I’m happy that I’m my signal strength meter is working again with my iOS 4.3.2/baseband 01.59.00 combination.

How to Restore Lost Contacts to Your iPhone

This article will tell you how to restore contacts which were lost/erased from iPhone, due to iTunes trashing them during a sync, especially after a firmware upgrade.  Restoration of your contacts is possible only if you either have an iTunes backup, or a copy of your AddressBook.sqlitedb.  It is particularly useful for people who lost their contacts after an upgrade to iOS 4.3.2, because iTunes refuses/fails to restore the contacts from a backup.  If you want to skip my rambling discourse, you can cut to the chase, and skip directly to the step-by-step instructions.

I’m always wary of updating my iPhone, because I’ve had many many problems with that over the years. But when the untethered jailbreak for iOS 4.3.2 came out this week, I felt it was time to finally upgrade from iOS 4.0.2. While the iPhone Dev Team has released redsn0w 0.9.6 rc 14, for this purpose, this tool isn’t appropriate for iPhone users who want to retain carrier unlocks, because it allows 4.3.2’s new baseband to be installed, for which there currently is no unlock.  In order to keep your phone unlocked, you need to use a tool which prevents your baseband from getting updated.  Luckily, iH8Sn0w has released Sn0wbreeze 2.6, which preserves your old baseband, thus allowing you to keep your unlock.

It’s important to make a backup of your iPhone via iTunes before doing any firmware updates.  Also, it’s a good idea to use iTunes to Transfer Purchases from your iPhone back to your computer.  For once, update went smoothly, and I thought I got off easy this time, because the phone booted right up after the Sn0wBreeze was done.  Little did I know that things are not always as they first appear.

The next step was to restore the phone from a backup that I’d made just prior to doing the firmware upgrade.  iTunes finished the restore without any complaints, but  when my phone rebooted, the first thing I noticed was that most of my apps were missing.  That was OK, I was able reinstall the apps via iTunes (and then had waste 1 hour rearranging my 200 apps back into folders).  When I went to use the phone, however, I discovered that all of my contacts were gone! Remember, I backed up my iPhone before doing the upgrade, so why didn’t %#$  iTunes restore my backed up contacts??? Ack! At this point, I knew that there was a high probability that I would be wasting a good part of my day getting my contacts back into the iPhone.

The contacts in iOS are stored in a file on the iPhone at /var/mobile/Library/AddressBook/AddressBook.sqlitedb.  The first step was to find where this file was backed up on my PC, and to see if it had my lost contacts in it.  I started searching my computer for the iTunes backup, and found a bunch of subfolders in C:\Users\<MyUserName>\AppData\Roaming\Apple Computer\MobileSync\Backup (Note: I’m using Windows 7).  Sure enough, there was a folder named 905279ef2efbc76bc402c0e411fc356d75ed95b0 with a timestamp around the time that I made the last backup.  Inside the folder are multitudes of files with hexadecimal filenames, as well as some .plist and .mdbx files.  Manifest.mbdb appears to be a a cross reference of the filenames to their path on the iPhone, but I didn’t want to waste time trying to find a program to decode it, so I simply opened up a Command Prompt, and grepped for a string that is unique to AddressBook.sqlitedb:

grep UpdatePersonLinkUponPersonUnlink *
Binary file 31bb7ba8914766d4ba40d6dfb6113c8b614be442 matches

Bingo!  I opened up 31bb7ba8914766d4ba40d6dfb6113c8b614be442 in GnuEmacs, and sure enough, it was an sqlite database, contained my the lost contacts from address book!  I’m curious to know if the same filename always maps to AddressBook.sqlitedb, or if the filename is random, so if any readers can verify this, please leave a comment below.  OK, it should be a piece of cake to restore the file, right?  First, I tried to fool iTunes into restoring the file for me.  I created a new backup via iTunes, and copied the old 31bb7ba8914766d4ba40d6dfb6113c8b614be442 into it and then tried to restore this hacked backup.  No dice.  iTunes noticed something was different, and complained that it couldn’t restore some of the files.

OK, how about renaming 31bb7ba8914766d4ba40d6dfb6113c8b614be442 to AddressBook.sqlitedb and then copying it to the proper location on the iPhone? Should be easy, right?  I downloaded the latest version of iFunBox, a great free utility that, among its many talents, allows you to drag and drop files in and out of any directory of a jailbroken iPhone.  Using iFunBox, I navigated to /var/mobile/Library/AddressBook, copied the AddressBook.sqlitedb from my PC over the file that was already in my iPhone.  Then, I rebooted the iPhone…. Still no contacts!  When I examined the contents of the iPhone again with iFunBox, I found that my new file had been overwritten.  The problem is that when you shut down the iPhone, it writes out the contacts from RAM, overwriting your substitute AddressBook.sqlitedb before it has a chance to read it!  How annoying!

I spent the next few hours trying various methods to get around the problem.   The most straightforward way would be to get the iPhone to crash, so that it wouldn’t have the chance to overwrite my AddressBook.sqlitedb, but I couldn’t figure out how to do that.  I tried using ssh to log into the iPhone and kill -9 random processes.  That didn’t work, but in the process, I found that a program that refreshes the AddressBook.sqlitedb:  /System/Library/PrivateFrameworks/DataAccess.framework.  The problem is, if you kill it, it immediately restarts before you have a chance to sneak your new file in. So how can one prevent that damn program from overwriting the new address book??  I tried changing the file access to readonly … it changes it back to read/write.  The process runs as a user named mobile, so I tried changing the file owner from mobile to root to prevent it from overwriting the file.  It just changes the owner back to mobile!  How frustrating!  Finally, I happened on the combination that works:  change the file owner to root, and disallow all access to the file! Eureka contacts restored!

Step by Step Procedure

Note:  This procedure requires a jailbroken iPhone.  This topic is too complicated to discuss here, and there are many tools available, but Sn0wbreeze is what I used time time round.

1. Extract AddressBook.sqlitedb from your iTunes backup

New Method:

A user has brought to my attention a cross platform program (Windows/OSX/Linux) which simplifies the extraction of AddressBook.sqlitedb from your iTunes backup. Download and launch iTunes Backup Extractor on your PC.  Click the Expert Mode button, and Navigate to and click the checkbox next to Library->AddressBook->AddressBook.sqlitedb, and click the Extract Selected button to copy the file to your PC.

Old Method:

If you already have a backup copy of AddressBook.sqlitedb from another source, skip this step. grep is a Unix command which doesn’t come with Windows.  If you don’t have a copy of it, you can download and install Gnu grep.  Find the directory containing the latest backup of your iPhone using the Windows Explorer:

Windows 7/Vista: c:\Users\USERNAME\AppData\Roaming\Apple Computer\MobileSync\Backup
Other versions of Windows: C:\Documents and Settings\USERNAME\Application Data\Apple Computer\MobileSync\Backup

Substitute your user name for USERNAME.  Find the newest subdirectory.  This is your latest backup.  Open up a Command (DOS) Prompt, and cd to the latest backup directory.  Find the file containing the backup of AddressBook.sqlitedb:

grep UpdatePersonLinkUponPersonUnlink *
Binary file 31bb7ba8914766d4ba40d6dfb6113c8b614be442 matches

Using Windows Explorer, copy the found file (in my case, it was named 31bb7ba8914766d4ba40d6dfb6113c8b614be442) and rename it to AddressBook.sqlitedb.


(Optional) If you want to verify the contacts before proceeding, you can view the contents of AddressBook.sqlitedb by using SQLite Database Browser.  Load AddressBook.sqlitedb into SQLite Database Browser, and select the table ABPerson from the Browse Data tab to see what names are contained in it.

Update 2011/05/19:  I have devised a simplified procedure which supercedes the remaining steps below: Restoring AddressBook.sqlitedb to iPhone – A Simplified Procedure

2. Install OpenSSH

Use Cydia to install OpenSSH on your iPhone.  You can find it by using Cydia’s search function.

3. ssh into your iPhone

Using an appropriate ssh client on your PC (I used PuTTY), ssh into your iPhone.  Your iPhone must be connected to the same WiFi network as your PC to do this.  To find your iPhone’s IP number,  go to Settings->Wi-Fi on the iPhone, and tap on the blue circled arrow next to the network you’re connected to.  Log in to your iPhone as user root, password alpine.

4. Copy your replacement AddressBook.sqlitedb to the iPhone

Download iFunBox and launch it.  Navigate to Raw File System->var->mobile->Library->AddressBook.  Drag and drop your replacement AddressBook.sqlitedb onto iFunBox to copy it to the iPhone.

5.  Change file owner and access of AddressBook.sqlitedb on the iPhone

Via ssh, type the following into the iPhone:

cd /var/mobile/Library/AddressBook
chown root AddressBook.sqlitedb
chmod 0 AddressBook.sqlitedb

Note:  the ‘o’ in “chmod o …” above is the number zero.

6. Reboot the iPhone and restore AddressBook.sqlitedb’s file attributes

Restart your iPhone.  It will act strangely because it can’t access your AddressBook.sqlitedb.  Mine was kept cycling from the boot up screen to the lock screen over and over again, and it was impossible to operate it.  Don’t worry, you can still ssh into it.  From your PC, ssh back into the iPhone and type the following commands:

cd /var/mobile/Library/AddressBook
chown mobile AddressBook.sqlitedb
chmod 644 AddressBook.sqlitedb
reboot

Your iPhone will reboot, and your contacts will be restored!  It’s a good idea to disable ssh when you’re done, or change the root password to prevent random hackers from hacking into your phone.


Related Articles:

Restoring AddressBook.sqlitedb to iPhone – A Simplified Procedure
 

Arduino-lite – A Lightweight Runtime for AVR

I just ran across Arduino-lite, a lightweight alternative runtime to Arduino, for programming AVR MCU’s.  This project is spearheaded by Robopeak Project.  It looks pretty cool.  It’s kind of halfway between Arduino, and coding directly with avr-gcc.  It supports the standard Arduinos, as well as:

  • Atmega8(A)
  • Atmega168(PA)
  • Atmega328(PA)
  • Atmega1280
  • Attiny2313
  • Attiny26
  • Atmega48(PA)
  • Atmega88(PA)

Not only does it support more MCU’s than Arduino, it also supports frequencies from 1-20MHz, unlike Arduino, which only supports 8 & 16MHz.

Furthermore, Robopeak claims that Arduino-lite’s binaries are 50% smaller than those produced by Arduino. An example on Robopeak’s Blog shows how Arduino-lite reduces the digitalWrite() function down to 1 AVR instruction.  It appears to make heavy use of macros, which is nice, because it eliminates function call overhead.  On the other hand, type checking and such is severely restricted.  I think it might be a great tool for projects that need to be compact, or run as fast as possible.  Also, it will greatly simplify coding for the ATtiny MCU’s.

It’s definitely not for n00bs, but if you’re comfortable with makefiles, give it a shot.  The download includes everything you need to get started.  You can download it for free from google code.

I just downloaded it, and am going to give it a whirl.  It almost sounds too good to be true.  If you have any experience with it, please leave a comment.

Download Arduino-lite: http://code.google.com/p/arduino-lite/

Relax Your Mind: Make Your Own Ganzfeld Goggles

The Ganzfeld effect is a form of visual sensory deprivation.  The idea is to give the open eyes a blank visual field of uniform color.  Since there is nothing for the eyes to see, the brain cuts off the unchanging input, and often manufactures its own images – these may be thought of as mild hallucinations.  Personally, I haven’t experienced any vivid hallucinations via a Ganzfield, but I find the effect to be rather relaxing.  I’ve found that a Ganzfeld is very good for helping to eliminate excess chatter in the mind, especially when practicing meditation.

One common meditation technique involves cracking the eyes just barely open, so that even though your eyes are open, you can’t really see anything.  There are two purposes for this technique: 1) it’s easier to stay awake with the eyes open and 2) when the eyes are closed, the brain goes into the idling alpha wave rhythm. When you meditate, one aim is to generate alpha with the eyes open; this isn’t easy, because in typical settings, there are too many distracting things for your eyes to see.  I find it easier to stay awake when I use Ganzfeld goggles than when I meditate with my eyes barely cracked open.

A common technique for creating a “Ganzfeld goggles” is to cut a ping pong ball in half, and then place one half over each eye. While this technique is cheap, and relatively easy, it’s not particular comfortable, as the edges of the cut halves tend to be sharp.  Also, they’re easily damaged.  I’ve devised alternate cheap and easy method of building Ganzfeld goggles, which is more comfortable and durable, and better than an expensive commercial alternative.

My take on Ganzfeld goggles starts with a pair of cheap swimming goggles.  I bought a pack of 3 at Big Lots for $7.

It’s important to use large goggles with a bubble lens as above.  What we are looking for is to have a big enough lens that when we’re wearing them, the edges are basically outside of the visual field.  Next, we need a can of frosting spray:

You can find glass frosting spray in the spray paint section of most hardware stores.  I also tried white paint, but frosting spray is better, because it lets more light through, and filters the light more evenly.  Remove the seals and straps from your goggles, and spray on the frosting

Be sure to spray both the outside and inside of the goggles.  2-3 coats are needed to achieve a sufficient frostiness.  Wait about 10 min between coats.  Once they’re dry, reassemble your goggles.

Your Ganzfeld goggles are now ready to use.


I won’t go into detail here on how to use Ganzfeld goggles, because you can find plenty of articles via Google.  However here are some basics:

Find a quiet room, and lay down in a recliner or on a bed.  Keep your eyes open, and relax.  You may want to try auditory sensory deprivation, as well.  Since it’s hard to find a completely quiet place, another way of decreasing auditory distractions is to listen to white, pink, or brown noise through sound-isolation headphones.  You can make noise files easily using Audacity, a free audio editor. Here is a tutorial on YouTube for how to generate white/pink/brown noise.  Although the video says you can use any version of Audacity, only Audacity 1.3+ can generate pink and brown noise.  Audacity 1.2.x can only generate white noise.

You can also try audio brainwave entrainment, using binaural beats.  Some people like alpha wave entrainment; personally, I find 7 Hz theta wave entrainment to work best.  There SBaGen and BWGen are two free programs for generating binaural beats.  An excellent commercial software, which is a lot more flexible, and can generate other waveforms, such as isochronic beats, is Neuroprogrammer.   STAY AWAY FROM I-DOSER. The author makes ridiculous, fraudulent claims, and the program is just a rip-off of Jim Peter’s GPL’ed SBaGen code.

If you want to use the goggles to enhance your meditation, simply wear them while practicing your normal meditation techniques.  Instead of keeping your eyes barely cracked open, you can keep them fully open, half open, or whatever way feels most comfortable.   Again, I won’t go into detail about meditation techniques, but a good method for beginners is Counting Meditation.  Sit with your spine straight and tailbone slightly elevated by a pillow. Inhale and exhale deeply and slowly through your diaphragm (you expand your belly, rather than your chest during breathing) while  counting your breaths.  As you relax, your breath will naturally slow down.  If you lose count due to being distracted, simply start over.  Eventually, you will be able to get the count higher and higher before you lose your concentration.

Another experiment you can try is to play with colored light sources.  For instance, you can sit in a room which is lit by a red lightbulb.  I’ve found that even sitting in the dark with some colored LED’s works.  If you want to attach the LED’s directly to your goggles, you can diffuse them with ping-pong balls.  Just cut a ping-pong ball in half.   Hot glue an LED into each one, pointing away from the opening.  Then hot glue the ping pong ball halves onto your goggles.

While I don’t experience hallucinations when using the goggles, they are quite relaxing, and really do enhance my meditation practice.  With the vision blocked, your brain shifts its attention more to your other senses.  If I use them without listening to my entrainment tracks, I become much more aware of the ringing in my ears that my brain normally filters out.

I’ve also played with an alternate pair, which I painted with several coats of black paint. The idea is to completely block out the light, so it’s like you’re sitting in a pitch black room of absolute darkness.

blkgoggles

I actually prefer this black pair when meditating. Your brain naturally produces occipital alpha waves when you close your eyes.  The idea of meditating with eyes open is that it forces you to produce the alpha waves by meditation only.  However, meditating with eyes open is visually distracting.  Wearing the black glasses allows you to eliminate visual distractions while meditating with eyes open.


Update 2014-12-18:

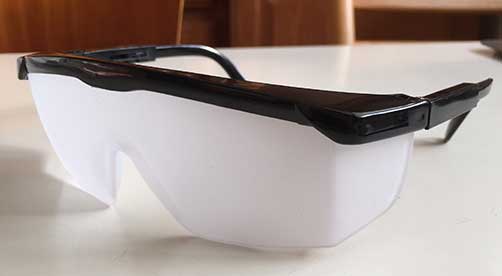
If you find swimming goggles to be uncomfortable, you can try using safety glasses. I bought a pair at my local 99 cent store. You can also find them cheaply at HarborFreight. Simply pop out the clear lens, spray with frosting spray, and then reassemble.

ganzglasses

I find the safety glasses to be a bit more comfortable for long sessions. The downside is that in order to avoid peripheral vision from ruining the ganzfeld, you have to wear them fairly close to your eyes, and avoid rolling your eyes up or down.

Mindmodifications.com has an interesting article about the Ganzfeld effect: MULTIMODAL GANZFELD GIVES MILD HALLUCINATIONS
They also have detailed instructions on how to build the goggles out of ping-pong balls, should you want to try that version, as well.

Enjoy your Ganzfeld goggles, and feel free to leave feedback about your experiences below, or to tell of any enhancements you devise.

Related Post: Build Ganzfeld-style Photic Goggles (AVS Lightframes)

Lampduino – an 8×8 RGB Matrix Floor Lamp

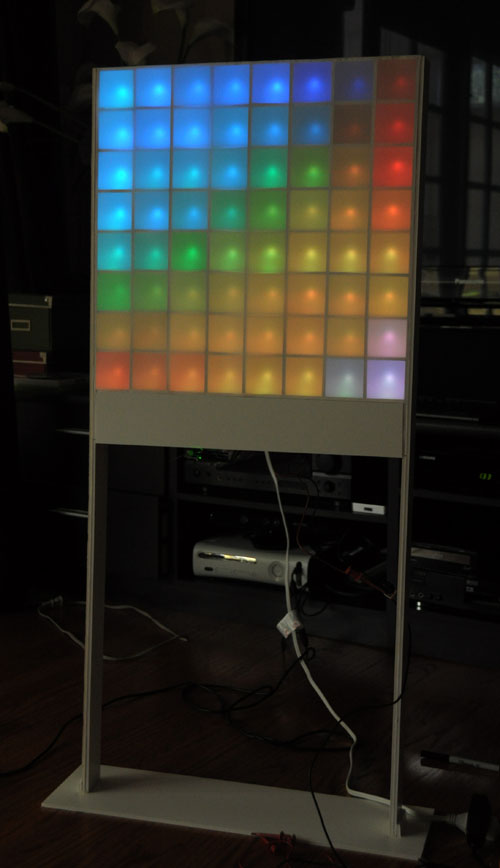
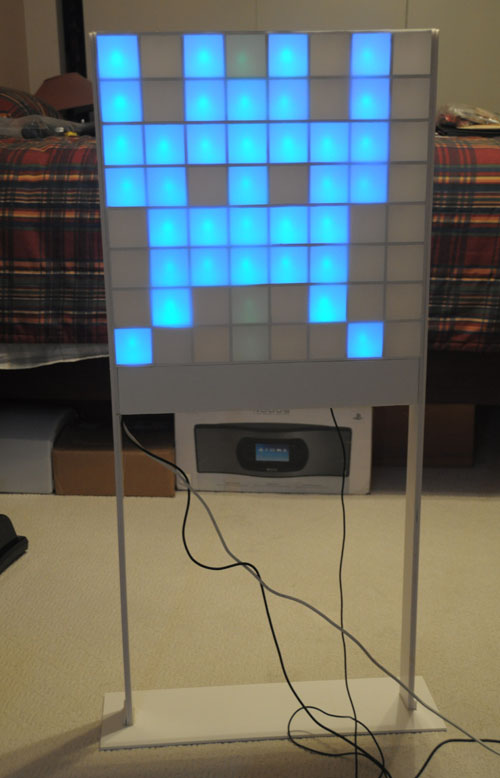
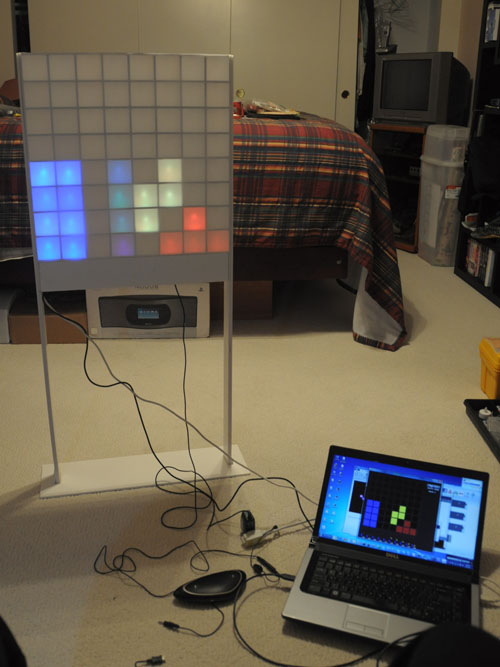
This past weekend, I finally finished building my 8×8 RGB matrix floor lamp.  I call it Lampduino.  A Processing sketch running on a host computer controls Lampduino via a USB connection.  When turned on without a computer, it automatically displays a soothing plasma simulation. If you want to build one of your own, I wrote a step by step Instructable:

Lampduino – an 8×8 RGB Matrix Floor Lamp


Space Invaders

Tetris

Related articles:

Reducing Arduino/FTDI FT232R Serial Latency

I’m working on a project in which a PC communicates with an Arduino (a Colorduino, to be exact) over a serial connection. It’s an 8×8 RGB LED matrix, which will be controlled by music. The ATmega168 MCU in my beta Colorduino has such small RAM that I can only buffer at most 2 screenfuls of data, even when I reduce the color resolution from 24-bits per pixel to 12-bits per pixel. I need to send the data down to the Colorduino very quickly. There needs to be very little latency, or the lights will lag the beats of the music. The serial communication speed is not much of a problem. Each data packet I’m sending is 100 bytes, so at . Besides the raw speed of communication, there is a built-in latency, due to buffering being done by the communications drivers. Luckily, FTDI’s Windows drivers provide a way to tune down the latency a bit.

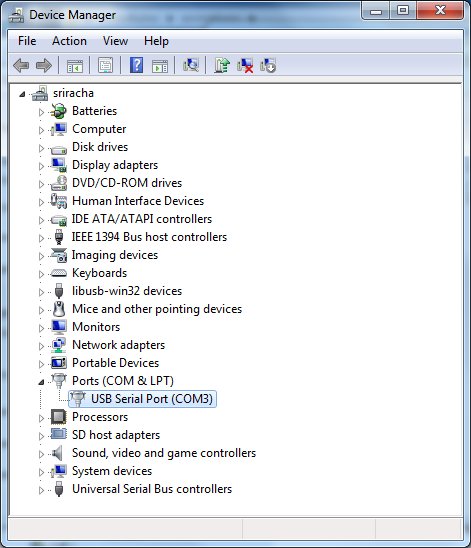
Start the Windows Device Manager while your FTDI USB->Serial cable or Arduino Duemilanove is attached.  Look for its corresponding USB Serial Port under Ports (COM and LPT).

Right click on it, and select Properties from the popup menu.  Next, click the Port Settings tab, and click the Advanced… button.

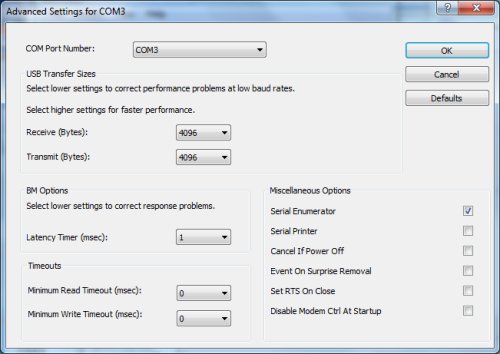
In the dialog which pops up, lower the Latency Timer (msec) value from its default of 16 down to 1, and click OK.

After you disconnect/reconnect your device, the new Latency Timer value will take effect.

I am not sure if there are similar settings in OSX or Linux.  Hopefully, someone can dig up a similar IOCTL to achieve the same effect.