I’m running some server software in a virtual machine running Debian 8 which is running under VMware on a Windows 8.1 host. While it’s easy to access the server through VMware’s virtual NAT from the host computer, it isn’t at all clear how to access it from outside the Windows host. There are two ways to accomplish this feat:
- configure VMware to set the Network type from NAT to Bridged (easy)
- keep the NAT and forward the VM’s port to the host, and then open a port in the host’s firewall (hard)
So which method is better? (1) is easier, because when you configure your VM’s network to bridged, the VM will get its own IP address on your LAN, and will be fully visible on your LAN, just like your real computers. (2) is more secure, because you only expose the ports that you need to the LAN, so you don’t have to configure the firewall in the VM’s client OS.
For our example, let’s walk through how to remotely access an apache server running in our VMware VM, listening at port 8080. First, let’s find the IP address of our VMware VM. Since my VM is running Debian, we simply run ifconfig:
% sudo ifconfig
eth0 Link encap:Ethernet HWaddr 00:0c:29:96:81:fa
inet addr:192.168.88.144 Bcast:192.168.88.255 Mask:255.255.255.0
inet6 addr: fe80::20c:29ff:fe96:81fa/64 Scope:Link
UP BROADCAST RUNNING MULTICAST MTU:1500 Metric:1
RX packets:61515 errors:0 dropped:0 overruns:0 frame:0
TX packets:18860 errors:0 dropped:0 overruns:0 carrier:0
collisions:0 txqueuelen:1000
RX bytes:49210391 (46.9 MiB) TX bytes:1321143 (1.2 MiB)
Interrupt:19 Base address:0x2024lo Link encap:Local Loopback
inet addr:127.0.0.1 Mask:255.0.0.0
inet6 addr: ::1/128 Scope:Host
UP LOOPBACK RUNNING MTU:65536 Metric:1
RX packets:61 errors:0 dropped:0 overruns:0 frame:0
TX packets:61 errors:0 dropped:0 overruns:0 carrier:0
collisions:0 txqueuelen:0
RX bytes:20606 (20.1 KiB) TX bytes:20606 (20.1 KiB)
From the output of ifconfig, we can see that our VM’s IP address is 192.168.88.144 on VMware’s virtual NAT. My Windows host, we can get our IP numbers from ipconfig:
C:\Program Files (x86)\Microsoft Visual Studio 8\VC>ipconfig
Windows IP Configuration
Wireless LAN adapter Wi-Fi:Connection-specific DNS Suffix . :
Link-local IPv6 Address . . . . . : fe80::4c64:efa3:132a:68c0%22
IPv4 Address. . . . . . . . . . . : 192.168.1.115
Subnet Mask . . . . . . . . . . . : 255.255.255.0
Default Gateway . . . . . . . . . : 192.168.1.1Ethernet adapter VMware Network Adapter VMnet8:
Connection-specific DNS Suffix . :
Link-local IPv6 Address . . . . . : fe80::e01a:da83:d339:b55e%20
IPv4 Address. . . . . . . . . . . : 192.168.88.1
Subnet Mask . . . . . . . . . . . : 255.255.255.0
Default Gateway . . . . . . . . . :
The output of ipconfig shows that on my LAN, my Windows host has IP number 192.168.1.115, and on VMware’s NAT, its IP number is 192.168.88.1. To test access to our apache server from within the Windows host, we an simply open a web browser, and point it to http://192.168.88.144:8080. Next, let’s configure things so that we can access the server from any host on our LAN.
1. Network Bridging (Easy Way)
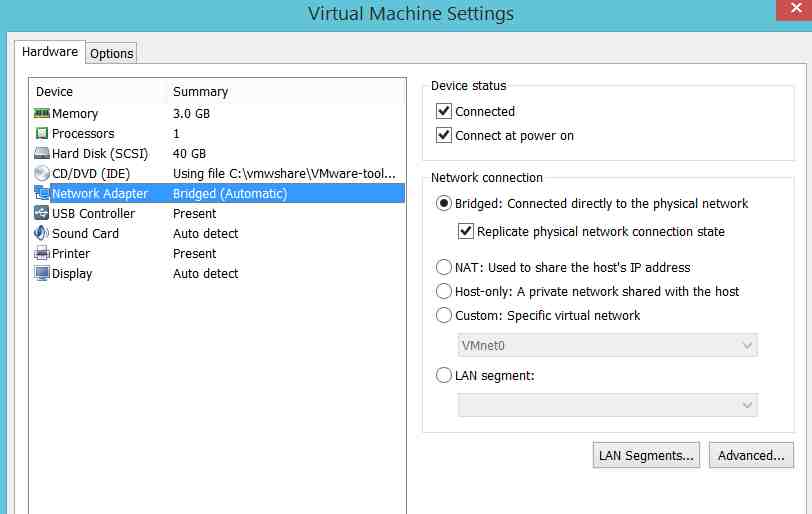
To switch our VM from NAT to Bridge mode, simply go to VMware’s main menu and select VM -> Settings... A Virtual Machine Settings dialog will pop up. In the left side of the dialog, select Network Adapter, and then on the right side of the dialog, under Network connection, change the setting from NAT to Bridged:
After you reboot your VM, it will obtain an IP number from your LAN. My VM came up with IP number 192.168.1.111, so apache is accessed via http://192.168.1.111:8080.
2. Port Forwarding (hard way)
Now, let’s see how to do it while keeping the NAT. In the Virtual Machine Settings above, make sure NAT is selected. If you change the setting, make sure to reboot your VM afterwards. The first thing we need to do is forward the port from our VM to the host. From VMware’s menu, select Edit -> Virtual Network Editor…
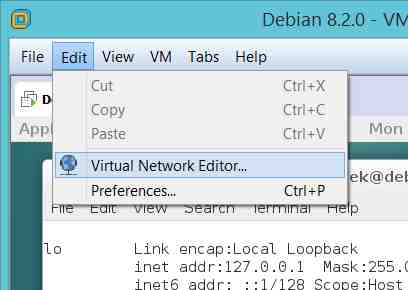
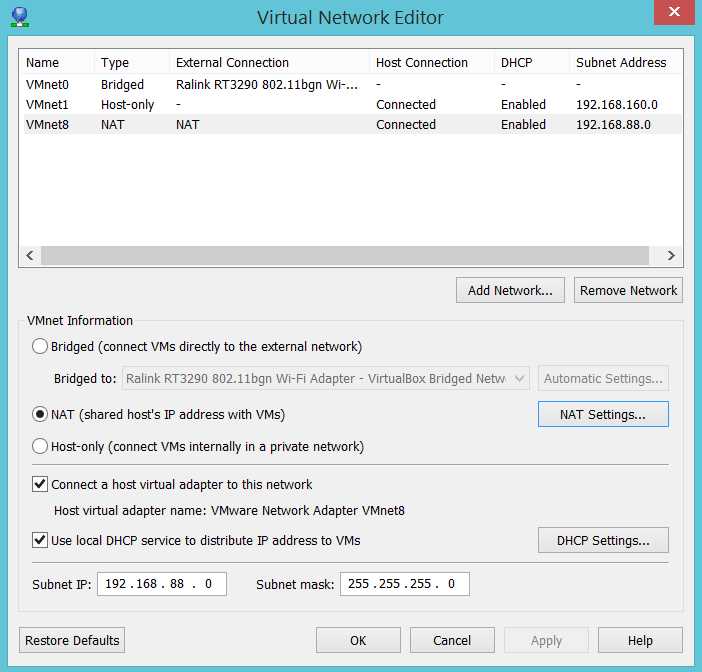
(Note, VMware Player, unlike VMware Workstation, doesn’t come with vmnetcfg.exe, the Virtual Network Editor. You can follow instructions here to access it: DOWNLOAD VMNETCFG.EXE & VMNETCFGLIB.DLL FOR VMWARE PLAYER). In the Virtual Network Editor, click the Change Settings button near the right bottom of the main dialog. In the next dialog, select the NAT from the listbox, and then click the NAT Settings… button:
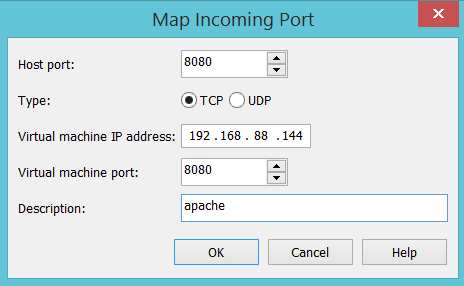
Next, in the Nat Settings dialog, click the Add… button, and fill in the info for your server’s port:
Host port: the port number you want to use to access the server … can be different from the actual port used in the VM if you like
Type: select TCP or UDP
Virtual machine IP address: the VM’s IP on the NAT
Virtual Machine port: the port number used by the server inside the VM
Description: arbitrary info
Finally, click the OK button to save your port mapping. At this point, the port forward is functional, but most likely, your have a firewall running on your host computer. You must open up a hole in your firewall for the Host port you selected above.
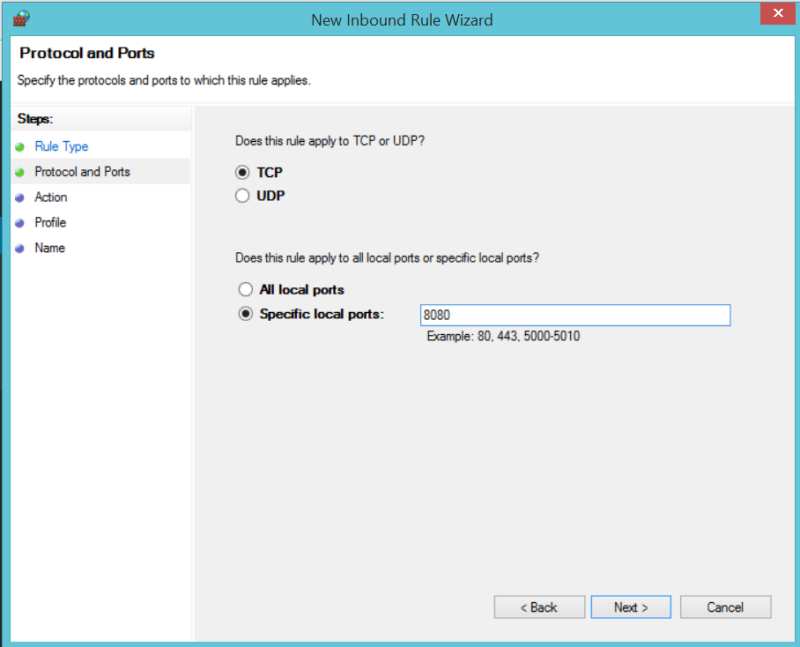
In a Windows 8.1 host, if you’re using the built-in Windows Firewall, run WF.msc. Select Inbound rules -> New Rule…. Under What type of rule would you like to create?, select Port – rule that controls connections for a TCP or UDP port. From the New Inbound Rule Wizard, select your protocol and port(s):
In the next dialog, select Allow the connection. Finally, you can decide where you want to rule to apply, Domain/Private/Public. Unless you’re planning to use the server while travelling, it is best to leave Public unchecked. Finally, you’ll be presented with a page to enter a name and description for the mapping. After you click the Finish button, you should be able to access your server from any host on your LAN. In our example, a web browser should work when pointed to http://192.168.115:8080.
