Weller WESD51/WES51 Repair – No Heat

Over the past couple of years,my Weller WESD51 soldering station had been getting progressively flaky. Sometimes, I would have to fiddle with it for a while to get it to heat up. Finally, one day, it just stopped heating altogether. I had trouble finding info on how to fix it, mainly because I couldn’t even find the pinouts for the soldering pencil attachment jack.

Finally, I hit the jackpot last week. I found this thread in AllAboutCircuits discussing a similar model, the WES51. The main difference between the WESD51 and the WES51 is that the WESD51 has a digital temperature display, while the WES51 only has a status LED. While the thread didn’t tell me how to fix it, I found the user/troubleshooting manuals attached! I have linked the manuals at the bottom of this post. Unfortunately, following the troubleshooting guide didn’t help me find the problem, because everything checked out OK.

Then I found this guy’s YouTube video on fixing a WES51 that wouldn’t heat up. As I suspected, the PCB’s in the two different models is very similar. In the guy’s video, he fixes it by replacing a 2.2uF capacitor that’s connected to the heater’s power transistor. I checked the corresponding capacitor in my WESD51, and sure enough it was bad. I found a in my junk parts bin to swap in and bingo, my WESD51 is working again! The step by step procedure is below.

Step 1: Open the case

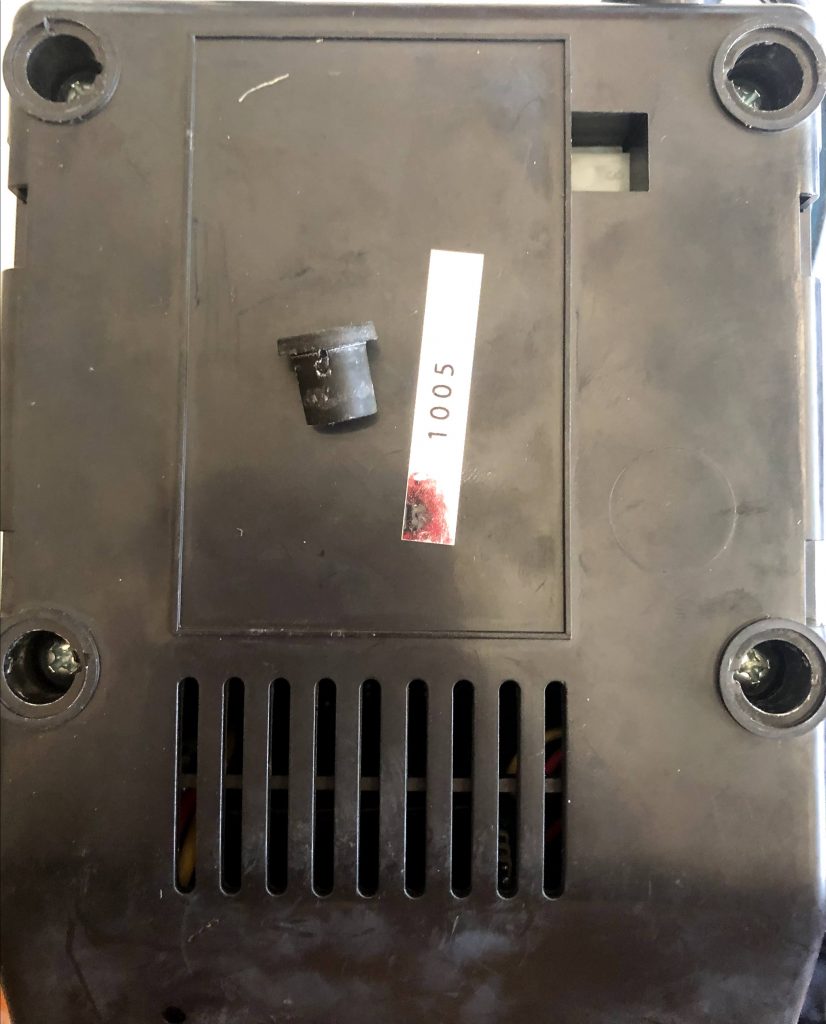
First, you need to open up the case. Pop out the rubber feet at the bottom of the controller case. Underneath are philips screws.

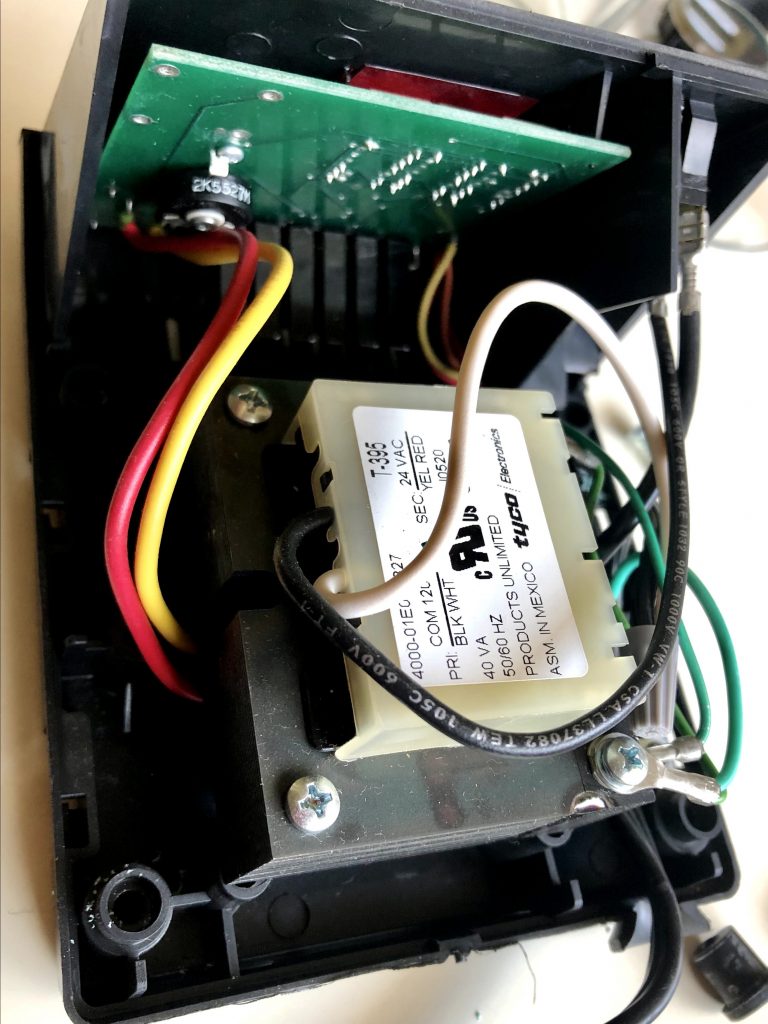
After you remove all four of them, the blue upper body easily separates. Here’s what’s inside:

Step 2: Remove PCB

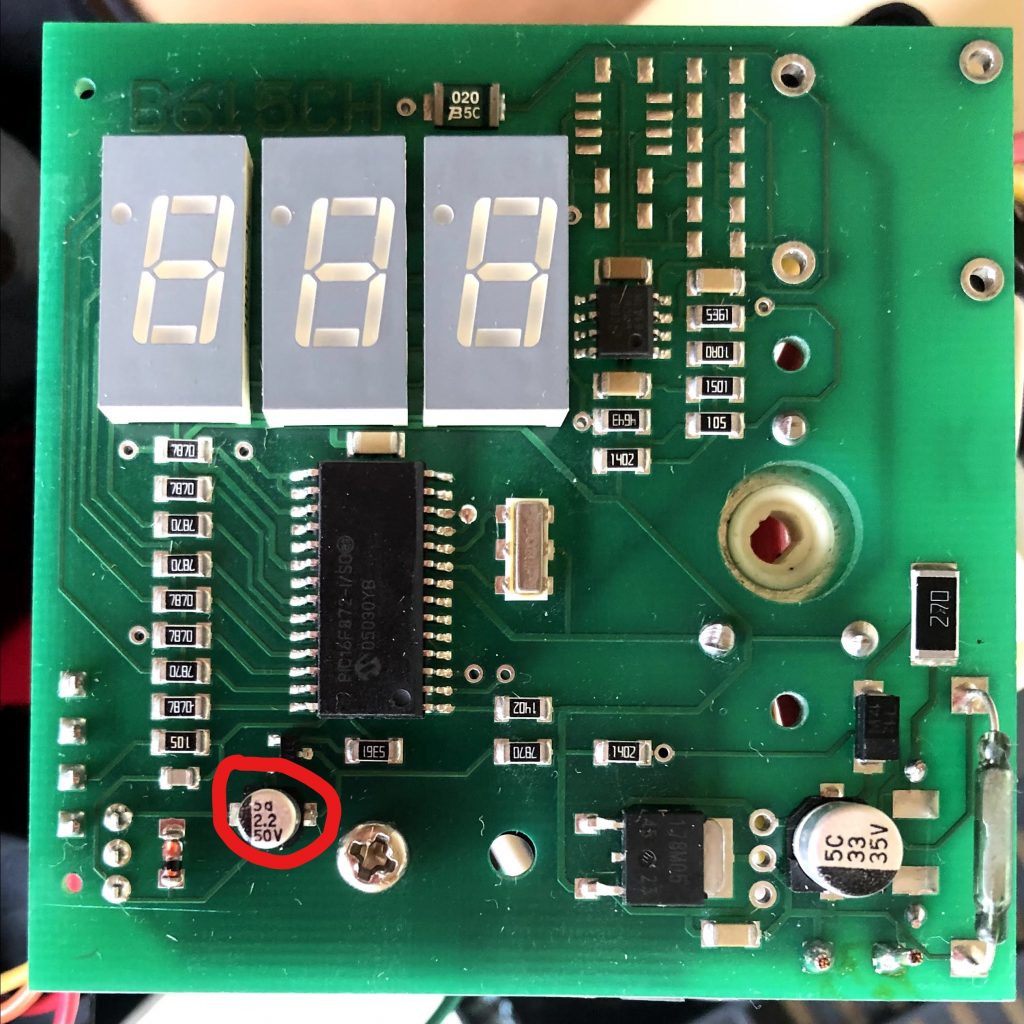
Separate the green PCB from the casing. You don’t have to remove the temperature adjustment knob from the faceplate. Locate the 2.2uF/50V capacitor. It’s circled in red in the photo below:

Step 3: Remove existing 2.2uF capacitor

Carefully desolder the capacitor circled in red above. If you don’t have a capacitance meter, just try swapping in a new part, and see if it fixes the problem.

Step 4: Solder in a replacement capacitor

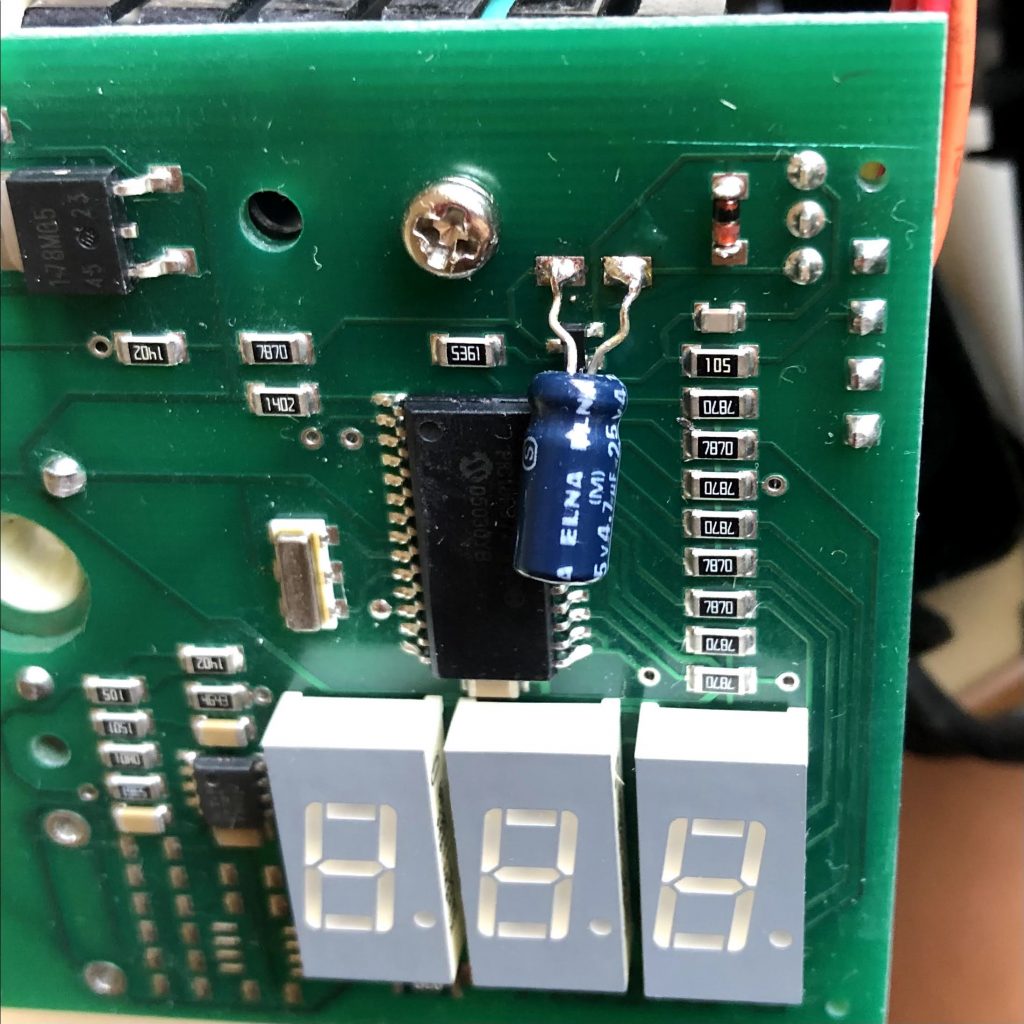
Make sure to pay attention to the polarity of the electrolytic capacitor… the negative terminal faces the line of SMT resistors on the right of the photo above. I didn’t have an exact replacement in my parts bin, so I just used a 4.7uF/25V part… the circuit voltage is 24V, so 25V isn’t much headroom, but it’s easy to replace it again if it fails in the future. Before putting everything back together, I fired it up, and it was heating again!

Downloads:

WESD51 spec sheet

WESD51 User/Troubleshooting Manual

WES51 User/Troubleshooting Manual

HowTo: Low Water Pressure Fix for Kohler Simplice Kitchen Faucet

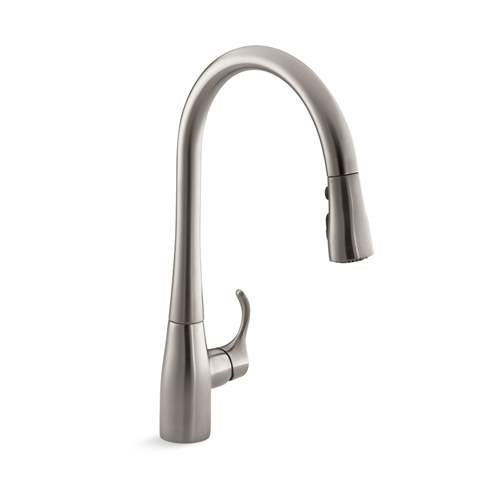
I have a Kohler Simplice kitchen faucet.

Over the years, it has occasionally had issues with low water pressure. I’ve had to take it apart several times, and have narrowed it down to a couple of common problems. In this article, I’ll explain how to quickly diagnose and fix it, so you don’t have to spend hours on it like I did.

Diagnosis

First we need to figure out where the problem lies.

  1. Are both the hot and cold water flowing slowly? If so, the problem is likely in the spray head assembly. See Spray Head section below.
  2. Is only one side flowing slowly? If only hot or cold is flowing slowly, and the other side is flowing fine, then the problem is likely that an inlet screen is clogged. See Clogged Inlet Screen section below.

Spray Head

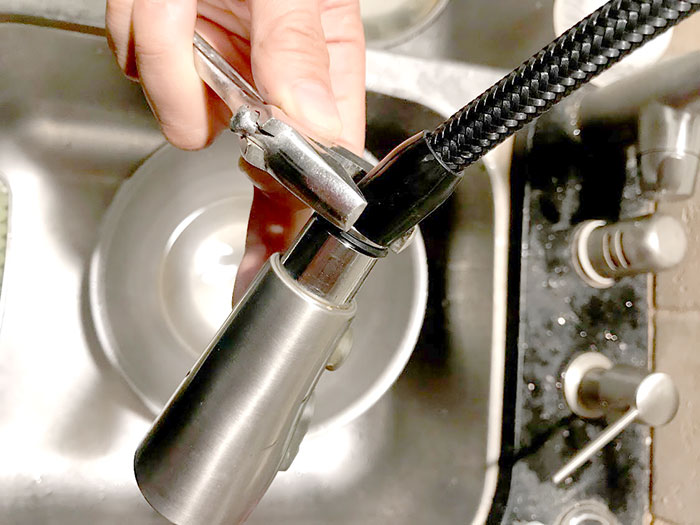
Pull out the spray head, and use a crescent wrench to hold the end still while you unscrew the spray head from the faucet:


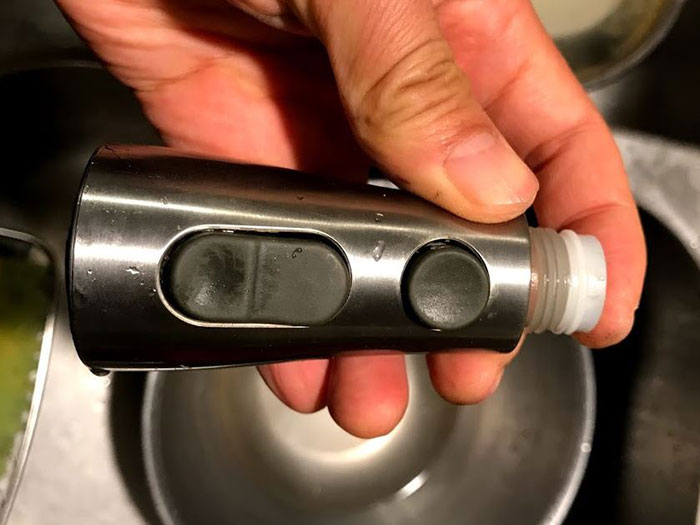
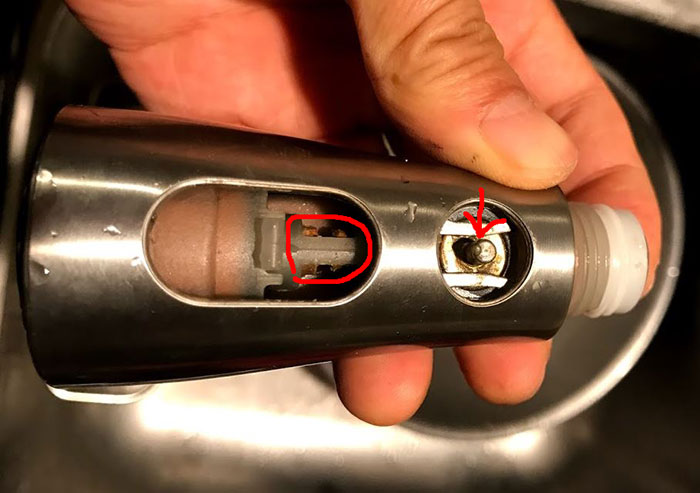
Turn on the water full blast. If it flows out of the hose strongly, then your spray head is definitely the culprit. With dry fingers, pull the black plastic buttons off the spray head.

  1. grab the pin located by the red arrow in the photo above with a pair of needle nose pliers. Turn it, and push it in and out until it moves smoothly
  2. use a small screwdriver inserted into the slot in the metal piece denoted by the red circle in the photo above, and slide the metal piece to & fro until it moves smoothly
  3. (optional) if you have silicone spray, spray it into the areas where the plastic and metal interface, and again move the metal pieces to & fro until they move even more smoothly

At this point, you can reassemble and test it out. Most likely, the problem will be fixed already. However, as long as you have it taken apart, you might as well clean off the calcium deposits. There are two places where calcium builds up: 1) the inlet screen

and 2) the aerator and jets


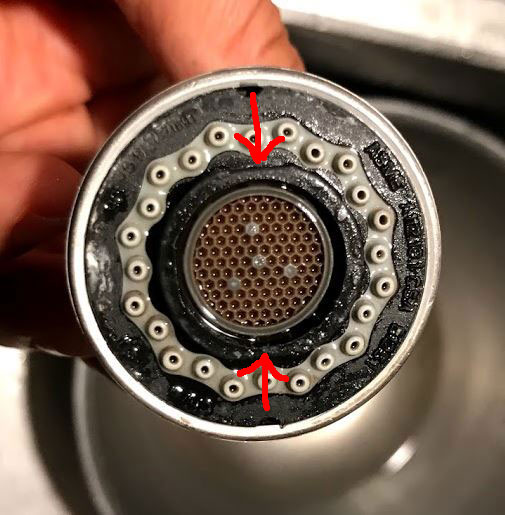
The entire black plastic face containing the aerator should be removable if you grab the flat sides of the inner black core around the aerator (see red arrows in photo above) with a wrench and unscrew it. Unfortunately, mine was glued on by serious calcium deposits (in the photo above, I’ve already cleaned off the calcium but it was still stuck). If you can unscrew the black plastic face assembly, you can disassemble and clean the aerator more thoroughly. Since mine was stuck, I simply soaked both ends of the spray head in hot vinegar, and then used a brush to rub off the remaining calcium deposits. If the gray jet holes are not clean, you can also insert a round toothpick into each hole, and rotate it to clean it out. Reinstall the spray head and test. The water should be flowing strongly now. If so, you are done.

Clogged Inlet Screen

If only the hot or cold side (usually only the hot side) flows slowly, while the other side flows strongly, the inlet screen on the clogged side is probably clogged up with calcium deposits. Go under the sink, and with two wrenches, unscrew and detach the inlet hose from the faucet on the side that’s clogged.

sorry for the horrible photo. The red arrow in the photo above points to the inlet screen. It’s not removable, so you have to clean it in place. Mine was completely gunked up with calcium deposits that had broken loose from my old water heater. I used q-tips soaked in vinegar, followed by scraping with a small screwdriver to clean the screen. Reattach the inlet hose and test. If the water’s flowing strongly again, you’re done!


Samsung Refrigerator Noisy Fan – Quick Fix

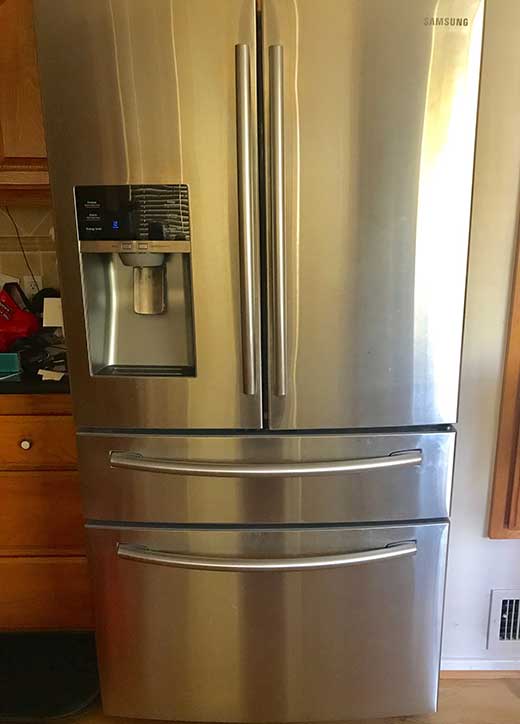
I have a Samsung RF28HMEDBSR french door refrigerator that’s only a few years old.

Several months ago, I started to notice a mild clicking sound coming from it occasionally. The sound would always stop as soon as I opened the door, and then usually restart a little while after closing the door. In the past few days, the noise got considerably louder. It became clear that the sound was coming from a fan that was inside the refrigerator compartment. It started sounding like a fan whose blades were hitting something. Then this morning, it became unbearably loud.. like there was an airplane inside my kitchen!

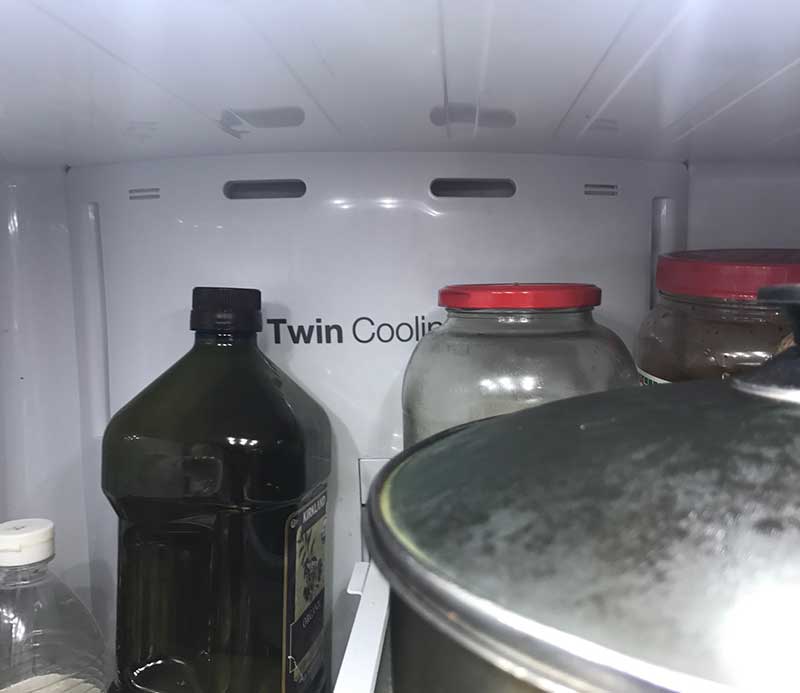
I thought maybe the fan bearings were just dry and needed oil. After doing a lot of research on the Internet, I figured out that the evaporator fan, which circulates cool air inside the refrigerator, was probably the culprit. It turns out that ice builds up on the evaporator (due to bad design of the defrost circuit), and eventually hits the fan blades, causing the racket.  The evaporator fan is a box fan that’s attached to the evaporator cover in the back of the fridge, behind where it says Twin Cooling:

The fan looks like this:

The proper fix is to remove everything from the refrigerator, take out all the drawers and shelves, remove the evaporator cover, and then melt the ice. I didn’t have time to do this today, and just wanted to silence the racket, so I decided to try a quick hack. The ice build up usually occurs on the coolant pipes feeding the evaporator. Notice how there are two large oblong air holes in the evaporator cover (see above photo), above Twin Cooling. The coolant pipes are approximately behind the air slot on the right.

I decided to try blowing hot air into the air slots, to melt some of the ice enough so that it wouldn’t hit the fan anymore. It’s important not to blow air that’s so hot that it melts the plastic cover. I set my dryer to high, and then pointed it at my hand, adjusting the distance so that the air was just a little too hot for me to tolerate. Then I aimed it at the intake slots, at about the same distance, and alternated blowing air into them, 10 seconds at a time, for 2 minutes:

Voila! The noise is completely gone! When I have more time, I will do the proper fix, taking the evaporator cover off, and melt the ice that’s covering the evaporator. Most likely, there’s a lot of ice back there, which blocks air flow to the evaporator, reducing the efficiency of the refrigerator, which wastes electricity, and in the worst case, keeps it from cooling properly. I will make a post in the future, documenting the process as I go.

In the meantime, if you want to tackle the proper fix yourself, here are some YouTube videos which are helpful:

At about 4:35 in the video above, the guy has a good hack for preventing the issue from ever happening again. He moves the temperature sensor for defrosting from the inlet to the outlet pipe of the evaporator, which extends the defrost cycle.

UPDATE 2020-05-20: It’s been almost 3 years since I applied the temperature sensor moving hack described above, and I haven’t had a recurrence of the noisy fan, so it works well as a permanent fix!

The video below gives a lot more details on disassembly procedures:

Service ManualRF28HMEDBSR Service Manual

How to Repair a Panasonic Massage Chair, Part 3

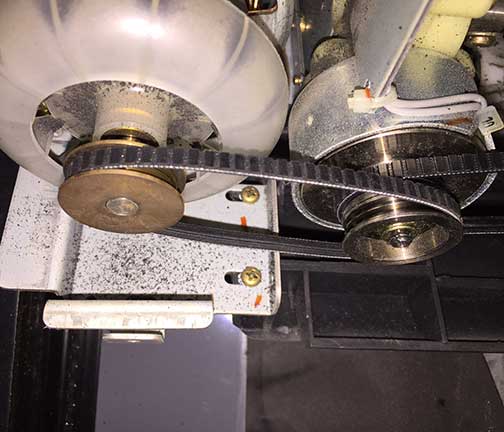
Unfortunately, my rubber hose hack from Part 2 worked only for a few weeks. The belt again stretched, and became loose:

loosebelt

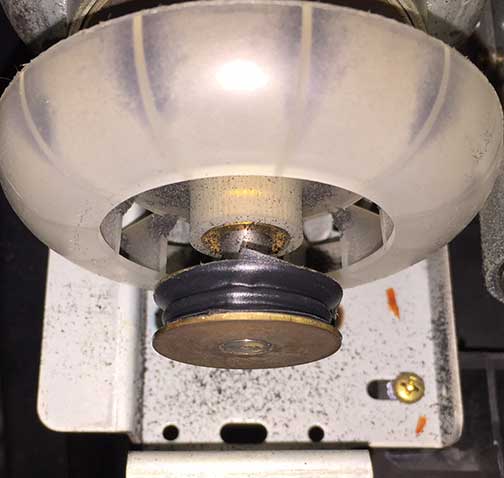
One thing you can also see in the photo above is that I’ve slid the motor as far to the left as the adjusters allow (the slotted holes for the two brass screws). I couldn’t bend the motor mounts any more to tighten up the belt, so in addition to the rubber hose shim from Part 2, I wrapped 4 layers of electrical tape around each of the two pulleys:

tapedpulley

Amazingly, this increased the diameter of the pulleys enough that the belt became taut. I have tested the chair for a few hours, and this fix seems to be working well. Let’s see how long this hack holds up…

Previous related article: How to Repair a Panasonic Massage Chair, Part 2

How to Repair a Panasonic Massage Chair, Part 2

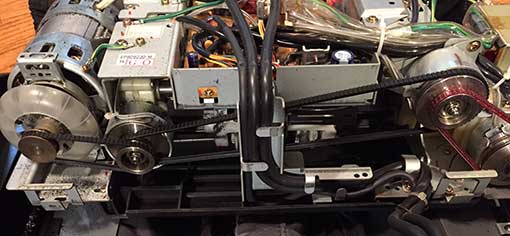
In my article, How to Repair a Panasonic Massage Chair, I described how I fixed my Panasonic EP1004 massage chair. The chair worked for a year or so, and then stopped working again. The symptoms this time were a bit different from when the clutches got stuck. Instead of running for a while, and then beeping and shutting itself off, the massage mechanism stopped moving up and down. The chair was just stuck in kneading mode, and wouldn’t do anything else. +I was pretty sure the problem was due to a loose belt, but just didn’t feel like taking it apart again. Tonight, I decided it was time to get it working again. I opened it up, and sure enough, one of the belts had slackened so much that the pulleys were just freewheeling. The loose belt was the small one on the far left in the photo below:

belt


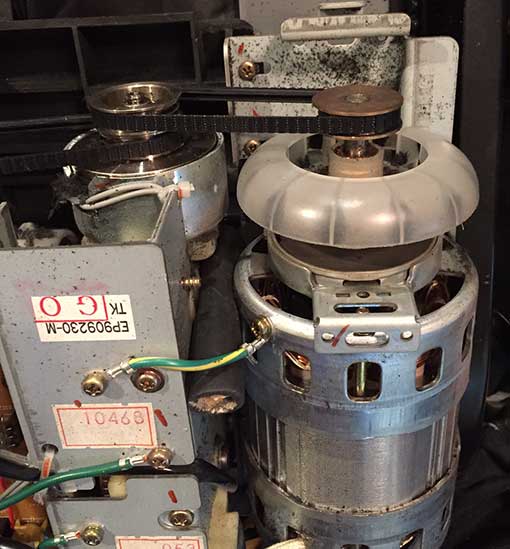
The belt doesn’t look loose in the photo, because I forgot to take a photo of it before tightening it up. Unfortunately, there was no adjustment left to tighten the belt. It must have stretched over it’s 15+ year lifetime. I’m pretty impressed by the quality of the of the belts in this thing. They haven’t dried up at all. If you look in the photo below, there are two screws in horizontal slots between the two pulleys. Note that the screws are all the way on the left of the slots, which means that the motor has already been slid as far as it will go to the right. Yet, the belt was still quite loose. I finally jerry rigged a fix by jamming a piece of rubber hose in between the motor and the metal box it’s attached to. To stiffen up the hose, I stuffed a wood dowel into it. The rubber hose is in the photo below, under the green/yellow wire that grounds the motor to the chassis.

beltfix

The chair is now working again… until something else goes wrong.

Previous related article: How to Repair a Panasonic Massage Chair
Next related article: How to Repair a Panasonic Massage Chair, Part 3


How to Repair a Panasonic Massage Chair

I have a Panasonic EP1004 massage chair that’s about 14.5 years old.
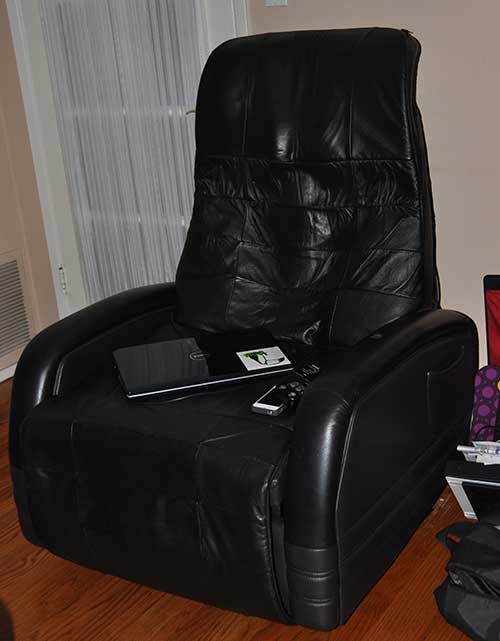
ep1004

For the past several years, it has had problems getting going.  When I tried to use it, the motors would spin for a while, but there would be no motion, and after a while, it would beep 3 times, and then stop.  I would then have to power cycle it, and try again over and over.  After several tries, it would finally start working.  Over time, it took longer and longer to get it working.  Finally, it became impossible to get it going.  I searched the internet, and found the service manual for it.

Unfortunately, the manual didn’t really help me diagnose the problem, but I figured out that the massage and up/down clutches had gone bad.  The clutches were expensive, and were unavailable for purchase anywhere.  I figured out how to repair them without spending a cent!  The step by step procedure is documented below.

To do the repair, you will need the following:

  1. Philips screwdriver
  2. 10mm socket wrench
  3. x-acto knife
  4. pliers
  5. a sheet of plastic

First, remove the screws which hold the back cover on.  They are covered by plastic caps, which must be pried open to expose the Philips screw head:
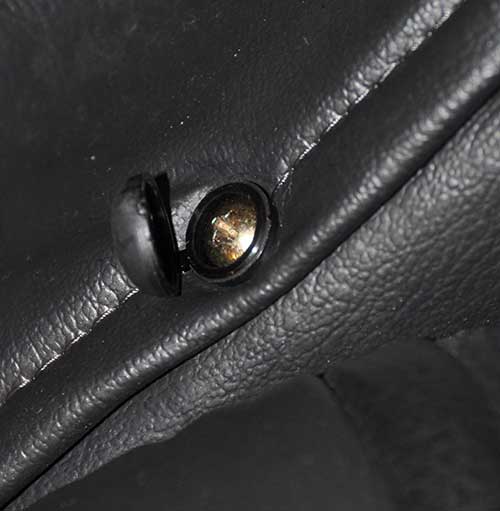
coveredscrew

Next, remove the two 10mm bolts attached to the metal bar at the bottom of the cover:

bolts

Here is a close-up of one of the bolts:

bolt

After flipping the outer cover out of the way, you will find a stretchy fabric cover below it.
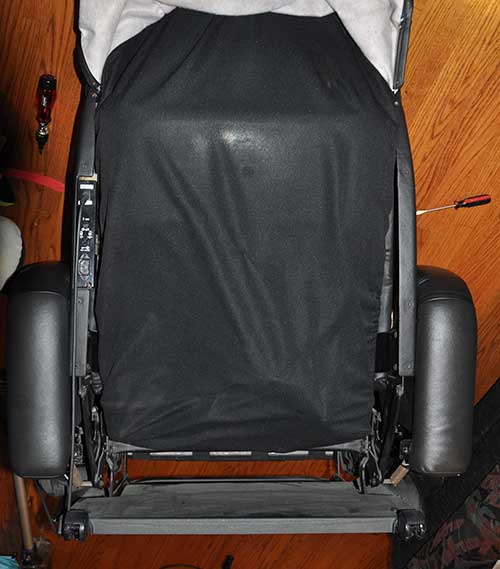
innercover

To remove the fabric inner cover, flip the chair over, and look for two Philips screws at the circled positions:

bottom

Circled in red below is a close-up of one of them:
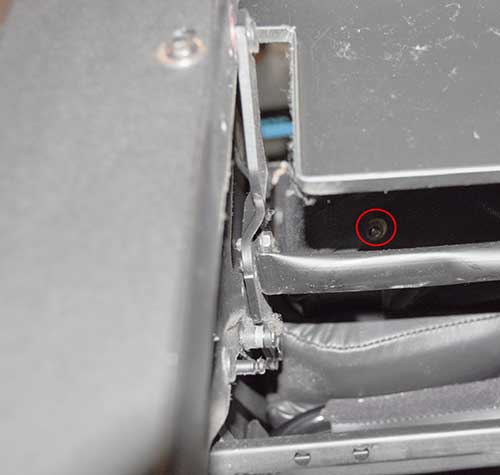
bottomscrew

After removing the screws, the inner fabric cover can easily be lifted out of the way, revealing the motor and control assembly.  Remove the two Philips screws at the top of the black plastic cover, and remove it:
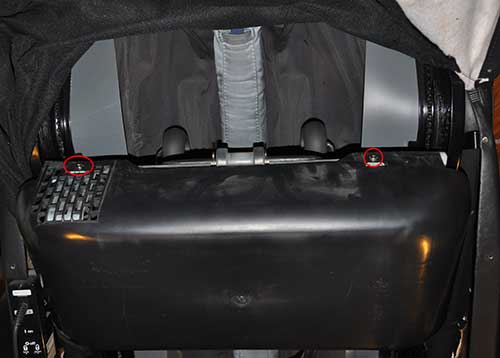
gutscover

Inside, you will find the controller.  I have labeled the clutches which were faulty in my chair:
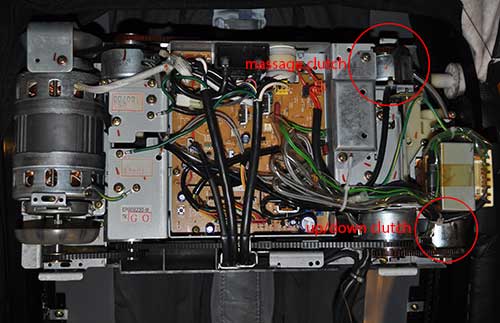
guts

There are 3 other clutches, which you can find by looking at the diagram in the service manual.  Fortunately, I was having problems with only two of them.  We are not going to remove the clutches.  Fortunately, the drive pulleys can be removed without taking the clutches out.  First, remove the 10mm nut that secures the pulley:

screwdriver

It is difficult to get the nut loose, because turning the nut also rotates the driven shaft. To keep the driven shaft from rotating when you turn the nut, jam a thin flat-bladed screwdriver between the two clutch plates, as shown in the photo above. A commenter below suggests that a bit of WD-40 may help, but be extremely careful if you try that… if it gets on the friction surface of the pulley, it will make your belt slip, or even eat your belt over time.

After you remove the pulley, you will find 4 parts: 1) a spring steel disk, 2) a rubber washer under it, 3) a small metal washer under that, and 4) the clutch plate below it.  Make note of the layout of the parts as you remove them:
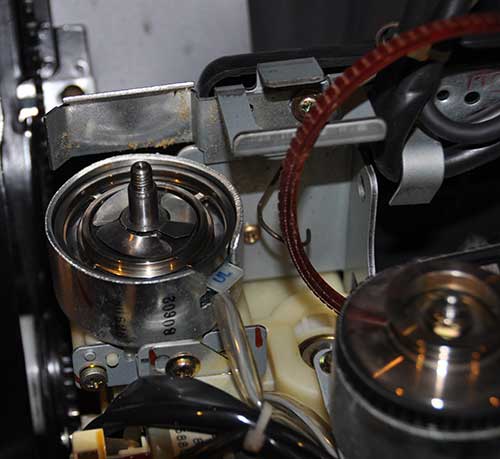
udclutch2

Here is the cuprit:

udclutch3

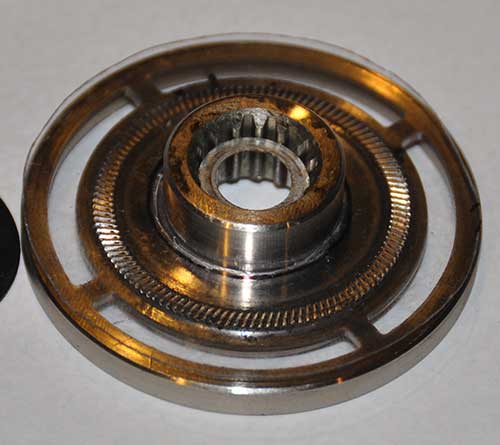
The clutches suffer from a basic design flaw. The rubber ring which serves as a noise damper for the clutch disintegrates over time, and becomes a sticky mess. It becomes so sticky that the clutch solenoid is too weak to overcome its grip, and can no longer drive the clutch plate into the pulley.  Thus, the clutch plate can’t contact the pulley, and it just freewheels.  Using the clutch plate as a template, cut out a ring of plastic as pictured below:
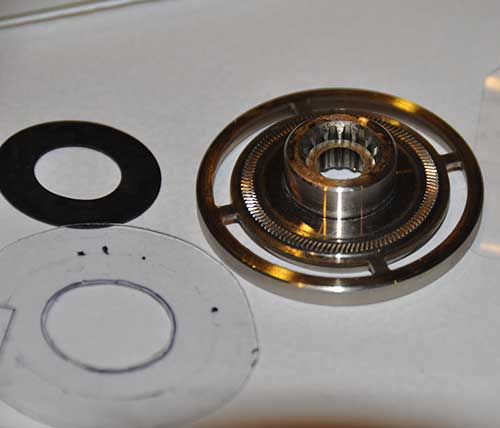
udclutch4

I used some hard plastic from some discarded packaging.  I used scissors to cut the outline, and an x-acto knife to cut out the hole. Draw an outline around a US nickel to get a nice, round hole.  Next, slide the plastic donut over the clutch plate:
udclutch5

What the plastic does is keep the sticky black goo from touching the clutch plate, so that the solenoid can move it up and down. Note: Even though the clutch plate has teeth in it, these teeth are on the bottom, and they are not deep enough to dig into the plastic disc that we are adding. The friction that the clutch uses to drive the pulley is between the other side of the clutch plate, and the flywheel, which is the inner face of the pulley. The only purpose for the plastic disc we are adding is to keep the black goo from sticking to the bottom of the clutch plate. Try use a thin piece of hard plastic, as I did. Do not try to substitute a thicker piece of rubber… we don’t want any friction on between the bottom side of the clutch plate and the clutch body. Assembly is the reverse of the disassembly process.

When disassembling the massage clutch, you find find that the metal plate that holds the control box cover gets in the way.  Carefully bend it out of the way with a pair of large pliers just enough so that the pulley can be removed.  After reassembling the massage clutch, bend the metal plate back into the original position.

Another issue which could cause your chair to stop working is loose or broken belts. Check all of the belts for proper tension. My shiatsu massage rollers were also squeaking when I put a lot of pressure on them. This was because the lower left belt was stretched, and was quite loose. Unfortunately, even after loosening the motor mount screws and sliding the motor as far left as the adjustment slots would allow, the belt was still too loose.  I ended up using a large screwdriver to just bend the motor mounts outwards a little bit to tighten up the belt. [UPDATE: This eventually failed, and the belt got loose again… see Part 2.]

Reassemble the rest of the chair by following the disassembly steps in reverse. Voila, your Panasonic massage chair is good as new again!

Downloads:

Panasonic EP1004 Service Manual
Panasonic EP578 Service Manual
Panasonic EP1010 Service Manual
EP1005 Operating Instructions
EP1004,1005 Simplified Service Manual

Next related article: How to Repair a Panasonic Massage Chair, Part 2