I have a Panasonic EP1004 massage chair that’s about 14.5 years old.

For the past several years, it has had problems getting going. When I tried to use it, the motors would spin for a while, but there would be no motion, and after a while, it would beep 3 times, and then stop. I would then have to power cycle it, and try again over and over. After several tries, it would finally start working. Over time, it took longer and longer to get it working. Finally, it became impossible to get it going. I searched the internet, and found the service manual for it.
Unfortunately, the manual didn’t really help me diagnose the problem, but I figured out that the massage and up/down clutches had gone bad. The clutches were expensive, and were unavailable for purchase anywhere. I figured out how to repair them without spending a cent! The step by step procedure is documented below.
To do the repair, you will need the following:
- Philips screwdriver
- 10mm socket wrench
- x-acto knife
- pliers
- a sheet of plastic
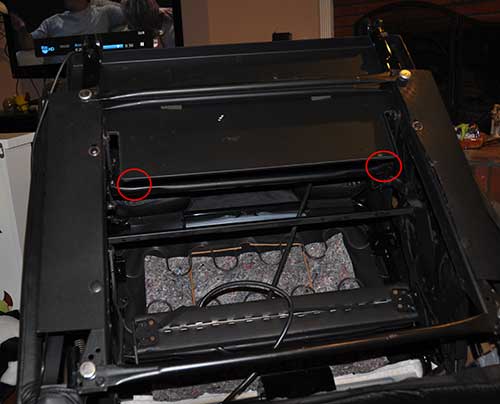
First, remove the screws which hold the back cover on. They are covered by plastic caps, which must be pried open to expose the Philips screw head:
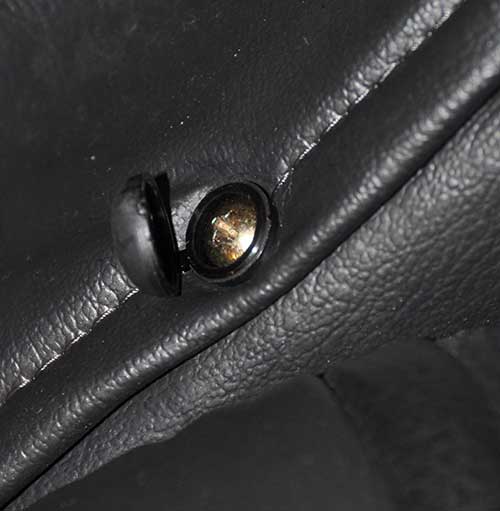
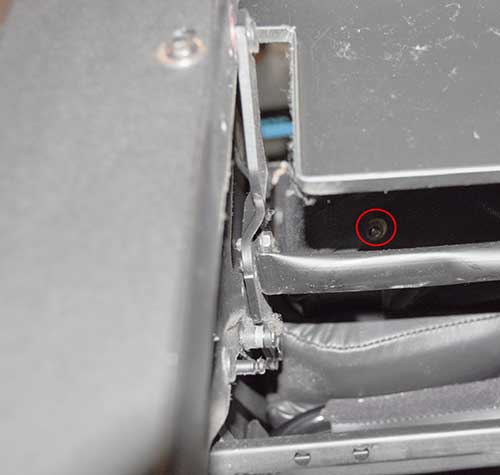
Next, remove the two 10mm bolts attached to the metal bar at the bottom of the cover:
Here is a close-up of one of the bolts:
After flipping the outer cover out of the way, you will find a stretchy fabric cover below it.
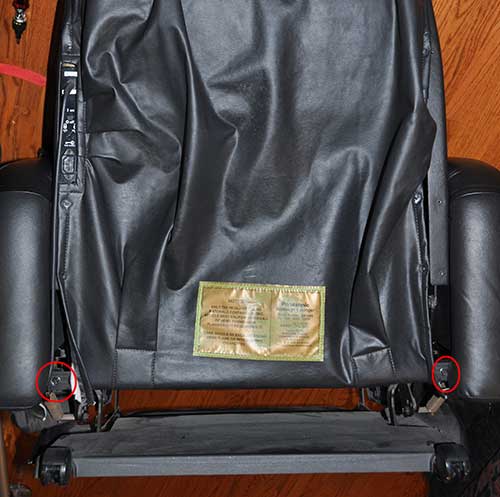
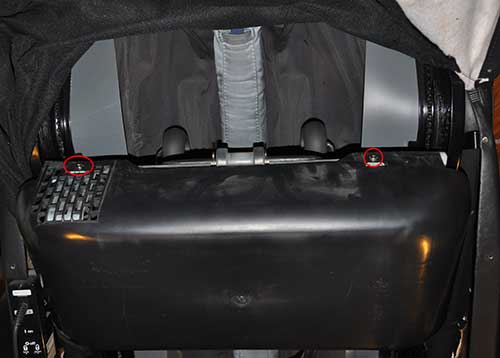
To remove the fabric inner cover, flip the chair over, and look for two Philips screws at the circled positions:
Circled in red below is a close-up of one of them:
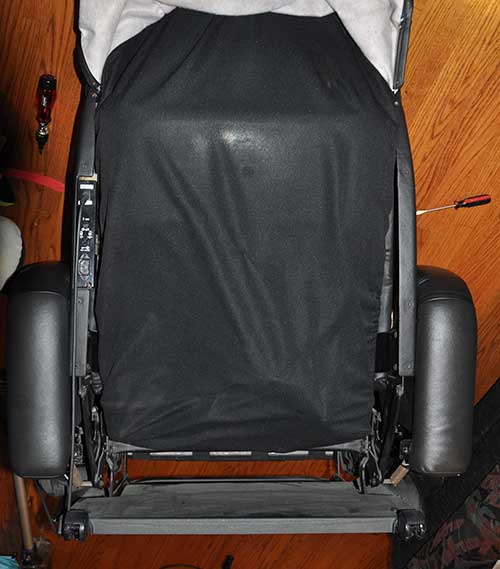
After removing the screws, the inner fabric cover can easily be lifted out of the way, revealing the motor and control assembly. Remove the two Philips screws at the top of the black plastic cover, and remove it:
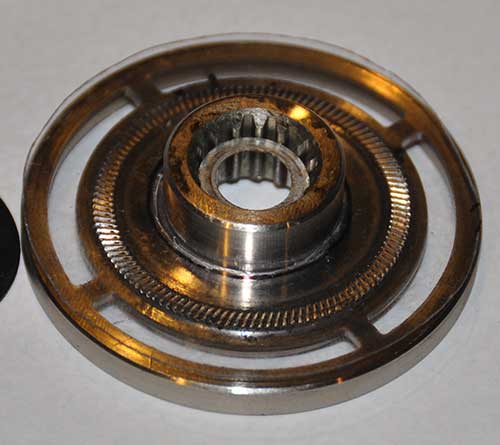
Inside, you will find the controller. I have labeled the clutches which were faulty in my chair:
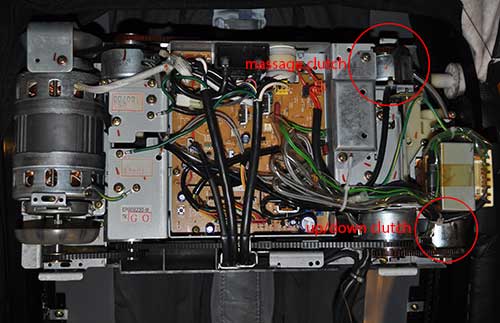
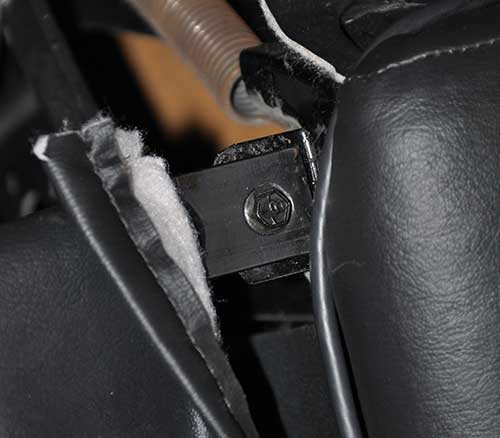
There are 3 other clutches, which you can find by looking at the diagram in the service manual. Fortunately, I was having problems with only two of them. We are not going to remove the clutches. Fortunately, the drive pulleys can be removed without taking the clutches out. First, remove the 10mm nut that secures the pulley:
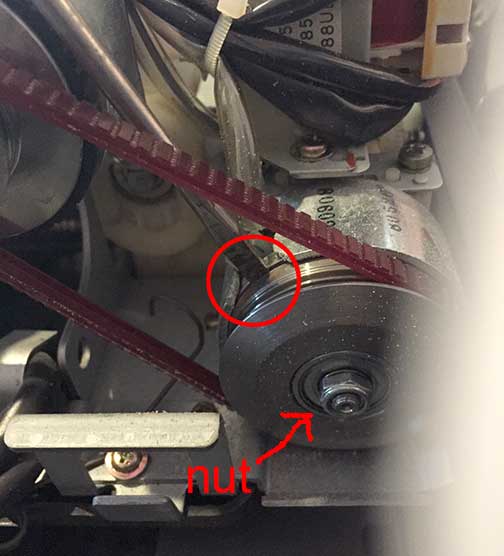
It is difficult to get the nut loose, because turning the nut also rotates the driven shaft. To keep the driven shaft from rotating when you turn the nut, jam a thin flat-bladed screwdriver between the two clutch plates, as shown in the photo above. A commenter below suggests that a bit of WD-40 may help, but be extremely careful if you try that… if it gets on the friction surface of the pulley, it will make your belt slip, or even eat your belt over time.
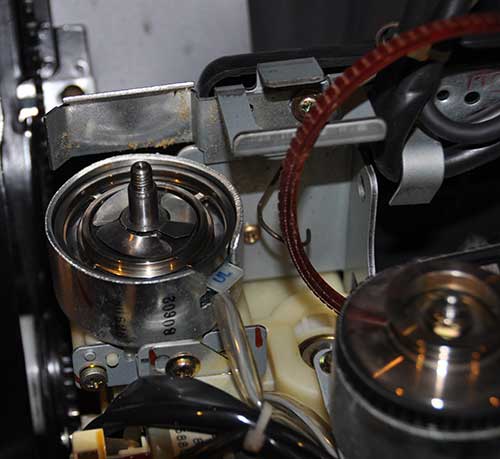
After you remove the pulley, you will find 4 parts: 1) a spring steel disk, 2) a rubber washer under it, 3) a small metal washer under that, and 4) the clutch plate below it. Make note of the layout of the parts as you remove them:
Here is the cuprit:
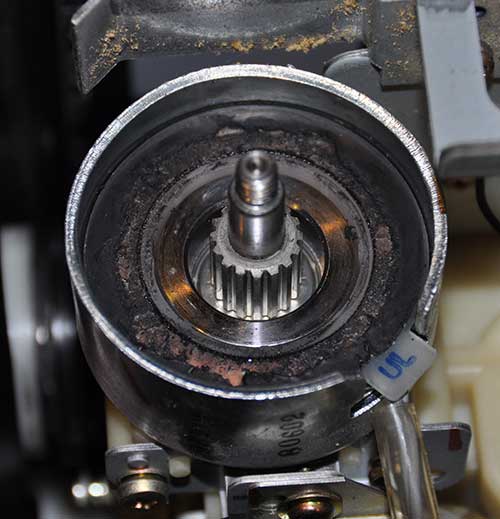
The clutches suffer from a basic design flaw. The rubber ring which serves as a noise damper for the clutch disintegrates over time, and becomes a sticky mess. It becomes so sticky that the clutch solenoid is too weak to overcome its grip, and can no longer drive the clutch plate into the pulley. Thus, the clutch plate can’t contact the pulley, and it just freewheels. Using the clutch plate as a template, cut out a ring of plastic as pictured below:
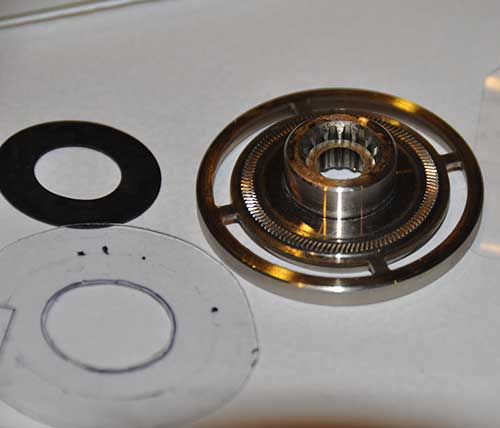
I used some hard plastic from some discarded packaging. I used scissors to cut the outline, and an x-acto knife to cut out the hole. Draw an outline around a US nickel to get a nice, round hole. Next, slide the plastic donut over the clutch plate:
What the plastic does is keep the sticky black goo from touching the clutch plate, so that the solenoid can move it up and down. Note: Even though the clutch plate has teeth in it, these teeth are on the bottom, and they are not deep enough to dig into the plastic disc that we are adding. The friction that the clutch uses to drive the pulley is between the other side of the clutch plate, and the flywheel, which is the inner face of the pulley. The only purpose for the plastic disc we are adding is to keep the black goo from sticking to the bottom of the clutch plate. Try use a thin piece of hard plastic, as I did. Do not try to substitute a thicker piece of rubber… we don’t want any friction on between the bottom side of the clutch plate and the clutch body. Assembly is the reverse of the disassembly process.
When disassembling the massage clutch, you find find that the metal plate that holds the control box cover gets in the way. Carefully bend it out of the way with a pair of large pliers just enough so that the pulley can be removed. After reassembling the massage clutch, bend the metal plate back into the original position.
Another issue which could cause your chair to stop working is loose or broken belts. Check all of the belts for proper tension. My shiatsu massage rollers were also squeaking when I put a lot of pressure on them. This was because the lower left belt was stretched, and was quite loose. Unfortunately, even after loosening the motor mount screws and sliding the motor as far left as the adjustment slots would allow, the belt was still too loose. I ended up using a large screwdriver to just bend the motor mounts outwards a little bit to tighten up the belt. [UPDATE: This eventually failed, and the belt got loose again… see Part 2.]
Reassemble the rest of the chair by following the disassembly steps in reverse. Voila, your Panasonic massage chair is good as new again!
Downloads:
Panasonic EP1004 Service Manual
Panasonic EP578 Service Manual
Panasonic EP1010 Service Manual
EP1005 Operating Instructions
EP1004,1005 Simplified Service Manual
Next related article: How to Repair a Panasonic Massage Chair, Part 2
Thank you very much for this detailed explanation. I had a similar problem, but was able to solve it following your instructions. Much obliged. This is Internet at its best.
My chair had the same symptoms, it would not go up or down, but my solution was different. The rubber on the sensors looked fine. But, on the right hand bottom sensor, the screw had become too tight so I just backed it off 1/2 turn at a time until the unit moved freely up and down. Then I put a dab of superglue on each nut to prevent any self tightening.
Superglue is pretty risky. You might not be able to get it off next time. I didn’t find any issue w/ the nut loosening up… the lock washer takes care of that
I have a similar problem where the leg massage work but the back massager is frozen and ultimately shuts down. Is this also a clutch problem?
yes. sounds exactly like the symptoms i had, which motivated me to write this blog post
Thanks Jerry! I just used your clutch tip to fix my 25 year old EP755.
Thank you for posting this up man! You ROCK bro! Worked on this chair for several days and was about to assume the pc board was bad. Came across your article after several searches over several days. My symptoms were a little different and the rubber inside wasn’t completely deteriorated, but it had gotten soft enough to make the clutch stick and the chair not work. I doubt I would have ever thought to look there for the problem.
Your The Man!
Thank you! And my back REALLY thanks you!!
Thank you for your detailed post! I’ve never done this kind of repair myself before but decided to attempt this following your instructions. The up/down function of our massage chair was not working and would beep and stop. Your ingenious use of the plastic donut over the clutch plate worked! Now all functions on the massage chair is working again and hopefully keeps going for a long time. Thank you so much for sharing! Saved me $300 in service call and diagnostic fee!
WOW! Not sure how to THANK YOU! I knew the cost of repair was more then what i wanted to pay and with it non-operational i could never sell it and now that it’s working… it’s not going anywhere. Thanks for the post….fixed the issue as described!
John, I’m trying to fix my chair and can’t figure out how to remove the pulley nut. What tool / technique did you apply?
Thanks,
David
I just used a nut driver (socket wrench)
I had a similar problem trying to remove the nuts. The shaft would spin with the nut and I could not loosen them. Without doing the clutch repair, I got the mechanicals (everything except the remote control, where my problem now lies) working with some cleaning, adjusting, etc. So I suspect that if the shaft just spins with the nut then the clutch has not failed and does not need to be repaired, which is why I did not try very hard to do it. Does this make sense?
Also, thanks a lot for this post with the photos. It is a very clear explanation of how to get to the mechanicals, which really is step 1 for most repairs. I did download the service manual, and can highlight one very useful thing: follow your instructions to get to the mechanicals, and then in the lower left corner of the main circuit board, there is a button switch. With power on, press and hold that button for 3 seconds, and the unit goes through a 1.5 minute test sequence. The service manual has a full troubleshooting flowchart, circuit diagrams, etc.
Yes, the manual is quite detailed. Unfortunately, the test sequence didn’t tell me anything I didn’t already know.
I don’t like wedging the screwdriver in the clutch either. You could put a nut driver in a cordless drill and reverse it out quickly. But re-tighten it by hand. And when you get the nut adjusted and test the unit, put a dab of superglue on each nut to lock them in place.
Hi thank you for this post. I attempted repair of my old Panasonic massage chair and thought it was electrical. It is a slightly different unit but uses same mechanism, and has same symptom. Once in 30 tries or so, the up/down movement works.
Don’t remove the entire motor assembly off the rail, it has a position sensor that detects unit at top/bottom of the rail, and calibrated at factory. It is a small plastic wheel that slowly rotates as assembly moves up/down. Removing it will lose the calibration.
In the event that you mess up the calibration by accident, the service manual shows you how to adjust it.
where can I get the service manual to re-calibrate the wheel
This looks great. I’m 90% through disassembling the chair. I’m trying to figure out how to remove the pulley nut. Any suggestions on tools and technique are appreciated.
Use a fast drill driver with 10mm socket, and take a tiny screw driver and jam in small Space between wheel that spins and housing. That should do the trick.
im having the same problem david had with getting the nut off cause its just spinning. and I don’t see space for a screw driver. what else works?
You are a genius. Problem is, before I found this article that fixed it, I screwed with the little brown positioning wheel. So my massage mechanism went too high on the track and stopped. Do you know how to adjust the little clicking wheel to let it know where it is?
The adjustment procedure is in the service manual linked above.
Thank you very much for posting that. We were ready to throw our massage chair away. Works great now. Ours was just the up/down clutch.
Wow ! ! ! i admired you are a life saver been scraching my head for the same thing Wonder somebody can talk to me since i am not good computer 1st time sending e-mail over 60 years #303 469 3399 @Fed.Hts.’..Colorado 80260
Anybody have a service manual available? How about e-mail me one if are available!
It’s linked in the article already: http://blog.lincomatic.com/wp-content/uploads/2013/01/panasonic_ep1004.zip
How thick is the ‘plastic donut”? I f it is too flimsy, it seems likely that the repair won’t last very long.
it’s about 1/2mm thick. Actually, the thickness doesn’t really matter.. the donut is there just to keep the rotted black rubber bits from sticking.
I’m trying to build a glove that is composed of some of the parts that are in a massgse chair but i don’t know what type of motor to use in it. I’d like to know what type of motor is used in the chair above, please contact me when possible.
Sorry, I don’t know anything about the motors. You can see them in the photos. They are brushless.
I am replacing the belts in my recliner. two are no longer avalible. Any idea on how to substitute a different belt. ie. vacuume etc.?
Hi I tried every step following your instructions. disassemble and clean the rubber mess and put them back. the motor still stops itself after 10 second. Do I need to clean the other pulleys? I believe there are five of them. thanks.
Make sure you make the plastic pieces for each of the 5 clutch servos before you reassemble. The clutch wheel must not stick into the old soft backing, and it may still be even if you cleaned it. The plastic is the trick.
I have this chair, and was able to get it working again, but the remote control seems dead. By pressing the small test button on the circuit board within the chair, I can confirm that all motors, etc. work fine. But without a remote control, it is not very useful. Does anyone have a spare remote for sale or could point me to a source for one? I tried Panasonic, but got nowhere. Thanks.
Does the red LED blink on your remote when you flip the power switch on the back on/off? If so, I’m thinking maybe it’s just the On switch is faulty? You could take it apart and try shorting the on switch to see if it fires up.
My Ep1004 stopped working. When the lock on/off button on the back of the chair is turned “on” then “off”, the controller beeps 5 time with all of the lights flashing on the controller and the massage chair does not start. The rollers are at the bottom of the chair, so they are at the bottom of your back when you sit in the chair. Is this stuck? I have not tried your outlined repair yet.
Any ideas on the problem? I have unplugged it and tried everything.Any suggestions?
That’s exactly the symptom that my chair had before I repaired it. It’s probably either stuck clutches like mine, or a broken belt.
I have an EP1005 with a similar problem in that I get the 5 beeps, all the belts spin and then nothing. My massage mechanism was stuck at the top before I started taking the clutches apart, but by using the drill on the bottom right clutch (tightening the nut) I made the massage mechanism move down. I tried the “test switch” button for 3 seconds but it doesn’t do anything. 🙁 I checked all the clutches on the right side and found the rubber disks to be in great shape. I’m beginning the process of checking the voltages/resistance values as laid out in the troubleshoot guide. Has anyone else gone down this road? Since the motor spins up, all the belts look fine, and the clutches look like they are in great shape (rubber washer wise) I’m hoping to find one bad component on the board. Replacing the whole circuit board is the last thing I want to do 🙁
Do the plastic trick to each clutch. Exactly as he outlined. It will work.
Has anyone found the appropriate manual for the EP1005? When initial plugged into an outlet mine spins all the belts, flashes/beeps 5 times and shuts off without any of the clutches engaging. The test switch does nothing. The leg vibration button is the only button that does anything. I opened all the clutches and found them all to be clean. My PCB is labeled EP 589 UL/CSA. Resistance values for all the clutches is 57.7 ohm, V at the board connectors for the clutches was measured at 1.4 V DC. If anyone has any ideas I’d appreciate it. Thx.
Are you saying the clutch voltage is a constant 1.4V? The chair is supposed to activate one of them when you power it up. I would try measuring the voltage at each of them when it first powers up and see if it goes up for a few seconds.
I have a .pdf document that is titled Service Manual for the EP1004, 1005. I don’t know if it has exactly what you need. It looks like the part number for the manual is mew/hpd9603-1005. If you google for that you may find it. If you post contact info, I can email my copy to you.
Thanks to Ed for sending me the Simplfied EP1004,1005 Service Manual. It’s more of a dissassembly manual and parts list than an actual service manual, though. The file is linked above at the end of the article.
Thank you for saving my Panasonic chair. After a few hours of trying to get the bolts off the clutches, I decided to try some WD40. I sprayed a few mico sprays right below the freespinning brass wheels. That did the trick. I don’t know how long it will last but now my back is really sore from leaning over this thing.
I am the original owner of a Panasonic EP574 massage chair with VERY few hours on it. I forget to use it. (shrug)
PROBLEM: The massage carriage unit would move to the top of the track and then descend about 12″, stop, then shut off. The massage rollers would not move. The lights on the hand controller would flash.
After reading your description of the electric clutches, I took them apart, bending the frame out of the way, as you suggested.
Both rubber thingies were intact and not destroyed as you pictured, although they were gooey-like. Not knowing what else I could do, I just reassembled everything. BUT, lo and behold, the chair now works, again. The massage carriage now moves up and down the full length of the track and the massage rollers now function, too.
However, during my prior investigation I thought it was an “electric eye” sensor issue and removed that “black disc with all those holes and slots”. I believe the electric eye reads those patterns cut into the “black disc” to control the movement of the massage carriage on the track.
My question is: How do I fine tune the position of that “black disc”? I suspect when I reassembled that “black disc” I’m off a few teeth. When the carriage unit descends, it appears to try to go further than the track allows. I noticed a “white hash mark” on the backside of the disc, but don’t know what its alignment point is. Anyone know?
Thanks,
Doug
Oakland, CA
Hi, It sounds like the reason it’s working is because when you took the clutches apart, they got unstuck… mine weren’t all destroyed; one of them was just gooey. Your symptoms sound exactly the same as mine were before I serviced the clutches. Have a look at the service manual I linked above.. the Adjustments section tells you how to adjust the position of the carriage.
Nevermind. I figured out the “black disc” issue. I just repositioned it by rotating it one tooth. The “white hash mark” is now perpendicular to the frame.
The massage carriage box now doesn’t try to go beyond the bottom of the track.
I understand your “clear plastic disc” solution. But if you cover those tiny teeth with that disc, aren’t you preventing them from engaging against that gooey rubber?.
Thanks, John, for taking the time and effort to post your solution. I couldn’t figure out why this chair, with so few hours on it, would suddenly stop working. Since all I did was reassemble the clutches, I assume the outer nut holding the clutch together had become too loose.
John, drop me a note when you’re in the San Francisco area!
The tightness of the nut doesn’t affect the performance. If you examine the mechanism, the splines are what drive the pulley. As far as blocking the teeth, my plastic disc doesn’t do that. The teeth grip into the plastic on one side, and the friction on the other side is provided by the remaining glop. The proof in the pudding is that the fix works. If you want to get fancy, you can use a thin rubber ring, instead, but I didn’t find that to be necessary.
Get fancy? Heck no. If it works, that’s good enough for me. I’m just trying to wrap my head around why it works.
So, John, do you think dusting that goo with some talc would have the same result?
Where on the planet are you, BTW?
Doug,
Ah, OK, now I get it… I think you mixed me up, the writer of this blog w/ John, a commenter in this thread.
Since your clutches haven’t gotten so gooey yet, talc may actually help keep extend their lives. I think that’s a good idea, but it’s only speculation on my part.
I’m on So. Cal. Oakland is actually a nice town. A friend of mine moved there recently, and showed me that it isn’t such an urban jungle. Lake Merritt was particularly nice.
Oh, yeah. I saw the name “John” addressed somewhere and, of course, I thought they were addressing you. :O
I rechecked the operation of my chair last night to bask in the sun of my success. I pressed the button AND the same problem came back. So I get to open the chair, again. Oh, joy.
That clutch must be pretty darn strong to grip through your plastic washer. I’ll see if I can find a jumbo, thin, rubber washer at the hardware store.
I’m a two block walk from Lake Merritt. The weather is SO much better than SF and Berkeley, too. Life is good. It’ll be better when I can get this damn chair to work reliably. GRRRRRR!
SF, one bedroom rentals are $3,500. That’s pouring a lot of folks into Oakland, which is a short hope on the BART train into the city.
The two notorious parts of Oakland, which give it it’s bad reputation, are West and East Oakland. West Oakland is the first BART station out of SF. I suspect, perhaps not in my lifetime, that that part of Oakland will gentrify. Part of it has already started. GoogleX recently hired the foremost researcher on life extension. Who knows? Perhaps I may live long enough to see all that happen. 🙂
Talk to you later. I’ve got a date with a chair and she’s wearing basic black!
Doug
If you can’t find a washer, you might try fashioning one out of a bike inner tube or patch. I think the thickness of the rubber might be close to what you need. Good luck, and please report back how it goes. [UPDATE: DON’T TRY THIS.. IT DOESN’T WORK.. USE THIN PLASTIC DISCS AS DESCRIBED ABOVE]
My friend has become a total Oakland advocate. She lives near the art galleries off Broadway, and always tells me what a foodie paradise it is. I’m still most enchanted w/ Lake Merritt… what an unexpected urban paradise. Who would have thought that Oakland would have a bird sanctuary? I ran there early in the morning and it was so serene.
I think you’re right about the bike inner tube thickness being the right amount of thinness. I’ll drop by a bike shop and see if they’re tossing out any bad innertubes. GREAT IDEA!
You’re fairly inventive. Are you an M.E.?
Did you know the jogging craze actually began in Oakland? It was because of the muggers chasing us! 🙂
I was a bit apprehensive about jogging in the area I was staying … near Jack London Square .. it’s still pretty seedy, I had a lot of company by the time I arrived @ Lake Merritt.
I thought about being an ME, but decided that being an EE had a bigger job market. I’m a MSEE, but I still like to tinker w/ mechanical stuff.
MSEE? Impressive. Hot stuff.
I had a buddy that started off with EE in school and switched to ME, because he needed something more physical to wrap his head around.
I’m into Product Development (inventor). I had one invention go national through 550+ retailers. Managing 3 startups currently; one hardware and two websites. I have Technical Co-founders on the websites, because I don’t code. I handle the BizDev-side of the project.
Will I be seeing you on Indiegogo anytime?
Ok. After taking it apart and back together 3 times, I FINALLY fixed my chair!
At first, because it’s thin, I tried using aluminum foil to cover the goo. It worked for a day. Then failed. Don’t know why it would work and then not work.
I then went with a version suggested on this blog. I used what appears to be acetate film, which Amazon used to sleeve over new Kindles. The film is very shiny with near photographic crystal clarity.
After three days the acetate film solution still works.
Hope any of my comments helps any others that come after me.
It was such a struggle to find the solution contained in this blog. WHEW!
OK, I had to take mine apart again today, because it stopped moving up and down. It turns out that my bottom left belt was so stretched that my rubber hose shim hack still wouldn’t shim it out far enough to take out the slack. I wrapped the pulleys in a few layers of electrical tape, and it seems to be working perfectly again. While I was at it, I decided to try replacing my clear plastic discs with thin sheets of silicone rubber, thinking they would give better grip. It was a very bad idea. The chair started squeaking very loudly, the motor kept jamming, and the clutches got extremely hot.. so hot that I couldn’t even touch them. I had forgotten how the clutches work. The reason that the thin sheet of plastic works is because the clutches actually engage by squeezing the two metal plates together. Even though the bottom of the inner splined plate has teeth on it, it MUST slip against the plastic disc, or the motor will not turn. The plastic goo that we’re trying to cover up is attached to a fixed flat plastic disc that DOES NOT MOVE. After I took out my rubber discs and replaced them with my original clear plastic discs (which, by the way, were still holding up after a year), it’s now working well again.
Hello. We have the same Panasonic massage chair. When my husband and daughter moved the chair, the remote was in the side or back of the seat and was crushed by the weight of parts of the mechanism there. Do you know where I can get a replacement remote? Thanks for your help! – Kim
Sorry, I don’t know where to buy them.
Try Ebay
My lounger model number is ep1000, The on/off switch doesn’t work, any suggestion, please
Thanks so much for your help. I really was lost in how to address the chair rollers not moving at all. Using your diagrams I was able to disassemble the clutches were the problem was. Now it works fine…..Thanks
Hi! Wish I could hire you to fix mine. I am in NJ. You are in CA? Know anyone in Northern NJ who could help me?
My Handiman took my chair apart following the directions on this site and directions from Panosonic. We ordered all the new belts that were avalible and made new clutches out of plastic, ( cutting circles out of plastic containers) I even got new 2 1/2 inch wheels at Home Depo and he replaced the old wheels that had turned into a sticky mess. It works pretty well. I just plain like this chair. I bought a new Massage chair but gravitate back to my old one that is so comfortable. Good Luck.
I had same problem on my Panasonic EP-750 massage chair.
Since this up-down motion clutch is placed up side down, it requires more magnetic power to engage the clutch plate.
I just simply took off a black rubber ring and spring plate then started working without problem.
Thank you for a good hint.
Mark
I have an e.t.a 10 2010 Masonic massage chair work in the morning timer wouldn’t turn on in the afternoon. leg vibrator still works but no lights I opened up the controller Encino burn spots on the circuit board. it’s as if a fuse has blown from the upper part of the chair. well the vibrator for your legs works fine. does anyone have any suggestions on how I can fix. works perfect except for this electrical problem.
Well I guess voice dictation did not work. My model is ep 1020 panasonic about 20 years old.
Found your video and am excited, in hopes that I can figure out my old massage chair. My chair is a EP578……quite old. But do you know of anywhere I can attain a manual for my chair. It has died on me after many years of great massages.
The EP578 Service Manual can be downloaded (for free) from https://philips.encompass.com/shop/model_research_docs/?file=/MSC/sm/EP578.pdf
Thanks! I added it to my collection. In case they take it down, I now have a local download of it above.
Why not just use naptha or mineral spirits to clean the goo. Is a replacement ring needed. I’ve got to the 2 cliches so far, still no movement. Will try the remaining cluches.
The replacement ring isn’t strictly needed, but if you don’t put on in, the clutch will eat away at the plastic below and eventually wear out. Better to put in a replaceable part.
You shouldn’t have to replace random clutches. Examine the mechanism to determine which belt affects the particular motion that isn’t working correctly (or you can zero in by looking at the repair manual … they label each of them). If the motor turns and the belt doesn’t, then that’s the clutch you need to fix. I only had 1 bad clutch in mine. The other problem was just a loose belt, which I shimmed with electrical tape.
Thanks, I get your point. Right now my motor and all belts ant cluches are moving but none of the gears are moving. I hit the test button and the remote beeps 5 times and all lights flash and the it stops. Iam guessing – check all the clutches.
George, yep. Sorta the same happened to me. The clutches were weak. They would engage at first and the rollers would climb up the track a bit and then the clutches would fail. The handle controller lights would then blink.
My chair is rather simple. One clutch operates the roller unit up/down the back of the chair. The other clutch operates the rollers.
Sounds to me that you need to follow Lincomatic’s directions about opening up the clutches and doing what he suggests. I experimented with foil, but after that didn’t work long term I went with a material more like what Lincomatic suggested.
Same here. Bought in 1997. Stopped using for a while then when I started it could engage by pushing down on unit. Now only the belts spin. So how do i know the cluch is engaging. I am assuming the clutch is activated by magnetic action? Or should check the voltage at the leads.
On mine, the first thing it does is activate the shiatsu kneading action. I think if that particular clutch fails, then it won’t even bother trying the to activate the others. So I would check that one first.
It really isn’t that hard to take them apart, but if you prefer, you could test for voltage at that clutch’s input first, and also test for an open circuit on the clutch coil.
I am a 55 year old woman and just fixed my chair thanks to your wonderful instructions! The chair hasn’t worked for months but is great now! Thank you so much!!!
You’re quite handy! Glad to be of help!
I love to fix things lol :p I do have another issue though. It is very hard to lift the leg part. I think the shock or hydraulic part, whatever it is, is bad. Can you tell me what part to order and how to change it out? I can’t seem to find anything on that issue.
Ok, the shock is for the back. :p Maybe a bad cable?
I’m not sure if we have the same model of chair. I don’t think there’s a hydraulic part on the leg section of mine. It seems to be just spring operated. Sorry, if it’s an old chair like mine, the parts are all NLA.
Yeah I was looking at the wrong part. I guess you just have to be strong to put the leg part up lol The only thing that doesn’t work now is the back. When you recline it doesn’t come back up by itself. But I can deal with that. Thank you for getting back to me and thanks again for posting such easy directions! I’ve missed my chair…:)
You’re quite welcome! Glad to be of help. I went through such a huge expedition figuring out how fix mine (almost threw it away), and was surprised that no one else had documented the procedure.
My unit tries to go beyond the lower limit, hits the bottom of the frame and is forced to shut down. How can I adjust the limit switch/sensor so it will not continue to try to drive itself downward?
The procedure is in the service manuals linked in the article
Thanks for your response. Unfortunately, adjusting the up/down sensor gear does not make a difference. I have tried adjusting it about 12 clicks in each direction. I am assuming something is wrong with the electronic portion of the sensing process???
Does it stop properly when at the top position? If so, then the position detector is definitely working, but misadjusted. If it has problems at the top and bottom, then it’s broken. Assuming that it’s still functional, you need to adjust it counter clockwise to move it higher (see page 22 of the EP578 service manual).
Hi there – I have an EP 1000 that is not powering on but I think that it’s a little different than your model so I was wondering if you could point me in the correct direction for the manuals for that model? Or possibly something else that would help? I just bought it from someone locally yesterday and it worked fine (used it two times) and now it won’t turn on… I appreciate the help in advance
is the slide switch by the power cable turned on?
Sorry I was not notified that you had replied to my comment at all I came back because it started doing something new now 🙁 Yes the switch was on I appreciate the equivalent to the “is the TV plugged in?” lol The issue now is that when we turn it on it beeps continuously.
Sorry i cannot help you. I am not even sure which model I have. It is about 15 + years old, but that is all I know about it. My chair tries to continue its run well past the bottom of the track and the adjustment wheel for this movement has no effect whatever on its movement.???
Takes about 30 minutes to repair the “klunk” non start in your chair. Just follow the excellent instructions.
Just do not remove the sticky rubber bushing.
Hi. I have 2 Panasonic massage chairs. The one I got in 1996 was a about $1600 and the one in 2000 was $3500 but the cheaper older one was the one with the real hard effective massage. The more expensive one had fancier wood arm rests and leather but the massage is a joke. The serious massage one did the clicking thing for a few uses in the last few months and finally stopped working. I am not sure I will have time to do the repair with my To Do list already going back to 1992 LOL but wanted to appreciate your great tutorials.
IMRAN
I have the 4005 series, my massage chair was working fine then suddenly stopped completely after a short circuit in my home. I checked the fuse and it was blown, I replaced the fuse but as soon as I plugged in the chair, the fuse blew up again. I’ve already blew three fuses, chair is completely unresponsive since. Any ideas as to what it might be? I would really appreciate any help.
By the way thank you for this one of a kind amazing tutorial!
Daniela
Edit to my first post regarding chair not working due to blown fuse: I have the EP1005 model, I apologize for my mistake.
Daniela
Thanks a lot man it worked on my massage chair: sweet!
Hi,
Do you where I can find a service manual for model EP1017
Just finished fixing my chair. Two of the clutches were stuck. Your instructions made the job easier and kept my cost to 0$. I know I would still be trying to figure what to do. THANKS! THANKS
James
UNBELIEVABLE !!!! Thanks so much
Dave
I have Model EP1010 and there is no service manual available that I could find. I read you article and recognized it as the same problem as mine and wondered if the mechanics were similiar. They were!! My wife was just days from buying a new chair. Your info saved me thousands !!!..
I bought one of these chairs at a garage sale for $100 that wasn’t working. Turned out it was the up/down clutch. I fixed it using this simple method and now it works great! Thanks so much!
Do you know where to get replacement belts for Panasonic EP578?
Mahalo,
Ron
If you want belts for massage chairs, try Belt Palace in Warsaw, Indiana:
http://beltpalace.com/info.html
They know everything there is to know about belts for massage chairs and they will supply you with the nearest fit to your requirements if you give them the codes, usually written on the outside of the item in question, and measure them carefully. They worked wonders for me!
I was just about to put my chair out for trash pickup , thanks for the help
Thank you so much for a nice post. I have a Panasonic EP 1010 massage chair with a smilar problem. Last night, I fixed the massage and up/down clutches as instructed. After the fix, the chair went chaos. Since the level position was changed during the fix, the massage hardware module tried very hard to move up even when it hit the top. However, I could not let it moved downward. I was wondering what happened. Did I make the situation worse? Could I ever make the chair work again? Soon after, I realized that the short belt connected to the motor was marginally tight and became very loose after the fix. The pullies on the top of the module were turning intermittentingly. I placed a tire wall stripe (used in a tree staking pole to tight the tree in place) between the motor and a metal plate. It tightened the short belt and the chair worked again. After that, I had to adjust the level detector wheel to move the massage hardware module down to the proper position. The chair worked again. This morning I got my cup of coeffee and rushed to the chair. With a smile in my face while sipping the coeffee, I was totally pleased. Thank you so much. Some 30+ years ago, we hired a PHDEE into the AT&T Bell research not only because he was a good researcher (there were many good researcher to choose from) also because he liked to fix his car which was not that common for people doing research. From your post, I know you must be an excellent engineer with a mind of curiosity, ready for new things to be discovered. Thanks for all the good discoveries on this Panasonic chair.
It’s not uncommon for the limits to get out of adjustment when you make the clutch repair. The manual describes how to do the adjustment. Just do a google search and you can download the manual for free. The same thing happened to me. I was worried that I had broken the chair. It’s now working great again.
My panasonic chair’s belts move but then the remote blinks and it shuts off. Similar problem as you describe but there doesn’t seem to be any clutch as the culprit. Any ideas? Much obliged for the tutorial, looks like it helped a lot of people.
How are you testing to make sure all of the clutches are engaging?
I’m not sure I know how to do that. I see the wheels spinning and the belts moving. None of them appear stuck. How can I test whether the clutches are engaging?
Sorry for the delayed reply. I was traveling. Sounds like one or more of your clutches is sticking open, just like mine. When one spins normally, but there is no motion, this is an indicator that it isn’t engaging. I would start with the massage clutch, and then the up/down clutch, and after that, any other remaining clutch. Test after repairing each one.. if it works perfectly, then you don’t have to fix any more of them!
Thanks a lot! I will go through that protocol. I see everything spins and then reverses and at the same time the remote flashes and then shuts down. I have the manual for my chair so I should be able to determine which clutch is which.
hello , I live in Brazil and would like to know where to find the kit belts chair massage national EP3510 ? Gratefu
Sorry, I have no idea where to get the belts. If your belts are just stretched like mine, you can try putting tape on the pulleys like I did:
http://blog.lincomatic.com/?p=1664
If you want belts for massage chairs, try Belt Palace in Warsaw, Indiana:
http://beltpalace.com/info.html
They know everything there is to know about belts for massage chairs and they will supply you with the nearest fit to your requirements if you give them the codes, usually written on the outside of the item in question, and measure them carefully. They worked wonders for me!
Thank you very much for this super clear detailed explanation. I had a similar problem, I did the repair on the 2 clutches as you described, I did not repair the other three. Anyway, the chair is now working again so I am hoping I don’t have to go back in and do the others! Thank you so much for thinking of others and making the instructions so clear. This is Internet at its best.
Thank you very much for your expert solution to Panasonic massage chair repair. You are an absolute “genius” and I am deeply indebted. I have a model EP1011 that I purchased about 15 years ago for around $4000 that I always loved but it stopped working about two years ago and my wife wanted me to throw it out. It had the same problem you mention….the motors would spin for a while, with no motion, and then it would stop. I called Panasonic technical service several times and their response was that it was probably a clutch problem, that were no longer available, and that I would have to buy a new chair for over $5000. I followed your instructions and “lo and behold” the chair now works perfectly. I am going to notify Panasonic of my deep satisfaction with them….they could have had similar plastic washer discs available for nominal cost…but instead suggested I had to buy a new chair. I can not thank you enough.
The above comment should have read deep “dissatisfaction” with Panasonic. I have bought many relatively expensive products from them over the years but will probably never buy from them again because of their response and lack of needed assistance
I followed your procedure and found the parts clean as new. The problem seems to be electrical. If the controller is bad is there a source for replacing that?
I’m not sure.. I found this place using google: https://www.encompassparts.com/modelbrowse/MSC/12/3
I’ve got a Panasonic EP1004 that I’m willing to give away for free. It is in good shape. The mechanicals all work as they should, but there is a problem (I think) with the remote control, so I have not been able to use it much. The only way for me to make it work was to push the little test button on the control board – that would get me a 2-3 minute demo massage. I got a new chair, so am willing to give this one away.
I’m in Redwood Shores, CA, which is near 101 x 92 on the peninsula in the SF Bay Area.
Whoever gets it must take the whole chair – can’t just take parts. I believe the problem is in the remote, and that it is fixable, I just have not had time to get to it.
You can respond to me here or at my email, which is dr ed wilson with _’s in between those 3 words, and it is at yahoo.
I have a slightly different chair but your fix worked great! If you shoot me your paypal address I’ll be glad to buy you a beer!
Glad to be of help! We can just share a virtual beer together 🙂
Sounds good! Tis the season.
Thanks again.
I have a Panasonic EP1010. The belts need replaced but I cant find them anywhere, does anyone know of any replacement belts?
If you want belts for massage chairs, try Belt Palace in Warsaw, Indiana:
http://beltpalace.com/info.html
They know everything there is to know about belts for massage chairs and they will supply you with the nearest fit to your requirements if you give them the codes, usually written on the outside of the item in question, and measure them carefully. They worked wonders for me!
Thank you so much for the information I repaired my EP 1010. It works fine again also someone gave information on where to buy belts. Mine are starting to slip although this thing is 20 years old we still like it. Thanks again.
have to push really really hard on power button to get it to turn on, wanna just buy new remote, since it just plugs in easy, but where? from who? how much?
Does the remote open up easily? If so, you can probably just clean the contact under the power button. Wipe with an alcohol swab, and scrape the oxidation off
Hi! I got used one model EP 585..it works for 1 week But the rolling massage button work just 1 up and then down it stop..but I ignore it maybe that’s how it works.. but now when I press the button it doesn’t respond at all except the foot massager..I notice when you select restore green light blinking and that’s it..any idea? Thanks
Probaby the same problem that mine had. Follow the instructions above for fixing it.
need a replacement control pad, the on/off button doesn’t do it any more. model # EP 3222 panasonic real pro elite
glad pay a service company to come replace and maintain my chair
I have a model EP1082TL with a controller (pad) just about shot with 1 button left that still works the massage chair. The massage chair itself is in perfect working condition. Looking for a repair shop near Aurora, CO OR a replacement controller IF I can replace myself? Thank you.
Found the service manual @ http://www.servicemanuals.net
I have a Panasonic EP 582. We had an electrical surge which blew out the transformer on my chair. Checked voltage coming in (120v) but nothing coming out. There are 2 secondary outputs, but since the transformer is dead, I can’t tell what the output voltages should be. I looked through the schematic and service manual for the EP578 (seems very similar) and it references one output voltage of 24v and one of 120v. Seems strange to have 120 coming out?? Can anyone tell me what the voltages should be for the two outputs from the main board transformer?
Page 24 chart shows which pins and voltage.. 24 + 120V
Which is the 24v and which is 120v. Wire colors dont match my transformer. One secondary goes to a connector next to the primary 120v source connector and one goes to the other side of the board. I don’t know which should be 24 and which is 120? Also, why 120v in AND 120v out? What value is the transformer in this situation? Acting as a thermal fuse?
Great work. Still trying to get my EP1005 to work. Checked the 2 clutches you mentioned. Both washers are whistle clean and look brand new. Controller checked out electronically. Someone suggested testing the motherboard. Now of course you mention 2 or 3 other clutches which I will have to check.
I had the same original symptom (motor/belts run but clutches don’t engage) but when I took apart the clutches, all the rubber gaskets were in perfect condition. No gunk anywhere. When I push the test button on the PCB, I have no movement whatsoever apart from the belts cycling.
what do you mean by the belts cycling? one of the motors is turning, but nothing happens? if so, it still sounds like a clutch that isn’t engaging properly.
Did you find a solution? My EP1010 does the same thing. Belts cycle a couple seconds in each direction then stops.
I have a EP1011 which has been seating in corner for a couple of years. I was thinking of taking it to an electronic repair shop but surfed the internet for any solution and found this article. Other than minor differences in how to get back cover of the chair (mine had a zipper), it was right on. Your awesome, thank you so much!!!
glad it helped! I wrote the article because I too, surfed the Internet, and couldn’t find any articles on how to fix it, so when I finally figured out mine, I thought I would write it up for the benefit of other frustrated Panasonic owners. What a bad design!
How did you fix your Panasonic M LoungerEP 1011?
Did you fix the up and down clutch? I suspect that’s the problem of my chair.
Thx!
hello EverReady
i need service manual.i don’t know what is the model number but .
i can see the number (EP755.7)(EP755K260)on the PCB board
thank you so much!!!
I am so impressed with all this but my 14yr old Panasonic is an EP1015 and looks a little different back there, and my up/down is the only thing that doesn’t work, I used to be able to juggle the knead/tap/roll buttons and get it to work, not anymore though, I can hear it shift to roll function but freeze, then three blinks and off, so I found the one repair guy in all of LA County who would look at it, he just left telling me the up/down motor on the right is frozen dead and they don’t make them anymore, I asked about clutches and he laughed that off which makes me a little suspicious – you’re obviously way knowledgeable and know exactly what you’re doing –
if it is motor is there a way to take them apart and fix them? Or do you have any suggestions for me+my chair? I love it don’t want and can’t afford a new one, I’d pay anyone anything to fix it, a friend who fixes his mechanical stuff told me to ask you if you think it is the clutch issue with mine too, if so he’d come try to fix it, he originally sent me this link.
Thanks so much for any info!
Based on the fact that juggling it around used to work, it sounds an awfully lot like a bad clutch. Check to see if the belt is turning on the motor. If it is, the motor isn’t frozen, and it’s just a bad clutch.
Omg you just made my day, all 4 belts are turning easily, I wish I could add a picture here and show you he was trying to turn this odd headed screw encased in white plastic he said was the “manual” way to turn the up/down function but he couldn’t turn it saying it was frozen cause motor was dead, I just looked again at your pics I think I see you have that same screw below the upper right clutch, anyway i’m going to go through neighbor’s recycling or something so I can prepare my plastic, my friend will probably come over this week and help me do this, I will SOO happy if we can do this, I actually have a bad back so i’ve used this chair almost every day for the 14yrs I’ve had it, I can’t afford a new one and don’t even want one, I only use the manual controls, knead and roll – i’m not a fan of bells and whistles on these new chairs – I’ll let you know what happens
THANK YOU!
Hey also this repair guy does know a place in Santa Fe Springs Ca that carries belts for older Panasonic massage chairs, I will try and find out what the name of the place is from him and post it here, he also said “Inada” bought Panasonic and by next year they might carry parts for older massage chairs, but I doubt that, they make chairs that cost 10k why would they bother with parts for older chairs but I’ll keep up on it anyway just in case.
I got a Panasonic chair off craiglist for free because it didn’t work. I found out the little 3 amp fuse had blown at the power supply, replaced it and the chair started doing what ever body else’s chair was doing. I stumbled across your blog and within an hour the chair was working beautifully. I can’t thank you enough for posting this… I love the internet and hopefully I will document some fix for others to benefit from in the future. Here’s to the start of a Happy New Year.
thanks for the feedback! it’s messages like yours that make it worthwhile foe me to document my findings
Thanks for posting this solution with the clutch problem !
By the way do you know how to fix the home position for the kind of chairs
The procedure for adjusting the home position is inside the linked service manual
Hi I’m finally back after almost two months of nagging/pleading, got my gearhead friend to finally come over and try your clutch repair, I think we shredded the rubber washer by putting it back in the wrong order, he says it was a little shredded when we disassembled the clutch, whatever, when we reassembled the bad (upside down) clutch with new plastic guard it spit the rubber washer out totally shredded, I say that couldn’t happen if it was tight in the groove, i.e. in the right place, anyway, we put it back together again sans rubber washer, plus we cleaned out all the gook on both sides of the clutch, hope that’s ok, placed our plastic thingy in just like yours, and voila it does work, sort of, actual roll button doesn’t work, blink blink off, but I don’t need it to work as a setting really, all I use is knead on highest setting, that works, then I just use the up/down press n hold black arrow buttons to make the knead slide up to knot in my back n stop, then move a little higher to the next knot n stop, and so forth, that’s all I ever used before, manually making it go up n down to knead out all areas of my back n neck that need work, so, the chair works for my purposes, I don’t know why actual roll button makes it blink blink stop, and another sort of odd new thing is when it gets to a point at either end of the track it rolls on it’s own to the end and stops waiting for me to reverse the direction with the black up down arrow buttons, this may make no sense if people have another model without these arrow buttons, but whatever it’s useable and great and I will now search our few vintage hardware and repair shops for replacement rubber washers unless you know where to get one? I think without it metal on metal, not gonna last, and maybe that’s why current problems? I’m THRILLED though, I forgot how EXCELLENT it feels, how relaxing, just had a long session on it so THANK YOU GUYS! We never in a million would have ever thought that up you’re brilliant really…want to say from lying on a lacrosse ball, entire back neck plus butt cheeks for any leg issues, my back is stronger since this chair broke, but the ball cannot replace the relaxing and therapeutic effect of the movement of this chair, no way, so I’m extremely grateful to you, thanks a million times over, and let me know if you know how to get rubber washers..
First, make sure that the belt that’s driving the up/down roller isn’t slipping. My belts were stretched. I could’t figure out how to add tension, because there isn’t any way to adjust it, so I wrapped the pulley in electrical tape, and so far, it’s working. Maybe duct tape would be better.
I don’t think you can buy the rubber washers anywhere. I would suggest fashioning one from a thin sheet of rubber. You might have to glue it in. As to where you would get a thin rubber sheet cheaply … maybe cutting a chunk off a large bicycle inner tube? A patch kit for an inflatable boat? Let me know how it goes…
The larger washer on my chair (which is not a gooey mess but a yellow nylon type) might be replaced with one from the hardware store that is for a kitchen sink soap dispenser. It is a bit thick but fits perfectly. This made my chair work but you should clean out the rubber that gets worn off after about 10 uses. I’m still experimenting.
Thank you for this web site!
Actually the next morning the chair was dead completely, like blink blink off immediately no functions working..maybe it was the coconut oil he rubbed on the chain, I’m avoiding googling that I don’t want to end our friendship over this chair but grrrrr….he wasn’t focused, anyway thanks for those great suggestions, I think the belts were all working fine, but when I get over my rage I’ll open it up again and see what’s up, it was kinda torture to get one massage remember how awesome it is then it went dead…I think we had that one simple clutch to amend but he got the order mixed up and chewed the washer omg still makes me really mad! ha…ok I’ll be back, thnx again
Chain? What chain? You mean belt? Rubbing oil on the belts is a huge no-no! It makes them slip!
You need to wash the belt in soapy water, then use some denatured alcohol or acetone to remove the oil from the pulley.
You might be able to use belt dressing instead of my idea of putting tape on the pulley. Just buy a can from Walmart or an hardware or auto parts store
and spray it on both the belt and the pulley after you clean them
I just googled coconut oil on a work chain, it took me to a bike forum and the various answers to the guy’s question made me really howl, no straight answers but reading it put me in a much better mood!
No not oil on the belts, I just partially unzipped the back fabric, mine zips off all the way around it’s a huge hassle, anyway I remembered chains being on each side but it’s just teeth, teeth the motor grips to move up and down, he rubbed oil on the teeth on both sides, I turned it on and the motor did move to the bottom position, but I think out of gravity from the oil not any kind of function control, lights blink for seconds then off. All belts seemed to be tight and spinning, would goof off get the oil off the teeth? and what is a pulley? sorry this is all foreign to me, hence my helper(not) who fixes his own cars n computers, I understand the five or so belts that wrap the clutches but I don’t know what a pulley is in this..
A pulley is the round thing that a belt turns. See this photo http://blog.lincomatic.com/wp-content/uploads/2013/01/screwdriver.jpg . The belt rides in the groove in the pulley. I f the pulley is smooth like the one in the photo, then the coconut oil is a no-no. I don’t recall any chains in mine. If it’s a metal chain, then the oil is totally OK. if it’s a belt that has teeth on the inside, and the pulley also has teeth, then the oil won’t make it slip, but it might eat the belt over time, so it’s not advised.
BTW, if the belts all seem tight and aren’t slipping, and it was working OK recently, then I would guess that the up/down clutch is slipping. Reference this photo: http://blog.lincomatic.com/wp-content/uploads/2013/01/guts.jpg I don’t know which model yours is, but if the mechanism is of similar layout, that’s the clutch that would cause it to stop moving up/down.
I have followed your advice and put a plastic ring in both the up/down and massage clutches. It works for a few times and now when I turns the chair on, it will turn off after all the lights on the remote blinks. What is wrong? When I have the chair opened, I can turn the massage clutch manually and it will go wide and narrow in both directions. But I can only move the up/down clutch down but not up. Is that a problem? Also, how can I tell if the rollers went too far and need caliberation?I cannot find the caliberation instruction anywhere on the web. My chair model is EP1005. Thank you very much for your help. You are such a life saver.
it sounds like a calibration problem. The service manuals for two
models are linked at the bottom of the article. If yours is a different model, the procedure is probably similar
I did the caliberation and it works. We were so happy, but when we turn the chair off and on the next day, we can hear the motor but nothing move and it flashes after 3 seconds. We have to turn the main switch off and on and then it will work again. Also, seems like rolling and threading works better than the program. Any idea what else is wrong? Thanks.
How do I test if the clutch is working or not and determine if I should unscrew the nut and put in the plastic? Thanks.
In my case, the clutches would not release, because the decaying rubber would make them stuck closed. When the chair is turned off, all of the clutches should be in the open position, so if turn a belt, there should be no motion
Thanks for the fast reply. Just want to be clear, if I open the chair and turn the belt and there is no motion, I should put in the plastic for the clutch that has no motion? Thanks.
No, it’s the reverse. If the chair is off and turning a belt results in motion, it means the clutch is stuck closed, and needs repair.
Hi! I’m really hoping to get the same amazing outcome as so many others in this blog. I know nothing about how to fix anything mechanical really, but I’m willing to give it a shot.
I have a Panasonic EP3222, very little use (we bought it off of Craigslist from a guy that broke his back and couldn’t use it). After a few months it just stopped working.
It powers on and lets you pick a program, reclines the back and legs…. then beeps and flashes 5 times and completely stops. If you continue to try to pick a program, it makes a horrible noise until you turn it off.
I’ve tried turning it off on the switch on the side, and unplugging it. But that doesn’t work.
Please help me!
~Cindy
Hi thank you for this post. I attempted repair of my old Panasonic EP1014 massage chair and thought it was controller. I just follow your instruction to disassemble the clutch. I find the material on Ebay to replace original rubber ring.
https://www.ebay.com/sch/i.html?_from=R40&_trksid=p2047675.m570.l1313.TR0.TRC0.H0.TRS0&_nkw=300x300x0.6mm+Black+Silicone+Rubber+Sheet+Self+Adhesive+Pad+&_sacat=0
I use the clutch plate for outline template and US quarter for the hole template on a silicone rubber sheet. I use x-acto knife to cut the outline and the hole. The dimension of the rubber ring is outline 50mm x hole 24mm x thickness 0.60mm. To make it easy for assemble and disassemble the clutch, I drill a small hole on the side of clutch disc with the drill bit size 1/16”and about 1.25mm deep. I use metal pin that has the same size 1/16” to stop the clutch disc against the case and tight the nut. When assemble the clutch, make sure the rubber washer under spring disc is on center because the hole is a lot larger than the shaft. When the rubber washer slide off center too far it will cause a lot of strange problem when starting the massage chair. I had to disassemble the clutch second time to fix the problem. So far it working very well. Thanks again for your post.
cool! thanks for sharing!
Fixed my non-working, 5 beeps at startup chair! Bought for $10 now works like a charm! Thank you!
Wow, $10? Awesome!
I followed the procedure and the E1010 is fixed. Thank you. I cut out the plastic templates for two solenoid motors. Ended up not using them; just used denatured alcohol to clean the rubber gasket, which were intact.
Short story: It’s fixed! Thanks.
Long story: I bought a Panasonic EP573 Zero Gravity Massage Recliner (I put all that in here as searchable words) for my dad as a father’s day gift almost 20 years ago. He camped out in it all the time and let me spend hours in it whenever I crossed the country to see him. Fast forward to 6 yrs ago. He had a stroke, moved to a nursing home and his chair came to me. It had that same symptom as most others here (“third time’s the charm” turned into “8th time”…”17th time”… etc.) turning it on until it finally didn’t do anything but make motor noise. The official Panasonic repair place said I had to replace the entire block. But, since the tsunami took out Japan’s warehouses a few years ago, there were no parts available. Wife “strongly urged” me to get rid of Dad’s chair. I had looked but never found a Zero Gravity chair that fit me so well (and I’m kinda attached to this one, obviously) so there was no easy replacement.
Thank you for your detailed write up. From the pictures, the block on my EP573 looks more like your EP1004 than to the EP578. I was able to open up the clutch by holding the other end of the shaft with a vise-grip and using a 10mm socket. Yes, the rubber was very gooey, so I completely removed it and wiped it with alcohol instead of inserting the plastic like you did. I don’t know if having nothing in there is ok (PLEASE let me kow IF it really NEEDS to be in there), but I read that it was for noise damping and I don’t mind a little noise. We’ll have to see if I still feel that way after a while. If so, I’ll order the rubber sheets off eBay and insert your plastic rings over them.
For now, I’m SO excited that it’s working that I could jump for joy (and if jumping hurts my back, I’ll have another reason to go for a chair massage again in Dad’s chair)!
Wow, awesome story! It’s probably OK to just leave it as is if it isn’t slipping, but I think over time, the teeth might start to wear, and it might start to slip. You can just cut new rings out of rubber sheets and insert those instead of my clear plastic. You don’t need both. If you have some old bicycle inner tubes, you can get rubber sheets out of those. Just be careful about the thickness of the rubber. It’s been a number of years since I did this repair. Upon re-reading my article, I noted that using rubber that’s too thick will cause it to malfunction.
Last Tuesday I sent a short note and photo of my electronics board to your hotmail address. I wanted to be sure you receive it and await your reply. Thanks again for your expertise!
Thank you for this tutrial. It really worked.
I am really grateful to the holder of this site
who has shared this enormous piece of writing at at this
time.
I moved lost my controller just purchased it in August 2018 I have thetthe 3D electric tapping asahi 789 massage seat need the company phone no so I could order one please I need help
Thank you lincomatic and all contributors. I am the newest and happiest chair saver. Was on the verge of tossing it when I was told I needed new head unit that is not available anymore. Was searching for parts and came across this.
On a lighter note I also came across our Panasonic chair formerly sat in by Phil Mickelson available now on E bay. I will attempt to paste photo below. Hope that new owner doesn’t end up with stuck clutch….
/Users/ekrogich/Desktop/Screen Shot 2019-06-12 at 9.04.01 AM.png
No good deed goes unpunished. In my post from Dec 2018 I said that Dad’s chair was working. It was so wonderful that I convinced my wife to let me put it in the livingroom with her furniture so I could tolerate, I mean “watch” her programs with her (as long as the chair was on).
Now we all know the rule is:
If it AIN’T broke, don’t fix it, but if something works but doesn’t have the 0.6mm high temp black rubber, is it broken? Anyway, I decided to “fix” it. Stupid me.
I got the silicone off ebay, as suggeseted in this article. I surgically cut the exact size discs and placed them into the clutches. It all looked and sounded like it was working, but I noticed that the rolling and massage motions were so weak they could be stopped just by leaning on the rollers. The thing was way too weak to do any good. I re-opened it the mechanisms, pulled out all my precision handywork and re-assembled the chair.
This time, it worked just like it did before I ever even opened it up. I mean DIDN’T work just like before.
I press the On, I hear the motor running, and after 15-20 seconds, all the lights start flashing in error mode, and the chair shuts off. I’ve opened it several times looking for the culprit. This is the EP573 without the “Tapping” mode so I’m wondering if there is another clutch that has the black gooey stuff. It acts just like it did when the two had the old gunk in them, so maybe there is a third one I missed. It acts the same way even with belts off both clutches. Please help. I can’t keep sitting through Hallmark and Lifetime faking bliss with a broken chair. Thanks.
Sorry that your repair wasn’t successful.
First, make sure all the belts are on and tensioned.
Is it possible that the position of the massage unit slipped while you had the up/down belt off? This will mess up the calibration. The chair needs to know where the massage unit is located in the up/down position. If the calibration is off, maybe it will stop working? There’s a procedure in the service manual for setting the up/down position – see HOW TO ADJUST THE POSITION OF THE UP/DOWN GEAR.
If that isn’t the problem, then it’s a bit more complicated. Do you hear any of the clutches click shut when you turn it on? If so, that means it’s activating properly, and maybe you assembled the parts incorrectly or in the wrong order. Take that one apart and make sure everything inside is in the correct position.
If none of them click, you will need a voltmeter. I would only attempt this if you are comfortable working around high voltage electric circuits. There is 120V inside, which can kill you, but the clutches are operated by a lower DC voltage (I think). One by one, connect disconnect a clutch’s connector, connect the voltmeter across it, and watch the voltage when you power it up. Unfortunately, I don’t know the voltage, but I’m pretty sure it’s DC, and should be between about 24-50V when energized. If you find one that has voltage during the power up, it’s one that’s being energized, and you should try to figure out what’s keeping it from moving shut when it’s energized.
Hope this helps. Good luck.
Hi! Did Cindy with the ep3222 get a reply? My beloved friend the massage chair turns on/reclines/ goes up but on any preprogram it will roll down then up then shake side to side and start flashing and shut off. I can do just legs and add anything but a roll.
I found a good solution for the rubber clutch filament. The iPhone screen protector are thin enough and slippery. Tried various plastic sheets, but the screen protector has been working for over 2 years. You may have to try various brands to find the best one for thickness, but I think that’s the solution ( thin enough and slippery).
I have an EP1010. I followed the instructions for adding the plastic disc. Now, just like you realized, the small belt on the other side is too loose. But for the life of me I cannot find any motor mount screws to adjust the tension on the belt. Any suggestions?
Follow the links to Parts 2 & 3 at the bottom of the article above
The motor cannot be adjusted to account for the reduction in tension of the belt on Panasonic massage chairs. Any adjustment would, in any case, be a short lived repair as the belt is worn. A new belt is required. Contact Jim at Belt Palace at Warsaw Indiana: http://www.beltpalace.com They supplied me with belts for my chair after I told them the numbers written on the belts and sent them some pictures. They don’t have every belt for every machine but slightly undersize belts work along with belt of the right dimension but with too many ribs: ribs can be cut away.
Thanks to Jim at Belt Palace, my massage chair is still going 3 years after changing the belts and fitting plastic disks to the clutches. 🙂
My wife has an EP-101; I followed your directions and it works great! I used plastic from the top of a box of Christmas cards. My marker would not draw the circles without beading up, so I put masking tape on it to make the marks. The tape made it a little easier to cut with an X-acto knife. The final part to disassemble, the metal clutch, would not budge. I was able to grasp the “spokes” with two needle-nose pliers and break it free. Thank you so much for these detailed instructions and pictures; it made the job very easy!! You’ve made my wife a happy woman.
Your post continues to live on! My wife threatened to throw out our 22 year old EP1004 unless my sons and I could fix it. we followed your instructions and installed plastic discs in two of the clutches and it now works! we ended up using a hard plastic material from a office document cover to make the discs. we noticed that the tightness of the clutch nuts makes a difference, too tight and it makes noise and won’t release and too loose and it won’t reliably engage – seemed to be a goldilocks tightness on the clutch nuts for it to work properly? a couple of the belts are pretty stretched as well and may be looking to replace them as mentioned here at beltPalace! Thanks again for posting this solution and saving the chair from the Garbage dump!
I have a EP1005. I followed all the instructions. The clutches were clean and when I ran the test the mechanism moved freely through the minute and a half process. But, when I re assembled the chair it went back to motor engaging, no movement, control flashes, then shut down. Could it be binding on something? At a loss.
I should also mention that before running the test I used a drill and box socket to spin each clutch. Each one performed its function, moving the mechanism, the rollers, etc.
sounds like maybe you a loose belt
Final update…I hope. The belts seemed fine, surprisingly very tight for their age. I began to think maybe the resistance created by the weight of someone sitting in the chair caused the clutch(s) to fail, where as running the test with zero resistance gave the appearance of no issues. So I broke down each clutch this time, clean them with MAF spray and placed a plastic washer in each as you recommended. Plastic cut from a Costco croissant container was perfect. Now it runs like the day we brought it home, way back in the last century. Thank you so very much, and my back thanks you even more.
That’s great news! Glad your chair is working again
well, need the ON/OFF button repaired or a new controller, however factory and shops say they stop holding parts after 8 years, my pristine unit works wonderfully, other than that, cant find anyone to repair it, so may have to donate it to someone good with fixing the remote. hate to put it on the curb
Just a quick note to say thanks for pointing me in the right direction. The clutches on my chair are a bit different and had no place to wedge a screwdriver to remove the 10 MM nut. there I was able to use a hacksaw blade to make a slot on top of the post then use a flat blade screwdriver to hold the post in place while I wrenched off the nut. Everything looked good upon disassembly of two of the clutches including the gasket so I put it all back together and everything seems to be working fine for now. Not sure how long it will last. Thanks again for your post.
Thank you for the help I have an EP 1010 I planned on it taking a couple of hours it took a half an hour and I used a sandwich bag for my plastic thanks again the chair is working it is probably 20 years old
Wow, a sandwich bag is pretty soft plastic. Hope it holds up
What have people used to make a rubber clutch washer? The 1.125 x .6 x .025 that drives in the clutch? Has anyone actually used an old bicycle inner tube?
I had that thought, but never got around to trying it, since the plastic disc was holding up. IMHO, an inner tube would best replicate the original rubber
I used cheep iPhone screen protector for the clutch. Has been working since 2015. Tried various other plastic and rubber rings. It’s possible some brands of screen protectors may be too thick. I lucked out on my first try.
EP1004 Thanks for the help. The plastic did the trick.
The issue I have now is the intensity belt is squealing when weight is applied. Any recommendations?
This site is great and thanks for the help.
I can’t wait to say thank you for your super clear explanation that guides me to fix my 17 year-old Panasonic EP755 massaging chair. My black rubber rings of all solenoids are intact and looking good in quality and shape. However, the motor just spins and no up & down motion as you described. Now, after I put new plastic rings (made from normal binder index, thin enough and cheap), my chair works like new. Here, I want to share some of my experience that may help to speed up the job. 1) add new plastic ring doesn’t matter the black rubber is good or bad, it helps. 2) do not bend the fan-shaped metal plate of the solenoid too much. 3) do not tight the top screw of solenoid too hard. Doing 2 & 3 too hard will stop solenoid working — at least it happened to me. 4) Never try to adjust the up/down sensor (wheel) unless it is necessary. 5) WD is not necessary. 6) Use impact driver & socket, with least torque, to open the top screw of solenoid. Handle with top attention and least force, or you may damage the screw pit & nut forever. Thanks again.
You’re a genius!
Your instructions were superb.
I was just about ready to buy a new one. You saved me thousands.
Thank you so, so much!!!!!
dude awesome got me going in the right direction and my 23 year old chair is messaging my broken back Ty
Thank you! Our EP1011 started having this problem after we moved to a new house. It would occasionally work for a while, but then progressed to nothing but the flashing lights. We followed your instructions to check the clutch, but the rubber part in the clutch actually looked OK, so we just reassembled it – and it’s working again, at least for now. Maybe it was just stuck? At least we have the information on how to fix it if it starts acting up again.
sounds like the clutch was stuck. it’s probably breaking down and getting gummy, but hasn’t disintegrated yet. glad you got it working again!
Thanks again! We were going to give the chair away, but now we’ll be keeping it!
WOW you are The Man, i was just about to take chair to the dump and saw your blog, Took 20 mins and chair is working perfectly
Thank You So Much
As others have, I want to thank you for posting your repairs. In my case when first turned on the motor moved forward and backward but not up and down. In fact I didn’t know it was supposed to also go up and down until after it was repaired. The upside down clutch (lower right) was the culprit. The rubber gasket looked fine, and I almost didn’t replace it. I touched it and realized it was sticky like glue. I made the plastic piece, installed it, and it works great. Thanks again!
Thanks so much for this advice. I followed your instructions and my Panasonic ep1022 chair works perfectly. It was a little tricky getting the nut off the top of the spindle. I use a pairing knife jammed between the two clutch plates to get enough friction to remove the nut. When I disassembled the clutch with two pulleys on it there was already a protective plastic donut covering the sticky rubber. This part looks factory, so I assume Panasonic knows of this problem and has fix.
Thank you Brother
I have the same problem and try to call Panasonic for repair but I unable to reach anyone as the phone number provided by Costco where my parents bought the Chair many years ago.
Fortunately, I saw your posting and considering the Chair so old but barely used. I just give a try. Thank you for your instruction so detailed that give me courage to fix it myself.
The black thing is melted and like glue, used alcohol clean up.
Thanks for your detailed instructions, after. 25 years my panasonic wouldn’t go up and down. Your plastic gasket did the trick. Wonderful
I also had the same issue. I thought it was time to trash my chair seeing how I have had 20+ years. When I Google the issue and found your tutorial I thought “what the heck it’s worth a shot”. Your fix was spot on! I can’t thank you enough!
I have an EP1011 model. I was able to fix it from your great instructions. However, the up/down adjustments are now way off. Does anyone have an EP1011 Service Manual or know how to set the detector gear on this model?
Thank you for this detailed explanation. I picked up a free Panasonic urban chair off Facebook with the back massager not working and came across this article. I used a flexible piece of plastic from a food container from the store and cut out the disk. Put it back together and it worked. I haven’t had time to test all functions but so far the back massager is moving and working again. The one thing I did to tighten the 10mm nut was to use some small vice grips to hold the opposite end of the shaft so I could tighten. Will definitely book mark this article and part 2 as well. Don’t know how old my chair is but one thing is that it seems they are pretty well built.
I have the EP790 and have been able to get it working again thanks to these instructions. My issue now I think it to calibrate. I read the manual and it’s not very detailed. Just says to adjust plastic wheel. I am think it has something to do with the gaps to set the high/low but am still having issues with it stopping mid program. Any help appreciated. Thanks
what are you trying to calibrate? the up/down position? it’s pretty detailed in this guide https://blog.lincomatic.com/wp-content/uploads/2013/01/EP578.pdf
Thank you for sending. I didn’t see the more detailed instructions further down. I’ve just made the adjustment and so far so good. Thanks again.
Best repair instructions I’ve ever found on the internet! My chair was within minutes of being junked when I found this. Exactly what was wrong and exactly what fixed it. I owe you!
licomatic….i love u
and my wife loves u too
my chair has been sitting in the corner for about 5 years
finally got to it today and your fix is exactly what the doctor ordered
Thanks
Thank you Lincomatic !
I own two Panasonic EP1010 chairs and they were non-functioning and sitting there for over 10 years. They were barely used and I was about to donate them. Then I came across your blog and my problem was exactly the same as yours: the rubber goo caused massage clutch and up/download clutch to be frozen.
Thank you so much for the clear instructions. They helped me repair the clutch.
I ended up buying from Amazon Nylon Washers with 3/4″ Hole Size and outer diameter of 2″ with 0.1” thickness.
https://www.amazon.com/dp/B009OLRIWO
I used a flap disc to thin it down to ½ of original thickness and increased center hole slightly. It worked perfectly. My two chairs are now working as new. Thank you so much !
Wow,that’s great news! I actually stopped using mine. Not only did the vinyl start breaking down and getting sticky, but the belts are now super loose, and I can’t tighten them enough to get it working right
Ebay sells belts for EP1010. They are probably not the same made quality as Panasonic.
https://www.ebay.com/itm/134753094268
My up and down action stopped after using about 5 times. The root cause is exactly as you had mentioned that the long belt at the bottom was loose.
I bought a set of replacement belts from Ebay and replaced the bottom two belts controlling up/down. After the replacement, it’s working like before. Thanks for the lessons learned from your articles.
https://www.ebay.com/itm/134753094268
Thank you, Lincomatic, for the detailed post and the brilliant solution to the common problem. So helpful! We are going to enjoy the chair again!
Like others, my chair (EP1010) had been non operational for years. Finally had a tech from a Panasonic authorized shop come in. He reported that the whole massage block had to be replaced as something was jammed. Of course, the part was not available. Now I had nothing to lose by trying the repair myself. Downloaded the repair manual, did the troubleshooting and narrowed it down to the circuit board or the massage and/or the up/down clutch.
Found this well written article, tried the repairs suggested and everything is now working great.
Thank you very much.