OpenWrt: Cross-compiling libmicrohttpd for TL-WR703N

Recently, I’ve been developing embedded webapps using node.js. Unfortunately, node.js is a bit bloated for resource-constrained platforms, such as the TL-WR703N running OpenWrt. Not only is it too large to fit into flash memory, requiring an external USB drive to run EXTROOT, but I’ve even encountered circumstances where I’ve been running out of RAM. Thus, I’ve been looking for a lean & mean HTTP library written in C. Right now, my top two candidates are axTLS and libmicrohttpd. Since it’s impractical to host a toolchain on the TL-WR703N, we have to cross-compile everything, which can be a bit of a chore to set up. The first step is to download and unpack the source code:

% wget http://ftp.gnu.org/gnu/libmicrohttpd/libmicrohttpd-0.9.38.tar.gz
% tar xzvf libmicrohttpd-0.9.38.tar.gz

If you don’t already have an OpenWrt toolchain set up, you can download and install it as follows:

% wget http://downloads.openwrt.org/attitude_adjustment/12.09/ar71xx/generic/OpenWrt-Toolchain-ar71xx-for-mips_r2-gcc-4.6-linaro_uClibc-0.9.33.2.tar.bz2
% bzip2 -dc OpenWrt-Toolchain-ar71xx-for-mips_r2-gcc-4.6-linaro_uClibc-0.9.33.2.tar.bz2 | tar xvf –

Next, we need a build script. Save the bash script below as build_libmicrohttpd_mipsbe.sh:

[code language=”bash”]
#!/bin/bash
#
# compile libmicrohttpd for ar71xx (mipsbe)
#

export BASEDIR=$(pwd)

### begin configuration

# node src directory
export SRCDIR=libmicrohttpd-0.9.38

#adjust STAGING_DIR and TOOLDIR below based on location of your toolchain
#ToolChain
export STAGING_DIR=${BASEDIR}/OpenWrt-Toolchain-ar71xx-for-mips_r2-gcc-4.6-linaro_uClibc-0.9.33.2/toolchain-mips_r2_gcc-4.6-linaro_uClibc-0.9.33.2
#export STAGING_DIR=${BASEDIR}/openwrt/attitude_adjustment/staging_dir

export TOOLDIR=${STAGING_DIR}/toolchain-mips_r2_gcc-4.6-linaro_uClibc-0.9.33.2

### end configuration

export TARGET_PATH=${BASEDIR}/${SRCDIR}-mipsbe
export PREFIX=${TOOLDIR}/bin/mips-openwrt-linux-
export LIBPATH=${TOOLDIR}/lib/

# MIPS cross-compile exports
export CC=${PREFIX}gcc
export CXX=${PREFIX}g++
export AR=${PREFIX}ar
export RANLIB=${PREFIX}ranlib
export LINK=${PREFIX}g++
export CPP="${PREFIX}gcc -E"
export STRIP=${PREFIX}strip
export OBJCOPY=${PREFIX}objcopy
export LD=${PREFIX}g++
export OBJDUMP=${PREFIX}objdump
export NM=${PREFIX}nm
export AS=${PREFIX}as
export PS1="[${PREFIX}] \w$ "
export LDFLAGS=’-Wl,-rpath-link ‘${LIBPATH}

rm -rf ${TARGET_PATH}
mkdir ${TARGET_PATH}
cd ${SRCDIR}
make clean
make distclean
./configure –prefix=${TARGET_PATH} –host=mips-openwrt-linux-uclibc –without-snapshot –with-mips-float-abi=soft
make
make install
[/code]

If your toolchain is in a different place from the STAGING_DIR specified in the script, adjust it to point to the proper location. Finally, execute the build script:

% sh build_libmicrohttpd_mipsbe.sh

After the build is complete, you can test it out by transferring one of the example files to your TL-WR703N running OpenWrt. A good candidate would be src/examples/fileserver_example. In addition to the executable, you also need to get the shared library onto your OpenWrt machine. It is built into a strange location: src/examples/microhttpd/.libs/libmicrohttpd.so.10. Put the file in /usr/lib/libmicrohttpd.so.10 on your target machine. Finally, you should be able to execute fileserver_example on the target machine.
TL-WR703N: Attaching USB Serial Adapters – FTDI/CP2102/PL2303/CH340G

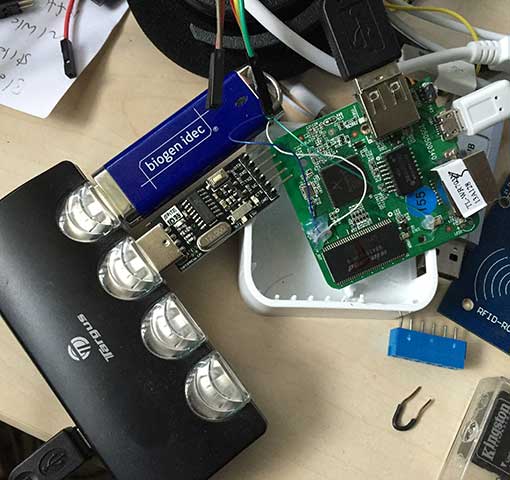
Although the TL-WR703N has a built in UART, as I have shown in my previous article, it’s rather difficult to access, and is useful as a serial console in OpenWrt. For the support of your own apps, it is far more convenient to simply plug in a cheap USB to serial adapter — this can be done without even opening the case. Since the TL-WR703N only has one USB port, if you are using EXTROOT, both the serial adapter and the USB flash drive can be attached to a USB hub: usbserialThe TL-WR703N can easily supply the required current, so an unpowered hub may be used. To add support for USB to serial hardware, use opkg to install the appropriate modules. Basic USB to serial support:

opkg install kmod-usb-serial

FTDI (FT232) support:

opkg install kmod-usb-serial-ftdi

Silicon Laboratories CP210x (CP2102) support:

opkg install kmod-usb-serial-cp210x

Nanjin QinHeng Electronics CH341 (CH340G):

opkg install kmod-usb-serial-ch341

Prolific PL2303 support:

opkg install kmod-usb-serial-pl2303

Additionally, OpenWrt has packages for a slew of other USB serial adapters that I’m not familiar with. If you are using Attitude Adjustment (12.09) and its official repository, here are the other supported adapters:

kmod-usb-serial-ark3116 kmod-usb-serial-belkin -- Belkin
kmod-usb-serial-cypress-m8
kmod-usb-serial-ipw
kmod-usb-serial-keyspan
kmod-usb-serial-mct -- Magic Control Technology
kmod-usb-serial-mos7720
kmod-usb-serial-motorola-phone
kmod-usb-serial-oti6858
kmod-usb-serial-qualcomm
kmod-usb-serial-sierrawireless
kmod-usb-serial-ti-usb
kmod-usb-serial-visor -- Handspring Visor/Palm m50x/Sony Clie

After you install the appropriate kernel modules, your USB to serial converter will show up as /dev/ttyUSBx

[ 489.990000] usb 1-1.3: new full-speed USB device number 5 using ehci-platform
[ 490.100000] ch341 1-1.3:1.0: ch341-uart converter detected
[ 490.120000] usb 1-1.3: ch341-uart converter now attached to ttyUSB0


TL-WR703N: Adding Storage Space – EXTROOT

Once you have your TL-WR703N running OpenWrt, you’ll find that it doesn’t have a lot of free space for adding your own files. Here is the output from df from after installing attitude-adjustment:

root@OpenWrt:/# df -h
Filesystem Size Used Available Use% Mounted on
rootfs 1.1M 352.0K 736.0K 32% /
/dev/root 2.0M 2.0M 0 100% /rom
tmpfs 14.3M 56.0K 14.2M 0% /tmp
tmpfs 512.0K 0 512.0K 0% /dev
/dev/mtdblock3 1.1M 352.0K 736.0K 32% /overlay
overlayfs:/overlay 1.1M 352.0K 736.0K 32% /

Note how rootfs has only 736KB free.  Luckily, there’s an easy way to put your rootfs onto external storage (extroot), which lets you easily expand your root file system onto a USB flash drive. In the instructions below, I will illustrate how to implement the pivot overlay flavor of extroot.

First, format your USB flash drive with an ext4 filesystem. I used an old 512MB Crucial USB drive. If you are using Windows, MiniTool Partition Wizard Home Edition can easily create an ext4 filesystem on your USB flash drive.

Before you can mount the USB flash drive on your TL-WR703N, certain packages need to be installed.  ssh into your TL-WR703N, and issue the following commands:

opkg update
opkg install block-mount kmod-fs-ext4 kmod-usb-storage
reboot

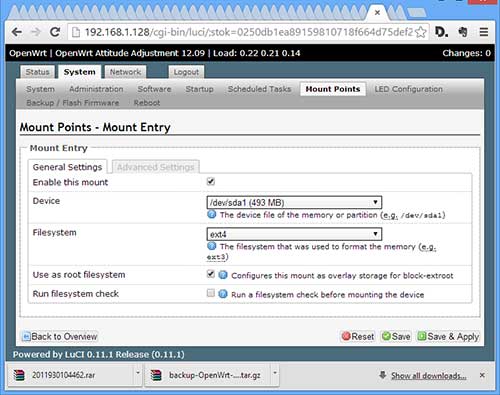
After OpenWrt reboots, access it via LuCI in your web browser, and navigate to the System->Mount Points tab. You should see a disabled mount point for /dev/sda1 as below:

mount

Click the Edit button and then check Enable this mount and Use as root filesystem:

extroot

Click Save & Apply, and then reboot OpenWrt.

If you don’t have LuCI installed, you can alternatively directly edit /etc/config/fstab. Add the following lines to the file:

config mount
  option device /dev/sda1
  option fstype ext4
  option is_rootfs 1
  option enabled_fsck 0
  option enabled 1

After your system reboots, if all is well, your USB drive will become your root file system:

root@OpenWrt:/# df -h
Filesystem Size Used Available Use% Mounted on
rootfs 462.3M 2.3M 435.4M 1% /
/dev/root 2.0M 2.0M 0 100% /rom
tmpfs 14.3M 48.0K 14.2M 0% /tmp
tmpfs 512.0K 0 512.0K 0% /dev
/dev/sda1 462.3M 2.3M 435.4M 1% /overlay
overlayfs:/overlay 462.3M 2.3M 435.4M 1% /

Note how rootfs/overlayfs now have 435.4MB free. From LuCI, it looks like this:

overlay


Related Articles: TL-WR703N

Hacking the TP-Link TL-WR703N – Part 2: Bring it back from the dead (How to unbrick it)

This morning, I realized that I actually had a 3.3V UART in my house that I could use to connect to my bricked TL-WR703N‘s serial port .. the Raspberry Pi runs on 3.3v! I dug up the instructions on how to hook it up on the OpenWrt forum. After hooking it up, configuring it, and firing up PuTTY, I found via the serial terminal output that OpenWrt was booting up just fine, but that the ethernet port was disabled. The problem is that mine has the newer bootloader which disables the LAN port:

U-Boot 1.1.4 (Mar 21 2013 – 10:09:10)

In my haste to flash it with OpenWrt, I missed the Gotchas in the OpenWrt wiki.  It turns out that my version of the TL-WR703N boots up with the ethernet port disabled, and the version of OpenWrt that I installed did not enable it. Fortunately, nebbia88 posted a special firmware which enables both the LAN port and WiFi by default, which I downloaded from dropbox (20170927: link is dead. download it here). The next step was to figure out how to get it loaded into my TL-WR703N. Unfortunately, the Raspberry Pi serial port was too flaky. It was printing out gibberish.

Method #1: Failsafe Mode

This is the easiest way to unbrick a TL-WR703N, because it doesn’t require any soldering, or even opening up the case. YOU DON’T NEED TO ACCESS THE TL-WR703N’s SERIAL PORT.  However, it will only work if your TL-WR703N will actually go into failsafe mode.

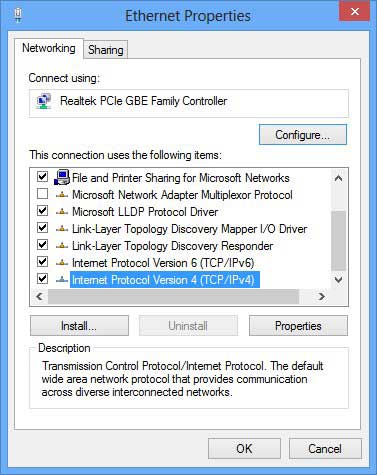
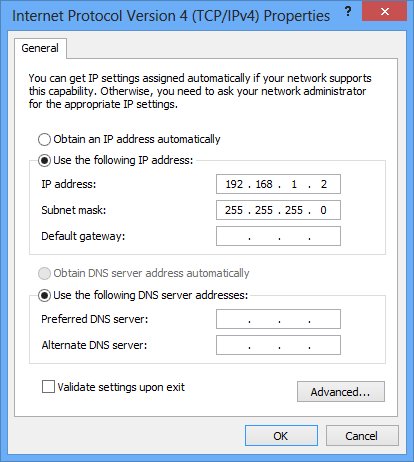
To get it into failsafe mode, power up the unit. The blue LED will flash once, and then go off for a few seconds. As soon as the LED turns on again, press the reset button. The LED should begin flashing very quickly, indicating that you are in failsafe mode. OpenWrt will always enable the ethernet port, and set its IP number to 192.168.1.1 when in failsafe mode. Next, set your host computer’s ethernet IP number to 192.168.1.2, and connect a CAT-5 cable between the TL-WR703N and the computer.  Instructions for this how to do this in Windows are below.

Step 1: open the Ethernet adapter’s property sheet:

properties

Step 2: double click on Internet Protocol Version 4:

ipv4

Step 3: Set your IP address to 192.168.1.2 and click OK:

ip

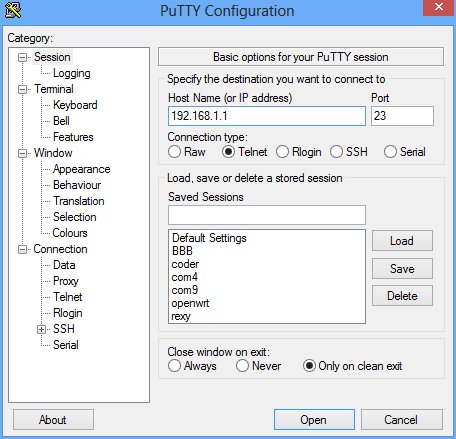
Step 4: Telnet to your TL-WR703N, in Windows, you can use PuTTY:

telnet
Step 5: After PuTTY connects, and you hit the enter key, you should be presented with the OpenWrt console:
console

If you cannot telnet into the TL-WR703N and get a console as shown above, then you will have to proceed to Method #2.

Before we can flash our new firmware file, openwrt-ar71xx-generic-tl-wr703n-v1-squashfs-sysupgrade.bin, we need to transfer it to the TL-WR703N.  One way to do it is to use nc, which is documented here, but I found it easier to use wget, which is also available in failsafe mode. First, we need to set up an http server on the host computer to send the file to OpenWrt.  onehttpd is a handy minimalist web server which can handle the task.  In Windows, simply drag and drop the folder containing your firmware file on top of onehttp-0.8.exe to launch the web server.

Step 6: Get the file into the TL-WR703N from the OpenWrt failsafe console, and the flash it in:

root@(none):/# cd /tmp
root@(none):/tmp# wget http://192.168.1.2:8080/openwrt-ar71xx-generic-tl-wr703n-v1-squashfs-sysupgrade.bin
root@(none):/tmp# sysupgrade openwrt-ar71xx-generic-tl-wr703n-v1-squashfs-sysupgrade.bin
root@(none):/tmp# reboot

After the unit reboots, you should be able to ping it at 192.168.1.1 via the ethernet port.

Method #2: Bootloader Mode:

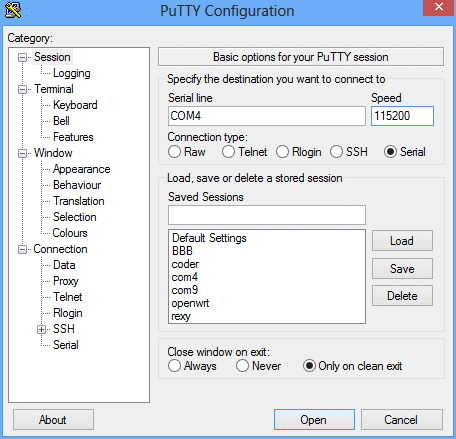
If you are not able to successfully enter OpenWrt failsafe mode, the bootloader is the only way to load the firmware. After hacking your TL-WR703N serial port, Connect your 3.3V UART->USB adapter to your host computer and connect to its virtual serial port using communication parameters: 115200,N,8,1. Open up your terminal program to connect to the virtual serial port. I used PuTTY:

puttyserial

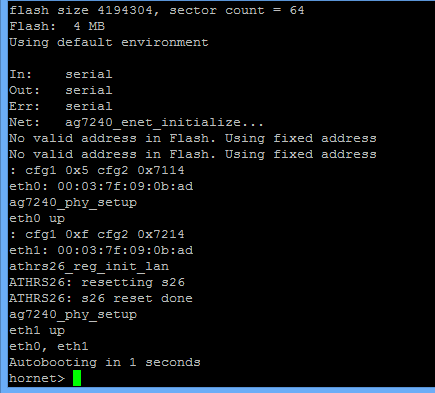
Power up the TL-WR703N, and type “tpl” (without the quotes) and then the enter key immediately after Autobooting in 1 seconds appears. If you do it correctly, you will get the hornet> prompt:

hornet

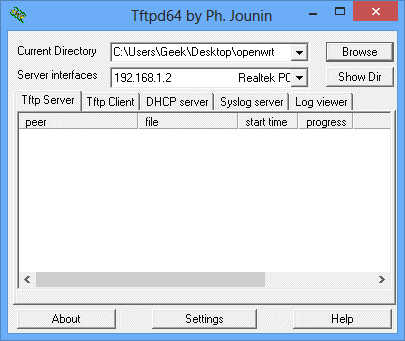
The timing is a bit tricky. If you fail, just power cycle the TL-WR703N and try again. You don’t need to reset your serial terminal between tries. The bootloader only supports tftp to receive the new firmware file. In Windows, tftp32 is a free server which works well. Download either the 32-bit or 64-bit version according to your version of Windows. Launch tftp32.exe (or tftp64.exe), set the Current Directory to the folder where your firmware file resides, and the Server interfaces to your ethernet adapter:

tftpd

From the hornet prompt in the serial console, issue the following commands:

hornet> setenv serverip 192.168.1.2
hornet> tftpboot 0x81000000 openwrt-ar71xx-generic-tl-wr703n-v1-squashfs-sysupgrade.bin
hornet> erase 0x9f020000 +0x3c0000
hornet> cp.b 0x81000000 0x9f020000 0x3c0000
hornet> bootm 9f020000

After it’s done running the commands, wait a few seconds, and power cycle the unit. After it reboots, you should be able to access the unit via its ethernet port.

Previous: Hacking the TP-Link TL-WR703N – Part 1: Brick it and then hack its serial port

Hacking the TP-Link TL-WR703N – Part 1: Brick it and then hack its serial port

I’m working on an embedded project that needs to be able to run node.js over WiFi. There aren’t too many cheap boards that can run linux. The $25 Raspberry Pi and the discontinued Pogoplug V2, which can be had for about $15 immediately came to mind. However, each of these boards had their shortcomings.  The Pogoplug is discontinued, so it may not be available in the future, and also, the PCB is rather big.  Neither of them has  built-in storage, and while both of them can take cheap <$10 USB WiFi adapters, the usable range is rather short.  Adding a power supply and a better USB WiFi adapter can easily drive the cost up by another $25. I recently discovered that the Arduino Yun, which has built-in WiFi, embeds an AR9331 processor.  The Arduino Yun is much too expensive, so I wondered if AR9331‘s could be bought separately. It turns out the answer is no, but then I discovered the vary hackable TP-Link TL-WR703N. A lot of hardware hackers are loading OpenWrt into this cute little WiFi router, and taking advantage of the many precompiled packages that are available. While node.js isn’t currently officially supported, I found that Giorgio Cefaro had gotten node.js running on an Arduino Yun. The Yun runs linio, which is based on OpenWrt, and since it uses the AR9331, I’m hoping that I can use his precompiled packages on my TL-WR703N.

I put “TL-WR703N” in to Amazon.com, and found it for $19.99 – what a steal, I thought. When it arrived, I found out that I’d ordered a TL-WR702N by mistake (grr.. Amazon for returning the wrong model in my search), which uses the same processor, but has much too little flash memory to load OpenWrt, and doesn’t have a USB port. Oh well, it works very well as a low-power WiFi client. I took it out to my garage, which is very far away from my AP, and was amazed that it worked as well as my Linksys WRT54G, which has dual external antennas! Furthermore, the TL-WR702N is has very flexible firmware, which allows it to act as a portable AP, repeater, etc. A great little device to carry around on trips. But I digress …

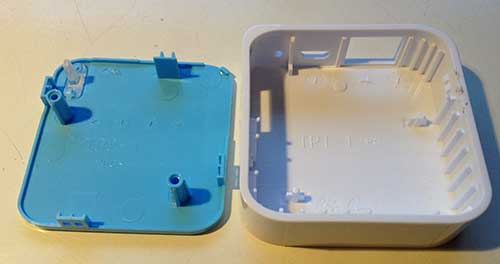
I ended up buying a TL-WR703N on eBay for $23. It came with Chinese firmware, but I was able to load OpenWrt following the instructions on the wiki page.  Much to my chagrin, after rebooting into OpenWrt, I was not able to ping or connect to it. The unit is now bricked. The only way to bring it back from the dead is to load new firmware via a serial connection.  [UPDATE: I found a way to unbrick it without any hardware hacking, if it is able to go into OpenWrt failsafe mode. See Method #1] Luckily, the TL-WR703N has a built-in UART for this purpose, but the PCB only has tiny pads for connecting to it. There are lots of instructions on other sites describing how to do this, but I’ll document my experiences here. Here’s what the case looks like with the top lid removed:

opencase

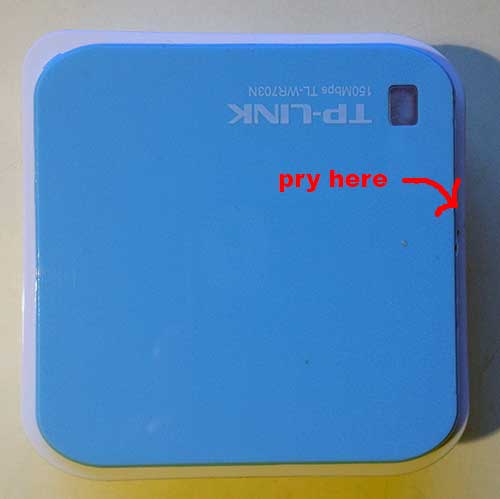
It’s held on by 3 clips. I first tried to use a guitar pick, and several plastic tools to open it up without marring the surface, but the case was just too tight. Finally, I wedged a small screwdriver in the location pictured below:

pryhere

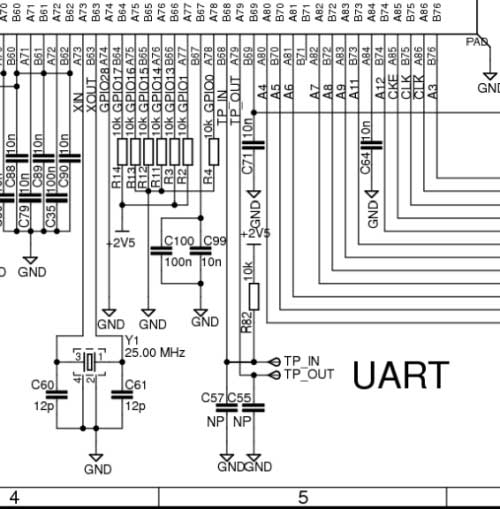
Once the first clip popped loose, I was able to just carefully pry the lid up and off from that edge, popping the other two clips open in the process. To hook up the UART, 3 pins are needed: Tx, Rx, and GND. Most writeups say to solder onto the round gold pads labeled TP IN  (Rx) and TP OUT (Tx). However, from Squonk’s reverse engineering of the PCB, I noticed that C57 connects between TP_IN and GND, and C55 connects between TP_OUT and GND:

uart

It turns out that C57 and C55 are unpopulated on the board. I decided that it would be easier to solder to the pre-tinned pads instead of trying to scrape the solder mask off of the round pads:

serial

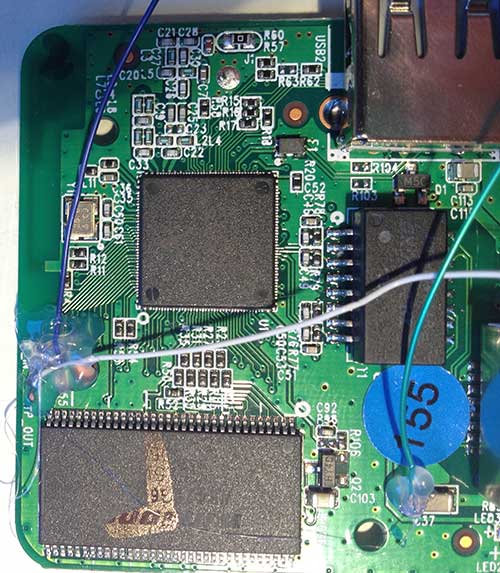
It turns out that I was wrong. I managed to solder my 40AWG wire-wrap wire onto one of C55‘s pads, but the rest of them were too tricky due to their small size. So I scraped off the solder mask on TP IN, and soldered there, and I found a relatively large capacitor, C37 to use for my GND connection:

soldered

TIP: Modern machine-assembled PCB’s are typically coated with a solder mask, which is an insulator. Before attempting to solder to one of the copper pads, scrape off the solder mask where you want the solder to stick with an x-acto knife, exposing the bright copper below.  Try not to scrape off the solder mask in adjacent areas, to reduce the chance of creating solder bridges (shorts).

Next, I applied a liberal amount of hot melt glue to secure the connections:

glued

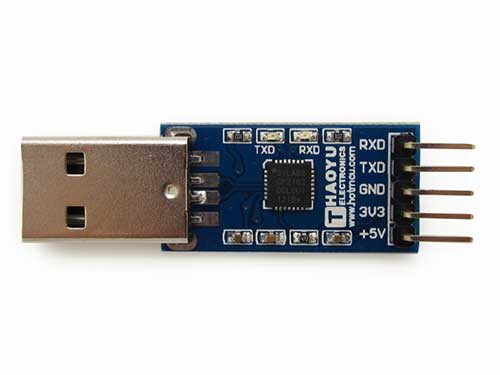
To connect the UART to a PC, the easiest way is to use a USB to 3.3V UART adapter. Unfortunately, the only one I have is 5V, which would fry the AR9331. I ordered this CP2102-based one which I found on eBay:

CP2102_0Connecting the USB UART adapter to the TL-WR703N is easy:

TP_OUT -> RXD
TP_IN -> TXD
GND -> GND

To access the serial console from your PC, you must first install the appropriate drivers for your USB UART adapter. Then, use a serial terminal client program (I like to use PuTTY), and connect to the virtual serial port with parameters: 115200,N,8,1.

To be continued after I receive my USB -> TTL adapter …

Next: Hacking the TP-Link TL-WR703N – Part 2: Bring it back from the dead