I’m working on an embedded project that needs to be able to run node.js over WiFi. There aren’t too many cheap boards that can run linux. The $25 Raspberry Pi and the discontinued Pogoplug V2, which can be had for about $15 immediately came to mind. However, each of these boards had their shortcomings. The Pogoplug is discontinued, so it may not be available in the future, and also, the PCB is rather big. Neither of them has built-in storage, and while both of them can take cheap <$10 USB WiFi adapters, the usable range is rather short. Adding a power supply and a better USB WiFi adapter can easily drive the cost up by another $25. I recently discovered that the Arduino Yun, which has built-in WiFi, embeds an AR9331 processor. The Arduino Yun is much too expensive, so I wondered if AR9331‘s could be bought separately. It turns out the answer is no, but then I discovered the vary hackable TP-Link TL-WR703N. A lot of hardware hackers are loading OpenWrt into this cute little WiFi router, and taking advantage of the many precompiled packages that are available. While node.js isn’t currently officially supported, I found that Giorgio Cefaro had gotten node.js running on an Arduino Yun. The Yun runs linio, which is based on OpenWrt, and since it uses the AR9331, I’m hoping that I can use his precompiled packages on my TL-WR703N.
I put “TL-WR703N” in to Amazon.com, and found it for $19.99 – what a steal, I thought. When it arrived, I found out that I’d ordered a TL-WR702N by mistake (grr.. Amazon for returning the wrong model in my search), which uses the same processor, but has much too little flash memory to load OpenWrt, and doesn’t have a USB port. Oh well, it works very well as a low-power WiFi client. I took it out to my garage, which is very far away from my AP, and was amazed that it worked as well as my Linksys WRT54G, which has dual external antennas! Furthermore, the TL-WR702N is has very flexible firmware, which allows it to act as a portable AP, repeater, etc. A great little device to carry around on trips. But I digress …
I ended up buying a TL-WR703N on eBay for $23. It came with Chinese firmware, but I was able to load OpenWrt following the instructions on the wiki page. Much to my chagrin, after rebooting into OpenWrt, I was not able to ping or connect to it. The unit is now bricked. The only way to bring it back from the dead is to load new firmware via a serial connection. [UPDATE: I found a way to unbrick it without any hardware hacking, if it is able to go into OpenWrt failsafe mode. See Method #1] Luckily, the TL-WR703N has a built-in UART for this purpose, but the PCB only has tiny pads for connecting to it. There are lots of instructions on other sites describing how to do this, but I’ll document my experiences here. Here’s what the case looks like with the top lid removed:
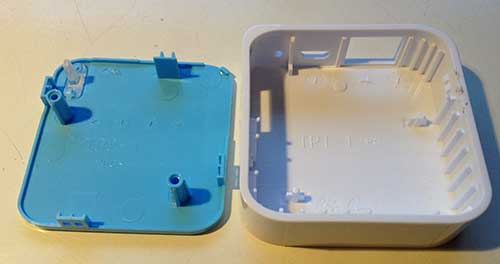
It’s held on by 3 clips. I first tried to use a guitar pick, and several plastic tools to open it up without marring the surface, but the case was just too tight. Finally, I wedged a small screwdriver in the location pictured below:

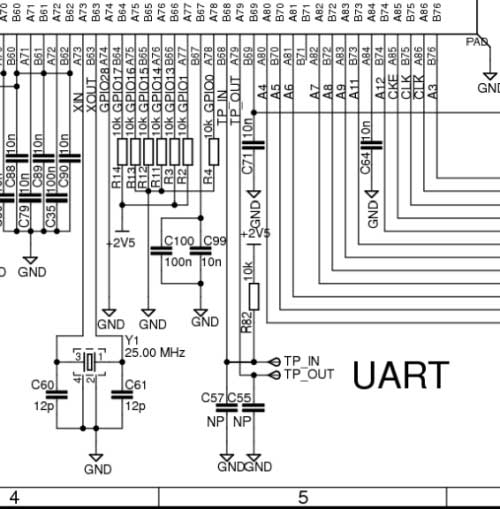
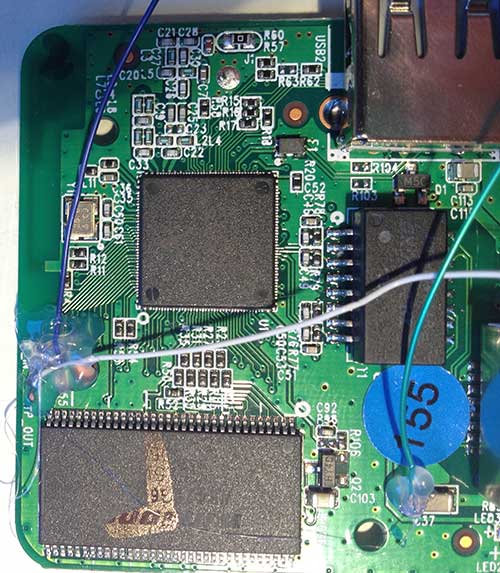
Once the first clip popped loose, I was able to just carefully pry the lid up and off from that edge, popping the other two clips open in the process. To hook up the UART, 3 pins are needed: Tx, Rx, and GND. Most writeups say to solder onto the round gold pads labeled TP IN (Rx) and TP OUT (Tx). However, from Squonk’s reverse engineering of the PCB, I noticed that C57 connects between TP_IN and GND, and C55 connects between TP_OUT and GND:
It turns out that C57 and C55 are unpopulated on the board. I decided that it would be easier to solder to the pre-tinned pads instead of trying to scrape the solder mask off of the round pads:
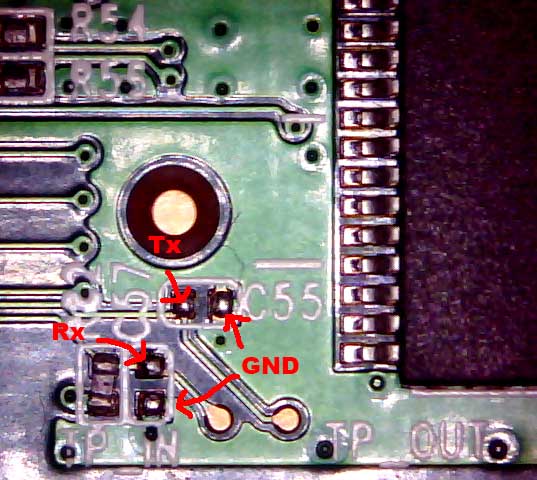
It turns out that I was wrong. I managed to solder my 40AWG wire-wrap wire onto one of C55‘s pads, but the rest of them were too tricky due to their small size. So I scraped off the solder mask on TP IN, and soldered there, and I found a relatively large capacitor, C37 to use for my GND connection:
TIP: Modern machine-assembled PCB’s are typically coated with a solder mask, which is an insulator. Before attempting to solder to one of the copper pads, scrape off the solder mask where you want the solder to stick with an x-acto knife, exposing the bright copper below. Try not to scrape off the solder mask in adjacent areas, to reduce the chance of creating solder bridges (shorts).
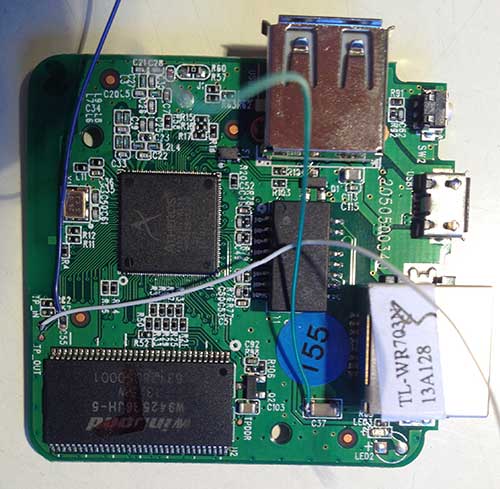
Next, I applied a liberal amount of hot melt glue to secure the connections:
To connect the UART to a PC, the easiest way is to use a USB to 3.3V UART adapter. Unfortunately, the only one I have is 5V, which would fry the AR9331. I ordered this CP2102-based one which I found on eBay:
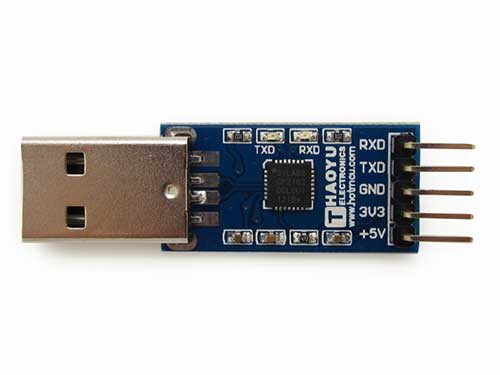 Connecting the USB UART adapter to the TL-WR703N is easy:
TP_OUT -> RXD
TP_IN -> TXD
GND -> GND
To access the serial console from your PC, you must first install the appropriate drivers for your USB UART adapter. Then, use a serial terminal client program (I like to use PuTTY), and connect to the virtual serial port with parameters: 115200,N,8,1.
To be continued after I receive my USB -> TTL adapter …
Next: Hacking the TP-Link TL-WR703N – Part 2: Bring it back from the dead
Hi! I’ve been through a similar thought process… and actually also proceeded the same way: bought a wr703n router, hacked it, installed openwrt … and now I am diving into the wonders of compiling nodejs for ARM. And I am a bit upset of my lack of linux/ARM knowledge. Did you have any luck in your quest of running node in this small RAM device? I am building some robot brain and I would gladly accept a hand there
Rudi
I got cefaro’s node.js running on it (linked in my article above), but I couldn’t get node-gyp to work, which I needed for my project, so I gave up on it. So, if you want to run node on it, you can avoid doing any compiling.