How to Get Rid of Smoni – Failed to create empty document

At some point in the past several months, probably after a Windows 10 update, my PC started to display a cryptic and annoying dialog box every time I logged in. I started wondering if somehow, a virus had gotten into my computer. I hadn’t spent the time to figure out what it was causing it, and how to get rid of it, until today. A google search of “Smoni Failed to create empty document” didn’t yield any useful results. It’s so annoying to go through Microsoft forums, and find the that the only advice they can give you is reset or restore your system. No thanks. It’s a lot easier to spend a little time troubleshooting on my own, than spending hours backing up and reloading all my programs and files.

I pulled up the Task Manager, scanned the running process list, and quickly found the culprit:

Aha! What’s this BrnlPMon process? Simply right click on BrnlPMon, and select Open File Location from the menu:

Windows then pops up a File Explorer window, with the offending file highlighted:

Hmm.. so what’s BRNIPMON.exe? Right click the file, and select Properties from the context menu. Select the Details tab on the resultant pop-up window:

Bingo! It’s Brother IP Monitor, which I figured out is monitoring software for my Brother WiFi connected laser printer. Something in my recent Windows 10 updates (probably the new Creator’s Edition), caused an incompatibility, which triggers this stupid error dialog.

At this point, I could just uninstall it or delete the files, but since I now know that it isn’t malicious, I’ll just leave it for now, and look for a software update when I have time, and see if that fixes the issue.

How to Repair a Panasonic Massage Chair, Part 3

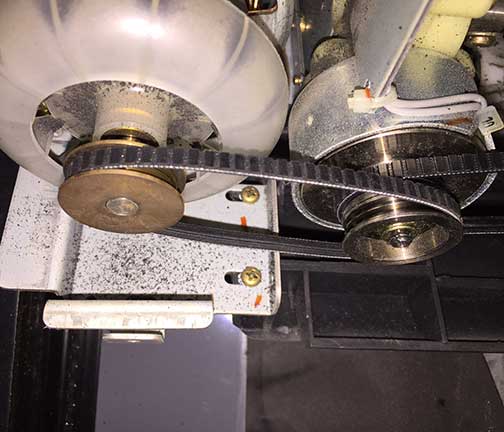
Unfortunately, my rubber hose hack from Part 2 worked only for a few weeks. The belt again stretched, and became loose:

loosebelt

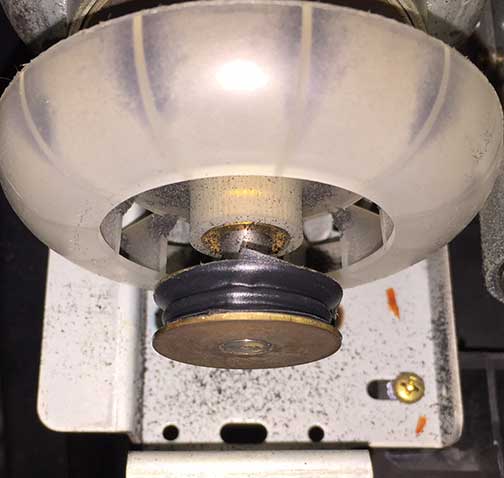
One thing you can also see in the photo above is that I’ve slid the motor as far to the left as the adjusters allow (the slotted holes for the two brass screws). I couldn’t bend the motor mounts any more to tighten up the belt, so in addition to the rubber hose shim from Part 2, I wrapped 4 layers of electrical tape around each of the two pulleys:

tapedpulley

Amazingly, this increased the diameter of the pulleys enough that the belt became taut. I have tested the chair for a few hours, and this fix seems to be working well. Let’s see how long this hack holds up…

Previous related article: How to Repair a Panasonic Massage Chair, Part 2

How to Repair a Panasonic Massage Chair, Part 2

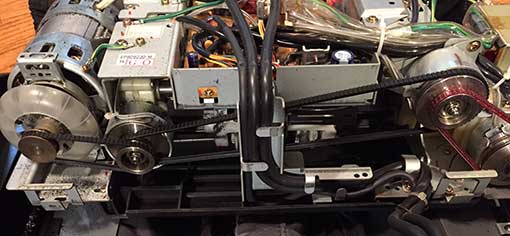
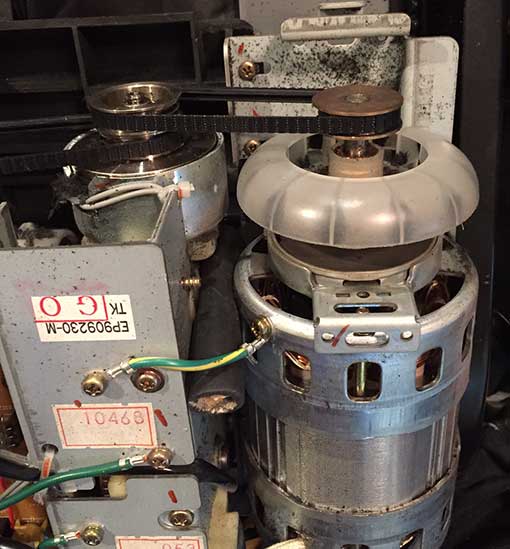
In my article, How to Repair a Panasonic Massage Chair, I described how I fixed my Panasonic EP1004 massage chair. The chair worked for a year or so, and then stopped working again. The symptoms this time were a bit different from when the clutches got stuck. Instead of running for a while, and then beeping and shutting itself off, the massage mechanism stopped moving up and down. The chair was just stuck in kneading mode, and wouldn’t do anything else. +I was pretty sure the problem was due to a loose belt, but just didn’t feel like taking it apart again. Tonight, I decided it was time to get it working again. I opened it up, and sure enough, one of the belts had slackened so much that the pulleys were just freewheeling. The loose belt was the small one on the far left in the photo below:

belt


The belt doesn’t look loose in the photo, because I forgot to take a photo of it before tightening it up. Unfortunately, there was no adjustment left to tighten the belt. It must have stretched over it’s 15+ year lifetime. I’m pretty impressed by the quality of the of the belts in this thing. They haven’t dried up at all. If you look in the photo below, there are two screws in horizontal slots between the two pulleys. Note that the screws are all the way on the left of the slots, which means that the motor has already been slid as far as it will go to the right. Yet, the belt was still quite loose. I finally jerry rigged a fix by jamming a piece of rubber hose in between the motor and the metal box it’s attached to. To stiffen up the hose, I stuffed a wood dowel into it. The rubber hose is in the photo below, under the green/yellow wire that grounds the motor to the chassis.

beltfix

The chair is now working again… until something else goes wrong.

Previous related article: How to Repair a Panasonic Massage Chair
Next related article: How to Repair a Panasonic Massage Chair, Part 3


How to Access a Hotmail Account via IMAP

Previously, if you wanted to use an e-mail client for accessing a Hotmail account, you were stuck with the POP3 protocol, which doesn’t allow you to access all of your mail subfolders. IMAP support was available, but cost extra. So, if you wanted to access your Hotmail folders, you were stuck with using Microsoft products, such as Windows Live Mail client or Microsoft Outlook.

Well, with the recent folding of Hotmail users into Outlook.com, Microsoft has quietly enabled IMAP access to Hotmail accounts for free. Now, you can use any IMAP compatible e-mail client, such as Mozilla Thunderbird.

Here are the settings for accessing a Hotmail account via IMAP:

Incoming server:

  • Server address: “imap-mail.outlook.com”
  • Server port: “993”
  • Encryption type: “SSL”

Outgoing server:

  • Server address: “smtp-mail.outlook.com”
  • Server port: “587”
  • Encryption type: “TLS” (“SSL” can be used if TLS is not an option)

How to Clean Rancid Oil

I have a Misto Olive Oil sprayer that sat unused for a few years while it was loaded with oil.  The oil became rancid, and left this smelly, sticky residue that was not only impossible to wash off the sprayer, but also off your fingers after touching it.  First, I tried hot water and soap with intense brushing.  That didn’t work well.  There was still yellow residue all over it, and it still felt sticky, and stank.  Even leaving it in soapy water for a few days didn’t help.  I searched the Internet, and found a recommendation for vinegar, but that didn’t work.  Then I read that boiling soapy water would work, so I tried soaking it in boiled soapy water.  The yellow residue finally washed off, but it still stank, and was still slightly sticky after a few tries.

At this point, I’d already wasted so much time and effort that I was ready to just throw it out.  Then, I remembered that I had some OxiClean that I bought from Costco years ago.  I wasn’t sure if it was safe for food, so I read the label, which recommended it for cleaning teapots.  I mixed one scoop of OxiClean with 32oz of very hot (not boiling) water, and left it to soak for 3 hours. The results were pretty amazing. The residue is completely gone … no more stickiness .. and the stinky smell is also completely abolished.  Amazing! Not only that, the stainless steel bits are all shiny, and look new again.  I wish I’d thought of the OxiClean before wasting a few days with the other ideas.

* I have absolutely no financial ties to OxiClean or Costco. *

How to Repair a Panasonic Massage Chair

I have a Panasonic EP1004 massage chair that’s about 14.5 years old.
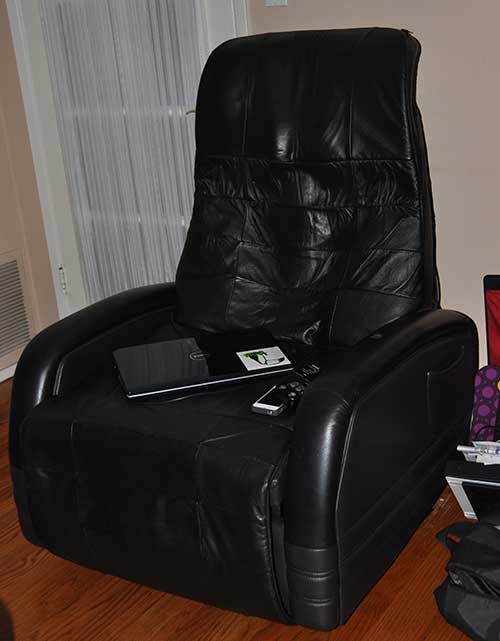
ep1004

For the past several years, it has had problems getting going.  When I tried to use it, the motors would spin for a while, but there would be no motion, and after a while, it would beep 3 times, and then stop.  I would then have to power cycle it, and try again over and over.  After several tries, it would finally start working.  Over time, it took longer and longer to get it working.  Finally, it became impossible to get it going.  I searched the internet, and found the service manual for it.

Unfortunately, the manual didn’t really help me diagnose the problem, but I figured out that the massage and up/down clutches had gone bad.  The clutches were expensive, and were unavailable for purchase anywhere.  I figured out how to repair them without spending a cent!  The step by step procedure is documented below.

To do the repair, you will need the following:

  1. Philips screwdriver
  2. 10mm socket wrench
  3. x-acto knife
  4. pliers
  5. a sheet of plastic

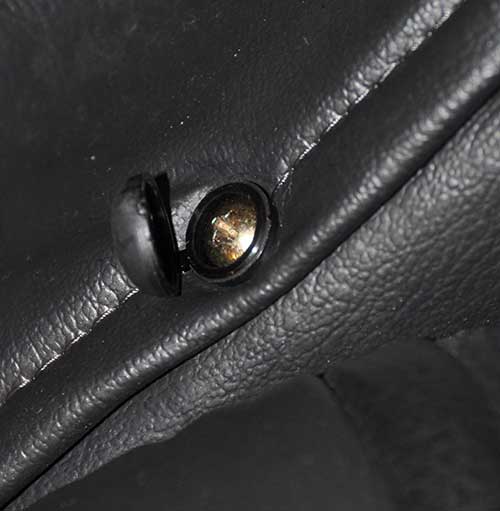
First, remove the screws which hold the back cover on.  They are covered by plastic caps, which must be pried open to expose the Philips screw head:
coveredscrew

Next, remove the two 10mm bolts attached to the metal bar at the bottom of the cover:

bolts

Here is a close-up of one of the bolts:

bolt

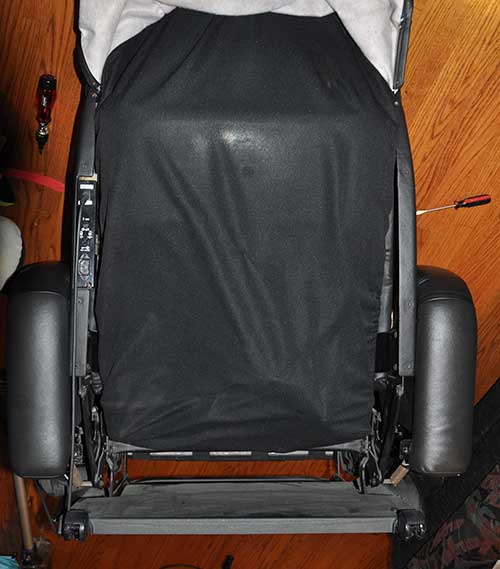
After flipping the outer cover out of the way, you will find a stretchy fabric cover below it.
innercover

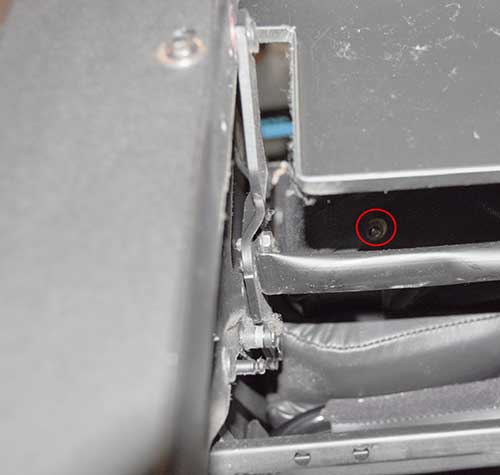
To remove the fabric inner cover, flip the chair over, and look for two Philips screws at the circled positions:

bottom

Circled in red below is a close-up of one of them:
bottomscrew

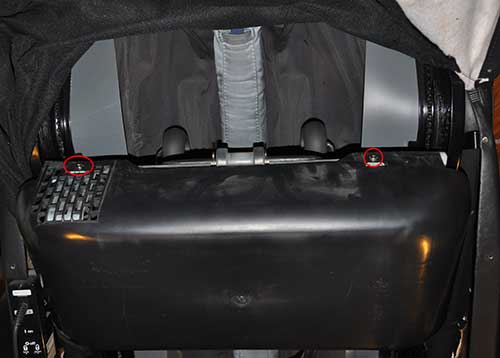
After removing the screws, the inner fabric cover can easily be lifted out of the way, revealing the motor and control assembly.  Remove the two Philips screws at the top of the black plastic cover, and remove it:
gutscover

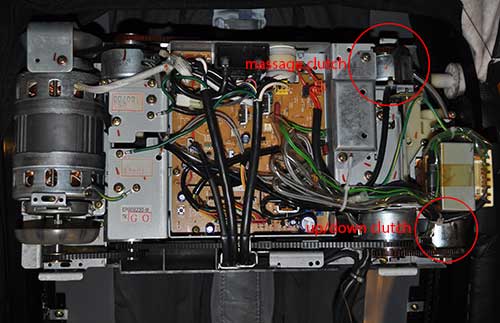
Inside, you will find the controller.  I have labeled the clutches which were faulty in my chair:
guts

There are 3 other clutches, which you can find by looking at the diagram in the service manual.  Fortunately, I was having problems with only two of them.  We are not going to remove the clutches.  Fortunately, the drive pulleys can be removed without taking the clutches out.  First, remove the 10mm nut that secures the pulley:

screwdriver

It is difficult to get the nut loose, because turning the nut also rotates the driven shaft. To keep the driven shaft from rotating when you turn the nut, jam a thin flat-bladed screwdriver between the two clutch plates, as shown in the photo above. A commenter below suggests that a bit of WD-40 may help, but be extremely careful if you try that… if it gets on the friction surface of the pulley, it will make your belt slip, or even eat your belt over time.

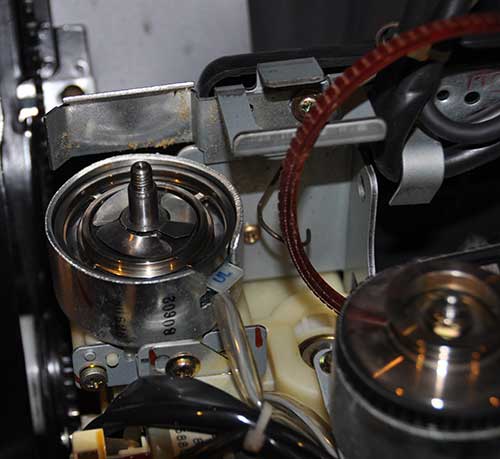
After you remove the pulley, you will find 4 parts: 1) a spring steel disk, 2) a rubber washer under it, 3) a small metal washer under that, and 4) the clutch plate below it.  Make note of the layout of the parts as you remove them:
udclutch2

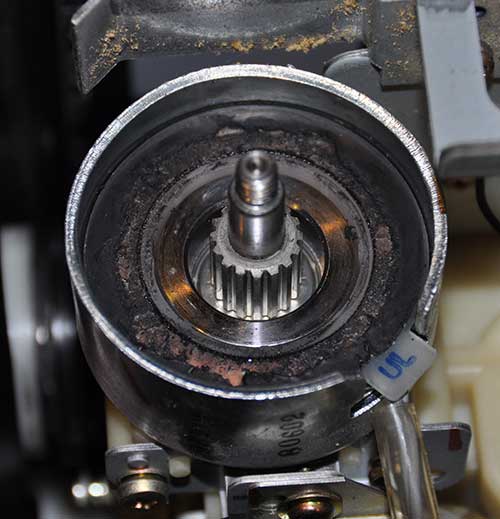
Here is the cuprit:

udclutch3

The clutches suffer from a basic design flaw. The rubber ring which serves as a noise damper for the clutch disintegrates over time, and becomes a sticky mess. It becomes so sticky that the clutch solenoid is too weak to overcome its grip, and can no longer drive the clutch plate into the pulley.  Thus, the clutch plate can’t contact the pulley, and it just freewheels.  Using the clutch plate as a template, cut out a ring of plastic as pictured below:
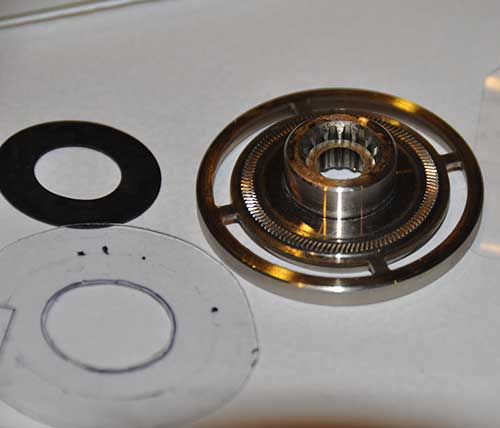
udclutch4

I used some hard plastic from some discarded packaging.  I used scissors to cut the outline, and an x-acto knife to cut out the hole. Draw an outline around a US nickel to get a nice, round hole.  Next, slide the plastic donut over the clutch plate:
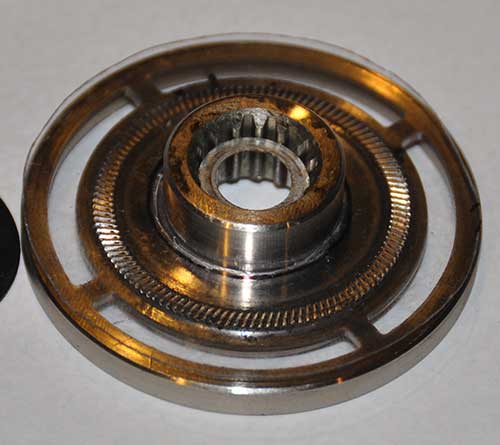
udclutch5

What the plastic does is keep the sticky black goo from touching the clutch plate, so that the solenoid can move it up and down. Note: Even though the clutch plate has teeth in it, these teeth are on the bottom, and they are not deep enough to dig into the plastic disc that we are adding. The friction that the clutch uses to drive the pulley is between the other side of the clutch plate, and the flywheel, which is the inner face of the pulley. The only purpose for the plastic disc we are adding is to keep the black goo from sticking to the bottom of the clutch plate. Try use a thin piece of hard plastic, as I did. Do not try to substitute a thicker piece of rubber… we don’t want any friction on between the bottom side of the clutch plate and the clutch body. Assembly is the reverse of the disassembly process.

When disassembling the massage clutch, you find find that the metal plate that holds the control box cover gets in the way.  Carefully bend it out of the way with a pair of large pliers just enough so that the pulley can be removed.  After reassembling the massage clutch, bend the metal plate back into the original position.

Another issue which could cause your chair to stop working is loose or broken belts. Check all of the belts for proper tension. My shiatsu massage rollers were also squeaking when I put a lot of pressure on them. This was because the lower left belt was stretched, and was quite loose. Unfortunately, even after loosening the motor mount screws and sliding the motor as far left as the adjustment slots would allow, the belt was still too loose.  I ended up using a large screwdriver to just bend the motor mounts outwards a little bit to tighten up the belt. [UPDATE: This eventually failed, and the belt got loose again… see Part 2.]

Reassemble the rest of the chair by following the disassembly steps in reverse. Voila, your Panasonic massage chair is good as new again!

Downloads:

Panasonic EP1004 Service Manual
Panasonic EP578 Service Manual
Panasonic EP1010 Service Manual
EP1005 Operating Instructions
EP1004,1005 Simplified Service Manual

Next related article: How to Repair a Panasonic Massage Chair, Part 2