Programming OpenEVSE with a Serial Cable instead of Hardware Programmer

Typically, OpenEVSE firmwares are flashed into the board using a hardware programmer, such as a USBasp. In the past, this was required, because the firmware had grown so large that there was no space left in the ATMega328P‘s flash to fit in a bootloader. However, the latest versions of the AVR tools that come with Arduino have shrunken down the binaries to the point that we now have space for a bootloader. Once the bootloader is installed, OpenEVSE can be programmed in exactly the same fashion as an Arduino Pro Mini, via a USB->TTL UART adapter, such as a FTDI cable, using the stk500 (arduino) protocol.

Before we can program the chip with a bootloader, we need to make a minor hardware mod. After a reset, the bootloader waits to see if a new firmware wants to be flashed before proceeding with booting the installed firmware. It is only during this very small time window that the ATMega328P‘s MCU is ready to accept a firmware. In order to trigger a reset via software, we need to connect the DTR pin of the FTDI cable to the RESET pin of the MCU via a .1uF capacitor.

Below is a photo of the mod, done on a Wattzilla C3 board, which is an OpenEVSE variant:

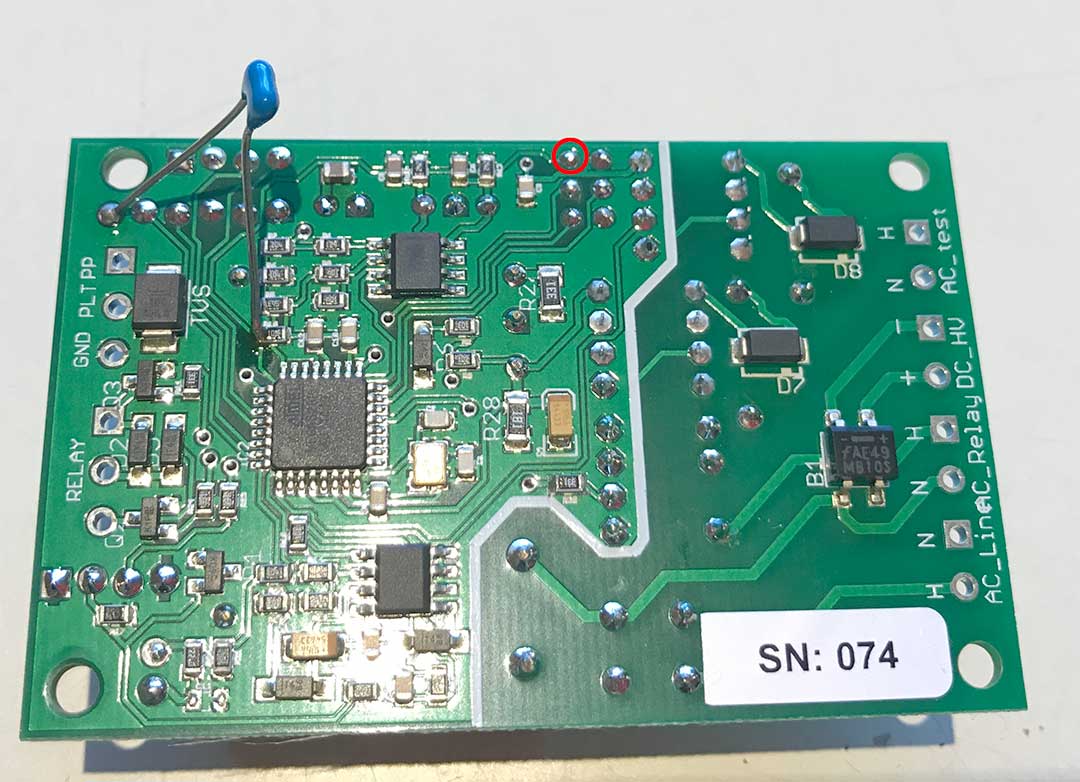
The DTR pin is on the far left of the 6-pin serial connector. The RESET pin can be accessed at either the left side of R10, as pictured above, or at Pin 5 of the ISP connector (red circle).

Once the hardware mod is in place, we must set the fuses to use a bootloader, and flash in the bootloader, using a hardware programmer. In this example, we will use OptiBoot, because it’s smaller and faster (115200 baud) than the standard Arduino bootloader.

avrdude -c USBasp -B0.5 -p m328p -Uflash:w:optiboot_atmega328.hex -Ulfuse:w:0xFF:m -Uhfuse:w:0xDE:m -Uefuse:w:0x05:m -Ulock:w:0x3F:m

After the bootloader is flashed in, we can thereafter flash in firmwares using just the FTDI cable:

avrdude -carduino -PCOM5 -b115200 -p m328p -Uflash:w:open_evse.hex

Substitute your FTDI cable’s virtual serial port for COM5 above.

For those who are not comfortable with command lines, it’s also possible to use the Arduino IDE to burn the bootloader, and flash in firmwares.

  1. Set your board to Arduino UNO by using the menu to navigate to Tools->Board->Arduino UNO
  2. Select your hardware programmer via Tools->Programmer
  3. Install the bootloader via Tools->Burn Bootloader
  4. Disconnect the hardware programmer, and use Tools->Port to select your FTDI cable’s virtual serial port.

Thereafter, you may flash in your sketches with the upload button. The above procedure will also work with any DIY or other Arduino clone which is not wired for a bootloader. Note that the bootloader takes up 512 bytes, so your maximum sketch size drops from 32768 to 32256 bytes.


Cheap 16×2 LCD Comparison

HD44780-compatible 16×2 LCD’s are cheap (<$4), and easy to use with Arduino via the LiquidCrystal library. To reduce the pin count considerably, the Adafruit LCD backpack is a nice little add-on that converts them to work via a two-wire I2C or SPI interface.

I bought two types to compare for use with OpenEVSE and LeafCAN. One has white lettering over a blue background, and the other one has black lettering over a yellow background. Here is an indoor comparison:

My camera can’t take good photos of the blue LCD indoors. The blue background is actually a good bit darker than in the photo, and the contrast is much better than it appears. Factoring that in, I guess I would still give the yellow LCD a slight edge indoors.

Now, here they are outdoors, in direct sunlight:

Again, the blue LCD didn’t photograph well. It looked slightly better than depicted in the photo. However, it’s a clear win for the yellow LCD. It works as a reflective LCD in direct sunlight, with very high contrast.

OpenEVSE – Open Source J1772 EVSE (“Charging Station”) for Electric Vehicles

Last year, I purchased a Nissan Leaf, which is an all electric vehicle (EV). Although the Leaf comes with an included L1 EVSE (“trickle charger”), which connects to a regular 120V wall outlet, it takes way too long to charge the car. The more practical solution is to purchase and install a J1772 L2 EVSE which is equivalent to the commercial charging stations you see in public parking lots. The problem is the cost. J1772 L2 EVSE’s cost a couple of thousand dollars; the quote I got from Aerovironment, Nissan’s chosen installer was about $4000 including installation. Considering that modern EV’s using the J1772 standard have the charger built-in to the car, and that a J1772 EVSE is no more than a smart safety interlock plug for connecting the car to the wall, I thought the cost was pretty outrageous.

I obtained a copy of the SAE J1772-2010 standard, and after a few hours of perusing it, realized that a J1772 EVSE could be implemented with an Arduino, a few parts, and a relay at the fraction of the cost of the commercial products.  Furthermore, that the circuitry is so simple and compact that it could be built into a small case that fits into your hand, and can easily be thrown into your trunk, rather than the giant monstrosities like GE’s WattStation.

I started to design my own EVSE around an AVR MCU, but soon discovered that Chris Howell had had exactly the same idea, and posted about his Weekend EVSE project on the MyNissanLeaf forums.  Chris had already made major progress on the project, so I thought, why reinvent the wheel?  I contacted Chris, and we decided to team up to develop an inexpensive, portable L1/L2 J1772 EVSE. Chris is a wizard with PCB layout, and has shrunken the board down to smaller than an Arduino over several revisions. It’s truly a sight to behold how tiny and simple it is after seeing the giant messy hackorama that’s being funded by the DOE, the $5000 Blink EVSE, which is just an amalgam of OFF THE SHELF DEVICES IN THEIR ORIGINAL CASES: http://www.mynissanleaf.com/viewtopic.php?f=26&t=5664 . One thing that I find annoying about commercial EVSE’s is that they often waste too much power in standby mode. Nissan’s included EVSE draws about 3W in standby, which doesn’t sound like much, but the question is WHY? Vampire power wastes about 10% of the energy used by a typical residential household. I’ve heard that the Blink wastes more than 50W when it’s doing nothing. Not only that, many of the commercial offerings (including Nissan’s included L1 EVSE) aren’t even 100% J1772 compliant!

After many hours of tweaking and testing, we designed a 100% J1772 compliant dual mode L1/L2 EVSE.
This DIY EVSE has worked flawlessly charging my Leaf ever since last summer:

The actual EVSE logic board is the tiny PCB at the top with the 3 LED’s attached to it.  The switching power supply is on the bottom right, and a 30A relay is on the bottom left.  A CT in the upper right is used to detect ground faults.

For a portable unit to throw in my trunk, I need adjustable current, so I’ve implemented a 1-button menu interface using a common HD44780-compatible 16×2 LCD, connected to an Adafruit LCD backpack, which greatly reduces the pin count required for interfacing to it. I’m currently using it in i2c mode.

Note how small the controller PCB is now … Chris is a PCB layout ninja … yes, that’s a complete implementation of a J1772 EVSE on that tiny board.  Now, go back to the Blink EVSE link I listed above, and see how huge and complex the circuits are in the commercial offerings THAT AREN’T EVEN 100% compliant to the standard!

This time, instead of going into the expensive box I bought for the first EVSE, it’s going to live in a $5 NEMA wiring box from my local hardware store. I think this box will be a lot more durable against getting dropped and thrown around than my fancy $18 NEMA box.

Hardware hackers, what are you waiting for?  Join in on the fun.  We’ve open sourced the design as OpenEVSE:  http://code.google.com/p/open-evse/. Now, you can build your own fully hackable, customizable EVSE!

DISCLAIMER:  Don’t jump into this project unless you have a thorough understanding of the precautions which must be taken when dealing with high voltages and currents.  It’s quite easy to electrocute yourself and DIE if you don’t know what you’re doing.