Converting Cheap Chinese USBHID Fake USBasps Into Real USBasps

I recently ordered some USBasps from Amazon, which looked interesting, because unlike the typical USBasps, which are just bare PCBs, these had metal cases:
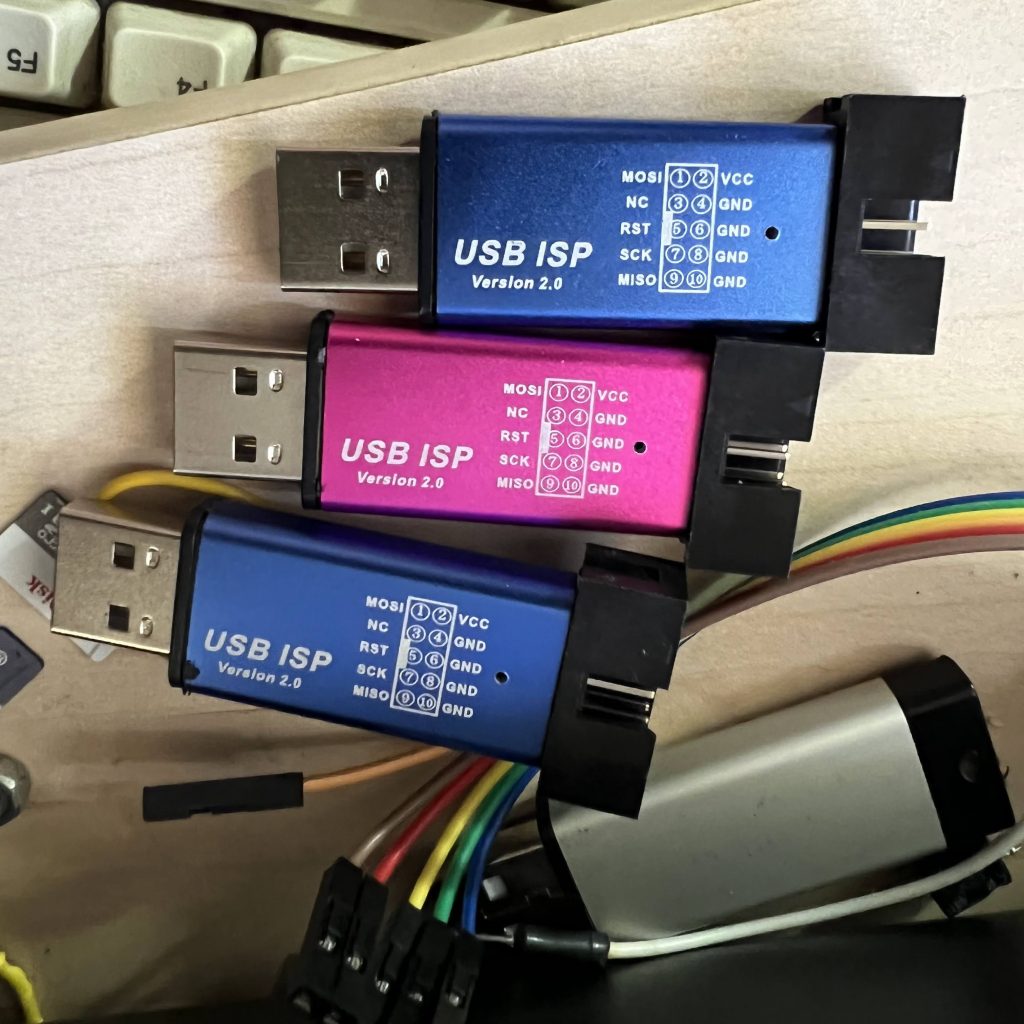
They are also common on AliExpress.

Unfortunately, when I plugged one into my computer, it detected as a USBHID device with VID=03EB and PID=C8B4, rather than as a USBasp. I tried overriding the USBHID driver on my Windows 10 machine, but that didn’t work.

Thankfully, after doing a bit of searching on the Internet, I found that others had encountered the same problem, and had found a solution. It seems that the firmware loaded into these things from the factory is proprietary, and require that you use the manufacturer’s janky software … it’s not AVRdude compatible!

Thankfully, the hardware is actually compatible w/ USBasp firmware with a minor tweak, and you just have to flash it with modified USBasp firmware.

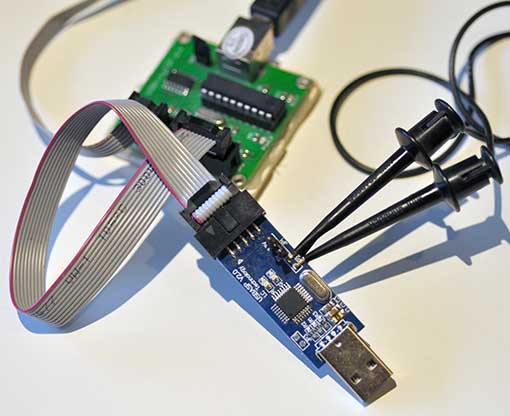
I have a bunch of real USBasps, so I used a USBasp to convert the fakes into real USBasps! In order to program it, slide off the metal case. Next need to connect a jumper across the two holes labeled –> UP <–. The jumper enables programming of the onboard ATmega88V. Then plug it into your other USBasp or other ISP programmer, using the 10-pin ICSP cable:
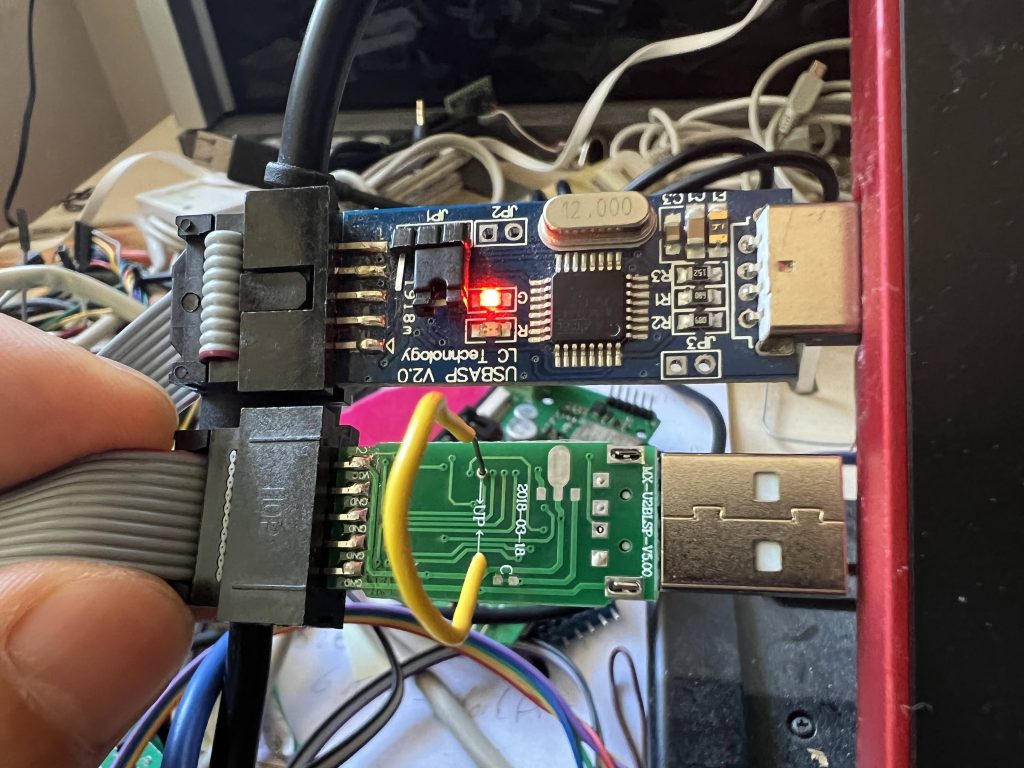
So where do you get the special firmware? GreenPhotons has graciously compiled a modified firmware for us. Next use AVRdude to program the USBasp firmware into our target:

avrdude -cusbasp -pm88 -Uflash:w:20161227_mega88_usbasp.hex

You can use any ISP you already have, if you don’t have another USBasp. Just substitute the programmer in the -c parameter (e.g. -cusbtiny for a USBtiny). If you don’t have another ISP programmer, you can use an Arduino. This guy shows you how, as well as another way to get firmware.

If you get the following error, then your USBHID ISP has an ATmega88P instead of an ATmega88V

D:\hacking\arduino\USBasp\convert_usbhid>avrdude -cusbasp -pm88  -Uflash:w:20161227_mega88_usbasp.hex

avrdude: AVR device initialized and ready to accept instructions

Reading | ################################################## | 100% 0.02s

avrdude: Device signature = 0x1e930f
avrdude: Expected signature for ATMEGA88 is 1E 93 0A
         Double check chip, or use -F to override this check.

Just substitute -pm88p for -pm88 in the avrdude command line:

avrdude -cusbasp -pm88p -Uflash:w:20161227_mega88_usbasp.hex

If you have an old copy of avdude that doesn’t like -pm88p, you can instead use -F to force avrdude to ignore the device signature:

avrdude -cusbasp -F -pm88 -Uflash:w:20161227_mega88_usbasp.hex

Downloads:

modified ATmega88 firmware for USBHID USBasp

References:

Making USBasp Chinese Clones Usable

Hacking An AVR Programmer

Hacking An AVR Programmer II

I found this great resource after writing this article:
USBasp on a Clone

How to Dramatically Speed Up AVRDUDE with USBasp or USBtinyISP Programmers

AVRDUDE has a little-known command line parameter, -B, which sets the bitclock, and can dramatically speed up writing/reading firmware to/from an AVR MCU when using a USBasp or USBtinyISP. For a USBasp, simply add -B0.5 to your command line parameters. Example:

avrdude -cusbasp -B0.5 -pm3280 -U flash:w:firmware.hex

In my tests, adding -B0.5 reduces the time to write & verify a hex file by about 2/3! For the USBtinyISP, add -B1 to your command line parameters. Example:

avrdude -cusbtiny -B1 -pm3280 -U flash:w:firmware.hex

The speedup is even more dramatic with the USBtinyISP. In a specific test, I found that write/verify time dropped from 59 sec to 17 sec!

You can also speed up programming from the Arduino GUI. Simply edit your programmers.txt file. In older versions of Arduino, it can be found in <ArduinoFolder>/hardware/arduino/avr/boards.txt. For Arduino 1.8.x, it’s located in C:\Users\<YourUserName>\AppData\Local\Arduino15\packages\arduino\hardware\avr\<version>\programmers.txt.

For the USBasp, add the -B0.5 parameter to the usbasp.program.extra_params line:

usbasp.program.extra_params=-Pusb -B0.5

In order to realize the speed gain in programming, the USBasp must have firmware which supports the setting of SCK. If AVRDUDE gives you this warning:

avrdude: warning: cannot set sck period. please check for usbasp firmware update.

then you must update your USBasp’s firmware. Follow the instructions in my article:
How to Update the Firmware on a USBasp V2.0

For the USBtinyISP, add the -B1 parameter to the usbtinyisp.program.extra_params line:

usbtinyisp.program.extra_params=-B1

If the Arduino GUI is already running, you must restart it in order to load the new settings.

HowTo: Fix AVRDUDE 6.3/Arduino 1.6.10+ Compatibility Issues with USBasp Clones

I recently upgraded to Arduino 1.6.13, and found that I could no longer program my boards with my Chinese USBasp clone programmer. When the Arduino IDE tried to load the firmware with my USBasp, AVRDUDE couldn’t find my USBasp, and gave this error:

avrdude: error: could not find USB device with vid=0x16c0 pid=0x5dc vendor=’www.fischl.de’ product=’USBasp’

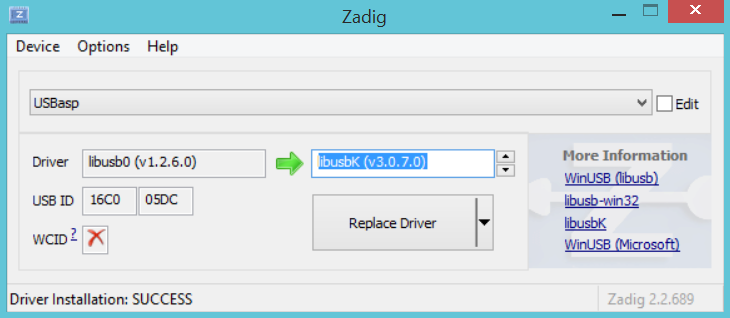
It turns out that the that AVRDUDE 6.3, which is bundled with Arduino 1.6.10+, has timing issues with USBasps. The fix is to replace your libUSB-win32 driver with libusbK v3.0.7.0. An easy way to install libusbK v3.0.7.0 is to use zadig. Download the zadig from

http://zadig.akeo.ie/

Plug your USBasp into your PC.

Launch zadig, and from the menubar, select Options->List All Devices

Next, from the top listbox, select USBasp.

From the Driver selector box, click the up or down arrow key until libusbK (v3.0.7.0) appears.

Finally, click the Replace Driver button.

The screen should look like this:

zadig

You do not have to reboot or disconnect/reconnect your USBasp. After Zadig finishes installing libusbK, AVRDUDE 6.3 will start working correctly with your USBasp.

NOTE: the version of AVRDUDE that Arduino 1.6.x uses is actually controlled by the Boards Manager (Tools->Board->Boards Manager). Even if you have a version of Arduino 1.6.x prior to 1.6.10, if your Arduino AVR Boards by Arduino is version 1.6.10+, it will use AVRDUDE 6.3.

Arduino 1.0.5-r2 for AT90USB1286 and Printrboard

It’s been a few years since I hacked together the copy of Arduino-0022 that’s been floating around the web, which lets you compile and automatically upload Arduino code to an AT90USB1286. This made it a lot easier to develop Arduino code for the AT90USB1286, and in particular to easily modify the Marlin firmware for the Printrboard.

Yesterday, I figured it was high time to add AT90USB1286 support to Arduino 1.0.5-r2. The basic procedure for the modification was to first install Teensyduino, which adds the AT90USB1286 compilation support to Arduino, but only uploads to a Teensy++ 2.0, running PJRC’s proprietary halfkay bootloader. I modified the Teensyduino configuration to also support uploads to targets running the LUFA CDC Bootloader, or via USBtinyISP or USBasp ICSP programmers.

Note that I copy that I modified only runs on Microsoft Windows.
You can download it from github: https://github.com/lincomatic/arduino-1.0.5-r2-at90usb1286
It’s easiest to download it as a zip file: https://github.com/lincomatic/arduino-1.0.5-r2-at90usb1286/archive/master.zip

Once you unzip the archive and launch arduino.exe, you will notice some new entries in the Tools->Board menu:

[USBasp]AT90USB1286
[usbtinyisp]AT90USB1286
[BootloaderCDC]AT90USB1286
[USBasp]Printrboard
[usbtinyisp]Printrboard
[BootloaderCDC]Printrboard

The only difference between the Printrboard and AT90USB1286 entries is that the extraneous USB Type, CPU Speed, and Keyboard Layout submenus are grayed out from the Tools menu.

To load Marlin firmware onto a Printrboard, you will most likely want to use [BootloaderCDC]Printrboard.

Note that unlike my Arduino-0022 hack, the pinMode()/digitalRead()/digitalWrite() functions in version currently only support the pins that are exposed on the Teensy++ 2.0. This is because I haven’t yet had the time to figure out how to add in the remaining AT90USB1286. However, this limitation doesn’t affect Marlin firmware on the Printrboard, because Marlin uses its own fastio functions, rather than using Arduino digital pin numbers and pinMode()/digitalRead()/digitalWrite(). See pinmap.txt for the currently supported Arduino digital pin numbers.

Thanks again to PJRC for Teensyduino. Teensys are a great alternative to Arduino boards.

How to Update the Firmware on a USBasp V2.0

REVISED 2018-07-16

If you buy a cheap USBasp V2.0 ICSP programmer on eBay, chances are, avrdude will give you the following warning message:

avrdude: warning: cannot set sck period. please check for usbasp firmware update.

While it’s just a benign warning message which can be ignored with no ill effects, it’s still a constant irritant. Furthermore, it also prevents my speed up technique from working, because it relies on changing the sck period. To get rid of the warning, you must update the firmware to the latest version: usbasp.2011-05-28.tar.gz

If you have another ICSP programmer already, such as a USBtinyISP, programming in the new firmware is quite simple. If you have more than one USBasp, you can even use them to program each other. Here are the steps:

0. Verify that you have a USBasp V2.0, and that it has a 12MHz crystal and an ATMEGA8 or ATMEGA8A MCU onboard. DO NOT CONNECT IT TO THE USB PORT OF YOUR COMPUTER.

1. Short the JP2 (self-programming) jumper.

2. Connect the USBasp V2.0 to the USBtinyISP (or other ISP) using a 10-pin ribbon cable

usbasp

3. Flash in the new firmware: avrdude -c usbtiny -p atmega8 -U flash:w:usbasp.atmega8.2011-05-28.hex

4. Reprogram the USBasp’s fuses: avrdude -c usbtiny -p atmega8 -u -U hfuse:w:0xc9:m -U lfuse:w:0xef:m

If you’re not using a USBtinyISP, substitute the proper parameter after -c (e.g. -c usbasp).

Note that the usbasp.2011-05-28.tar.gz archive doesn’t contain a compiled .hex file, so you have to re-compile it using WinAVR. Instead, you can just use my hex file, which I compiled directly from the sources: usbasp.atmega8.2011-05-28.zip

If you don’t have another ICSP programmer, you can use an Arduino, following these instructions: Updating firmware on USBASP bought from eBay. However, you may also have to also set the fuses according to Step 3 above. My PC wouldn’t recognize the reprogrammed USBasp until I set the fuses.