I’ve had to do a lot of experimenting and tweaking in order to get decent prints out of my Printrbot (NOTE: Just to be clear, the Printrbot I built was not from a kit from Brook Drumm. I self sourced the parts, including the printed bits, which were given to me by a friend. You may or may not run into the all of the issues I had, but my tips below are generally applicable to Repraps of any kind, as well). Initially, my prints were wiggly unless I printed very slowly, at 15mm/sec. After tweaking, my prints at 30 mm/sec look better than they used to at 15 mm/sec, and now my 15 mm/sec prints look even better.
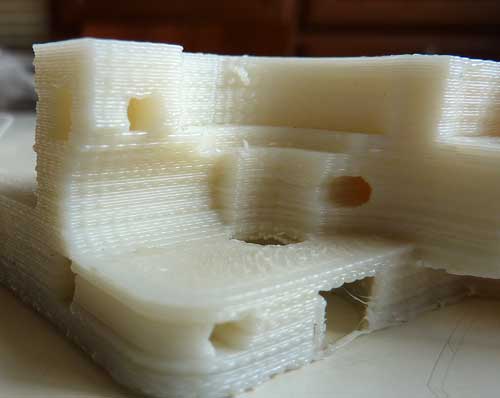
Below is one of my best prints before tweaking; note the squiggly lines, which are caused by vibration, and binding bearings on my y-axis:
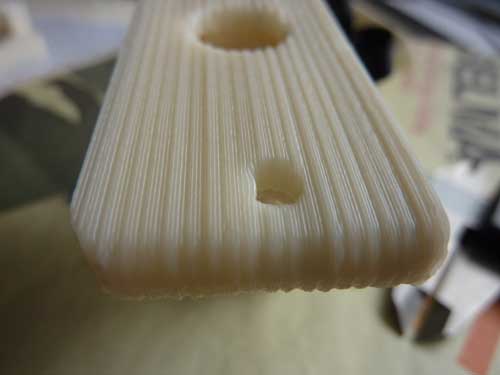
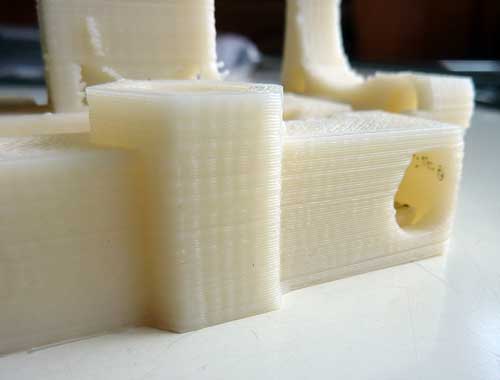
In the next photo, the lines go parallel to the x-axis. Note that they are pretty straight, with very little wiggling. This is because the y-axis was stationary, and all of the movement was in the x-axis, which was moving smoothly, without binding:
However, notice how the layers don’t stack nicely in the z-direction, and how the pattern is periodic, repeating about every 6 layers. This effect was caused by the notorious leadscrew wobble, because my leadscrews weren’t perfectly straight. Many people call this phenomenon “z-wobble” because it’s caused by the z-axis leadscrew, but it’s a misnomer, since the resultant wobbling is in x and y.
OK, so let’s get to tweaking the Printrbot.
Step 1: Make sure your x-carriage slides smoothly, with no binding
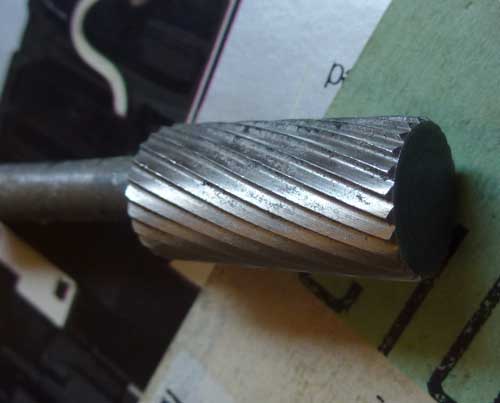
First, with the x-belt detached, slide the x carriage, and make sure it slides smoothly, with no binding. Reprapped prints are generally not perfect. My x-axis was very stiff when I first assembled my Printrbot, and the rods and bearings were misaligned. Also, the LM8UU linear bearing holes were extremely tight. I cleaned up the imperfections in the bearing holder holes in the x-carriage by using this rotary rasp on my drill press,
and running it up and down the holes. If you don’t have a rasp, you can use a large drill bit, but it will take longer. Once the holes were cleaned up, my linear bearings were nice and parallel. Next, I found that the hole spacing for my x-rods was narrower on the right side than the left. The printer that was used to print my x-ends must have skipped a few z-steps while printing the right side. This also caused severe binding of my x-axis. I used a drill bit to open up one of the holes, so that the rods could be parallel, but this made the rod loose, causing the squigglies in the prints. I’ll detail how I fixed that below.
Step 2: Make sure your z-bearings aren’t binding
With the leadscrews detached from the z-motors, try raising and lowering your z-carriage by hand. Mine was binding quite a bit, which made my z-motors sometimes skip, even with the current turned up. The problem was in my z-axis bearing holes; they were too tight, also not perfectly straight, so the z-axis linear bearings didn’t stack perfectly. This caused severe binding in my z-axis. Again, I used the rotary rasp to clean up the holes until my z-bearings were lined up nicely. Once you get it right, the z-axis will slide up and down smoothly.
Step 3: Make sure your smooth rods are very tight
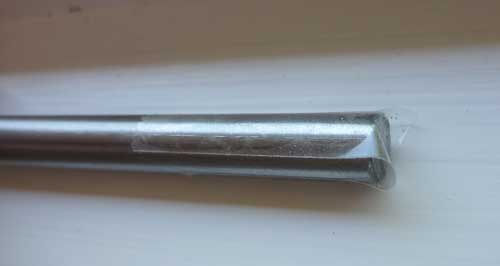
In order to get maximum rigidity in the frame, it is of utmost importance for your smooth rods to fit tightly into their holes, with no play. Mine were all rather loose (especially the one that went into the hole I had to enlarge to get my x-rods parallel), so I put tape on them like so:
and then pounded them into their holders with a rubber mallet. If 1 layer isn’t enough, keep adding more until you get a very snug fit.
Step 3: Square up your z-axis
Once x and z smooth rods are nice and tight, check the spacing of the z-rods at the top and bottom. If necessary, re-adjust the bolts the threaded rods in the base to get the top and bottom spacing to be as close as possible. While you’re at it, use a t-square to make sure that they aren’t tilted in the x or y-directions before you tighten down the nuts. If you don’t square up the z-axis properly, your taller prints will come out tilted, or the layers will get larger or smaller as the layers go up.
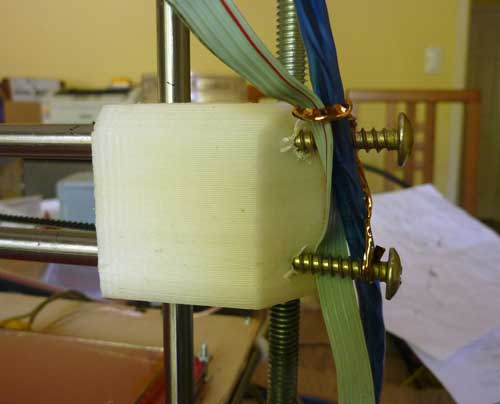
In order for your z-carriage to move up and down smoothly for the full travel, the spacing of the the x-ends needs to just right. After making my x-rods fit tightly into the x-ends, the distance was very difficult to adjust, so I drilled holes into my right x-end, lined up with the ends of the smooth rods, and inserted 2 coarsely threaded screws:
Then, I pounded in the x-ends so that the fit was a bit tight, and then used the screws to get the fine adjustment. Tightening the screws pushes on the x-rods, which spreads the carriage out. I adjusted the top screw until the x-carriage was sliding smoothly, then turned in the bottom screw until it just touched the bottom rod. If you overtighten a screw, just back it off, squeeze your x-ends together, and start over.
Step 4: Get rid of leadscrew wobble (aka “z-wobble”)
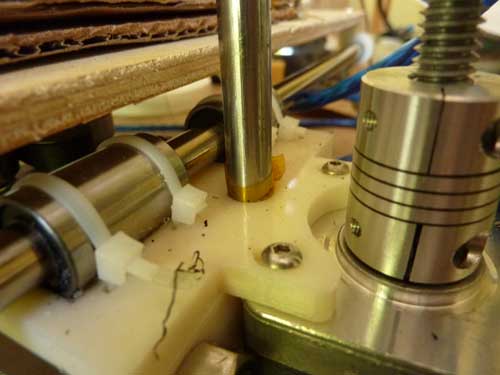
My leadscrews were binding like crazy and making my z-motors skip steps instead of turning. One problem was that I couldn’t get the threaded rod centered in the plastic printed z-couplers. If the leadscrews aren’t perfectly concentric with the motor shafts, they will wiggle. After fiddling with them a while, I gave up, and bought these aluminum flex couplers on eBay:
In the photo above, you can also see the kapton tape that I used to wrap the z-smooth rod in order to tighten it up.
Make sure your smooth and threaded z-rods are parallel
Even with the aluminum z-coupler, the leadscrews were still binding and squeaking, even though I lubed them with 3-in-1 oil (I’ve since switched to automotive grease, which doesn’t need to be renewed as often, and doesn’t drip all over the place). The z smooth and threaded rods should be perfectly parallel to each other. Upon close examination, I found that my motor mount holes were printed slightly too close to the z-smooth rod, causing my threaded rods to bow away from the smooth rods at the top. I had to elongate the screw holes in order to get the threaded and smooth rods parallel.
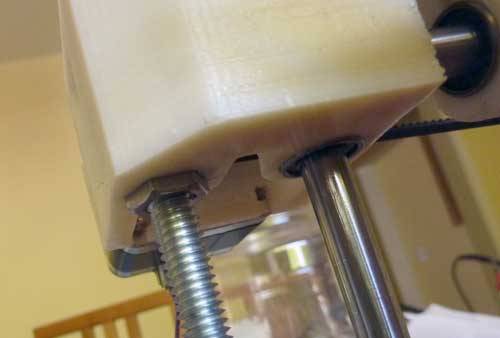
The threaded rods were still binding. I finally figured out that the drive nuts were slightly tilted when fully inserted into the nut traps. Again, this was due to the imperfections of Reprap-printed parts. I pulled the nuts out, and then reinserted them only halfway as pictured below
This got rid of most of the squeaking and binding. You might think that it’s dangerous to not press the nuts all the way into the nut traps but the weight of the carriage is always pressing down on them, so they won’t fall out.
At this point, the wobbling in my leadscrews was still visibly causing my carriage to wobble. Loosening the screws on the z-motors finally put and end to it. Instead of tightening the z-motor screws as tight as possible, loosen them up just enough that the motors can move a little bit. This way, the leadscrews will displace the motor laterally a little bit when rotating, rather than bending the smooth rods. I know it sounds illogical to not tighten them all the way down, but believe me, it works, and doesn’t compromise their accuracy. I can easily make prints of .1mm layer height. Now, even though my leadscrews still wobble, the wobbling doesn’t cause my extruder carriage to wobble, and I my prints have great alignment of the layers.
Do NOT be tempted to add any constraints which attempt to bind the leadscrews and z-rods together. This just makes things WORSE. No leadscrews are perfectly straight, and if you bind the leadscrews to the smooth rods, it just makes them bend the smooth rods along with them, and increases the wobble.
Step 5: Reduce x-carriage wobble
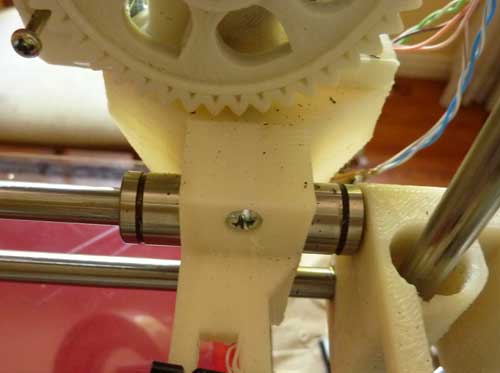
Next, I found that my extruder carriage was wobbling left and right whenever it was changing direction at high speed. I grabbed the extruder found that there was some axial play in the bearing. A good way to stabilize it is to put 2 linear bearings on the top rod, instead of just 1. This makes a huge difference in the stability of the carriage, at the expense of a a little bit of travel in the x-direction. Believe me, it’s well worth it.
With 2 bearings on top, there is now no appreciable axial play. You might be tempted to put two on the bottom rod as well, but this will likely cause binding in the x-axis, and won’t increase stability in a noticeable fashion.
Step 6: (Optional) Sexy x idler
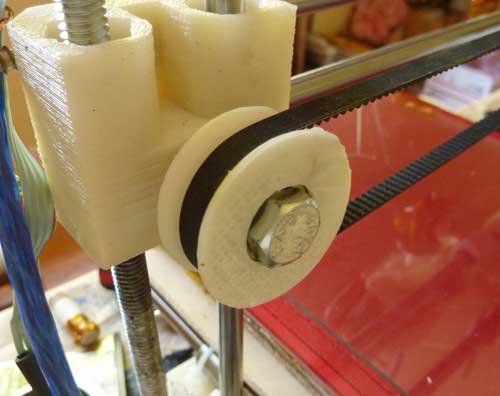
The next tweak I did really didn’t have much effect on performance, but it looks cool, and there are no fender washers to rub against the edges of your x-belt, possibly making it last longer. I printed a plastic idler bearing, and inserted the original 608 skate bearing into it:
I tried a few different designs. This one worked best for me: http://www.thingiverse.com/derivative:30363.
Step 7: Fine tune the calibration
Now that your Printrbot is mechanically tweaked, the most important thing to do is make sure it’s perfectly calibrated. This is the only way you’ll get parts that are dimensionally accurate. After doing the initial coarse calibration via calculations based on thread pitch, belt pitch, etc, enter those values into your firmware, and then you can start the fine calibration. I won’t go into the details of how to do that, because it’s documented widely elsewhere. Brook Drumm has some initial values to use in his Printrbot documentation. You can also use Josef Prusa’s Reprap Calculator. Instead of recompiling Marlin to change the x/y/z steps per mm, I just use the M92 – set steps per unit – g-code.
To calibrate each axis,
- move it 30mm (I clicked the move 10mm button in Pronterface)
- measure the actual distance moved with calipers
- scale the existing value according to the error
- repeat until the error is <.1mm
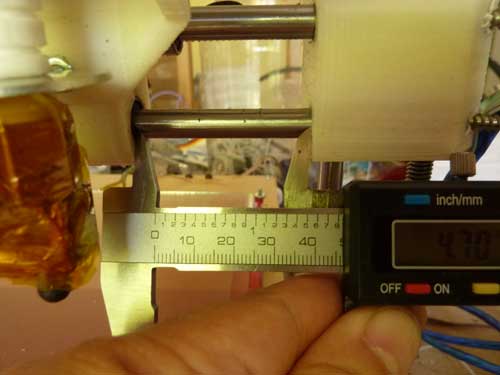
Here’s where I measure for the x-axis:
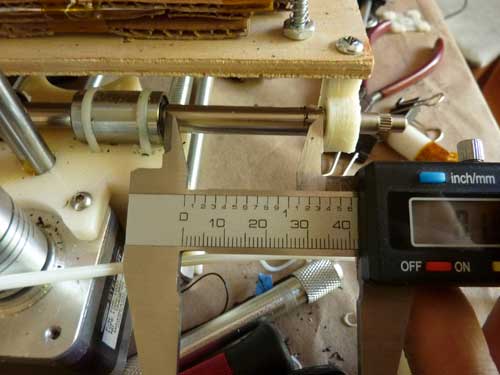
y-axis:
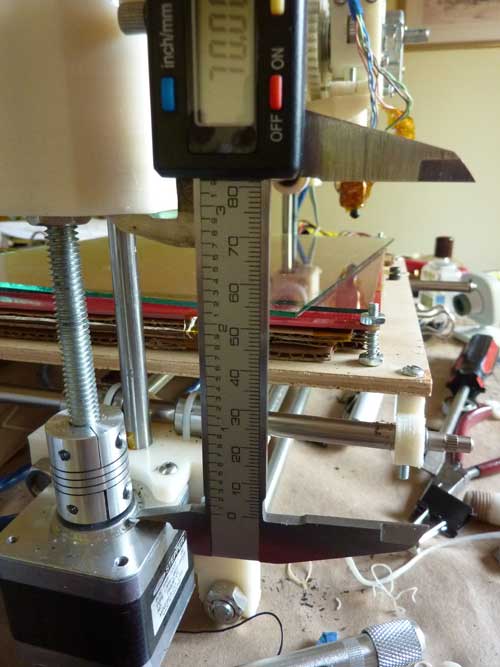
and z-axis:
For the extruder, attach a piece of tape to the filament, extrude 30mm, and measure. Richrap has an excellent tutorial on how to do that.
Here are the specifics of how to scale your steps per mm:
- Say your current x steps per mm is 78.81.
- You move the carriage by 30mm and measure 31.15 mm of movement
- Your new x steps per mm = 78.81 * 30 / 31.15 = 75.91
- Using Pronterface, enter M92 X75.91 to set the new steps per mm in your firmware
- Repeat the process until your error is down <.1mm
For the y-axis, use M92 Ynnn, and for the z-axis, M92 Znnn.
Once you have the new steps per mm for all of your axes, you can enter it into your firmware’s source code, but I like to just use M92 to initialize the printer each time I use it. Most slicers have a way to input some “start g-code” which is prefixed to any g-code that it generates. In Slic3r, you can find this in the Custom G-code tab. Here is my start g-code:
M92 X79 Y78.964 Z3007 E550 ; set steps/mm
G0 X0 Y0 Z0 ; go home
And my end g-code:
M104 S0 ; turn off hot end
M140 S0 ; turn off bed heater
G0 Y0
G0 X0
G0 Z0
M84 ; disable motors
I initially used G0 X0 Y0 Z0 in my end g-code, but that was a bad idea, because the carriage would sometimes hit the print. Now, I move it to the edge of the print area before I move it down. You can also skip the G0 Z0, but I don’t have endstops, so having it makes sure my Z home position doesn’t get lost between prints.
I’ve found that for the extruder, fine calibration by this method gets you in the ballpark, but is still deficient. I will try to write an article in the future to get into the details of getting your extruder and slicer to be fully calibrated to each other.
Step 7: Enjoy the fruits of your labor
Here is a print I made after tweaking:
Much better! Notice how the layers stack nicely so that the sides are now straight… no more leadscrew wobble.
But the rectangular part in the foreground still has some waviness to it. This is because to print that section, the y-axis has to move forwards, and then when it stops moving, it vibrates, causing the ripples. Each ripple is smaller than the previous one, because the vibrations are decaying. The problem lies in the design of the Printrbot; the y-bearings are too close together. Another problem is that the y-belt isn’t centered in the carriage, so the opposite end of the y-carriage wobbles more. I still need to print at 30mm/s or less to get nice prints. For perfect prints, I have to slow down to 15mm/s. At higher speeds, the entire Printrbot starts to vibrate like crazy. The base is just too narrow in the y-direction, unlike the lasercut Printrbot, which has little feet extensions.
Step 8: For high speed printing, stabilize the y-axis
The Printrstand by pelagibot is very similar to the wooden feet on the lasercut Printrbot. It looks nice, but I don’t think it will work well enough to really stop the vibrations. I decided not to risk the filament to find out. I think using these U-clamps on a big piece of wood would work great, but at the expense of being ugly, and making the Printrbot a lot bigger and heavier.
I haven’t done Step 8, nor any further tweaking of my Printrbot, because I’ve since moved on and designed my own Reprap, which can print at more than 2x the speed at the same quality, but my Printrbot served me well, and I am thankful to Brook Drumm for designing it. My Printrbot was built from self-sourced parts, and it’s quite possible that the kits that Brook sells have better performance than my build, and likely better quality printed parts.
Nice write up thanks.
Very useful article for a beginner, thanks for taking the time to write this up
My Printrbot LC kit is now calibrated and printing well. Managing Z Home via software and using calipers with Pronterface rather than ‘print, measure, repeat’ are huge time savers
BTW, it’s Brook Drumm. You consistently wrote Brook Dunn so it’s an easy search/replace to fix
Oops. Typo.. I know the correct spelling, funny how I mistyped. thanks.
So what have u printed sucessfully so far?
lots of stuff. I used the Printrbot to print out two other printers of my own design, as well as lots of other things, some which are shown on this blog.