Ever since I bought my Roland TD-3SW v-drum kit, I’ve found the included FD-8 hi-hat pedal to be a major annoyance. The problem is that I would practically have to stand on the pedal in order to get the hi-hat closed sound. Adjusting it according to the instructions in the manual didn’t help. I basically lived with it this way until my son recently wanted to start using my drum kit, and couldn’t apply enough force to the FD-8. It was time to fix the problem.
I googled around and found a few fixes, notably this discussion on vdrums.com: FD-8 Hi-hat Controller Pedal – Notes on Improving Volume and Feel. However, I felt that the fix described in the thread seemed too hacky for my tastes. Finally, I found this video on YouTube by a brilliant German guy: How to fix a Roland FD-8 hihat pedal. I decided to try his method, and it worked great! My pedal now has action a lot more like a real hi-hat pedal; you don’t have to mash it down hard to get the “closed” sound. I’ve modified the procedure a little, and have documented it below:
Step 1: Remove screws
In the YouTube video, Marcel practically tears down the entire FD-8. Actually, you don’t really have to disassemble everything. All you need to do is get access to the problem parts. Remove only the screws pictured in the photo below from the bottom of the pedal:
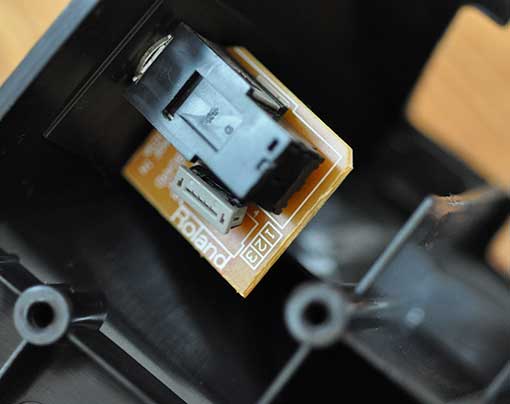
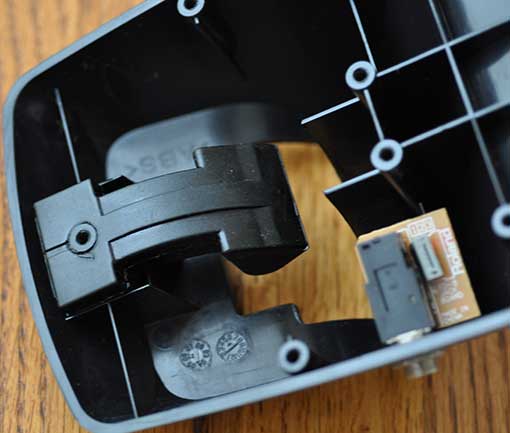
This will allow you to separate the front plastic cover from the metal bottom. The bottom metal plate has a resistor attached to a small PCB via a ribbon cable, which is attached to the 1/4″ TRS jack. This is what the resistor looks like:
There is a rubber foot (show in a photo below), which presses along the resistor in order to tell your drum’s brain box the position of the pedal. The problem is that the rubber foot doesn’t press hard enough against the section that indicates hi-hat closed (low resistance), near where the ribbon cable connects.
When you open the case, the ribbon cable will be attached to the grey clip pictured below:
To release the ribbon cable, simply pull upwards on the grey part of the clip until it stops. Then the ribbon will easily slide out of the slot. The rubber foot is attached to the underside of the plastic cover:
The problem is that the rubber foot is extremely stiff, and doesn’t bend as easily as it should. To remove it, gently rock it back and forth while pulling upwards. In the video, Marcel sprays silicone lube on it to loosen it up, but mine wasn’t that tight.
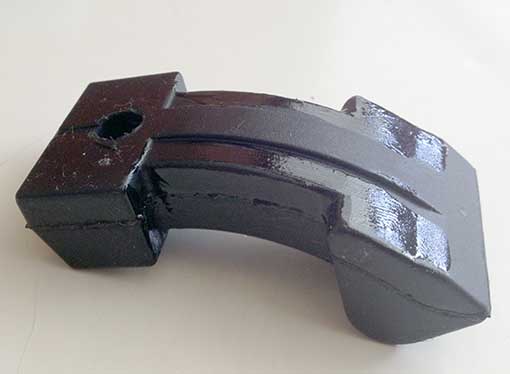
The method shown in the video is to soften up the rubber foot by thoroughly coating it with petroleum jelly and letting it sit in a warm place overnight. Since petroleum jelly eats rubber, I decided to apply it only on the part that affects the flex action, and not on the contact surface:
In particular, notice how I avoided applying petroleum jelly to the narrow protruding ridge. This keeps it from softening the ridge, which we want to remain hard, to maximize the pressure and lessen wear.
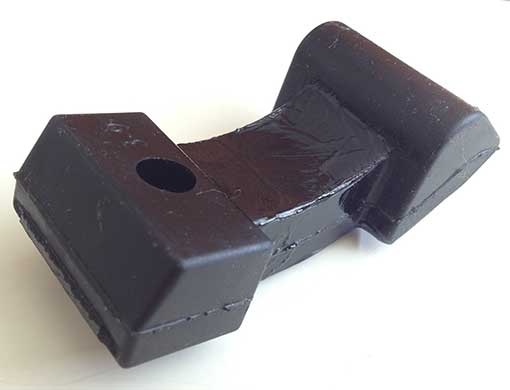
I left the rubber foot on top of my cable TV set top box (a consistent heat source) overnight. The next morning, the rubber was considerably softer, and I could tell that it was taking a lot less force to flex it. Again, here’s where I deviate from Marcel’s video. He initially applies the petroleum jelly a lot thicker than I did, and says to wipe it off after the rubber softens, leaving a layer that’s approximately as thick as what I applied in my photos above. Instead, I wiped the petroleum jelly residue completely off with a paper towel. I figured that some of it would still be soaked into the rubber, and that would be enough. Better than having it eat through the rubber until it turns to mush.
Reassembly of the pedal is just the reverse of the dis-assembly steps. When re-inserting the ribbon cable into the gray connector, make sure the gray connector is pulled up while inserting the ribbon cable, and then press it down to lock the cable in place. Also, be sure that the metal tongue pictured below has a layer of silicone grease on it:
Mine still had enough lube on it from the factory, so I didn’t apply any extra. The rubber foot slides against this metal tongue when you press the pedal, so if it isn’t lubed properly, the pedal may need extra pressure. DO NOT use petroleum jelly here, because it will slowly melt the foot, and probably turn it into mush over time. Silicone lube, on the other hand, does not react with rubber. You can get small quantities of silicone grease in most auto parts stores.. it’s used on the rubber bits of brake parts. Also, you can buy it pool supply stores, or at a hardware store. This cheap stuff at Home Depot should work OK: Silicone Faucet Grease.
My pedals has great action now! I’m not sure if it will harden up in a few months, but the hack is easy and I’d rather play the hack on the conservative side. An alternative hack would be to drill holes along the side of the rubber foot, thus lessening its tension. I was originally going to do this, and it turns out someone on vdrums.com successfully did it (see the the 2nd to last post on this page), but in the end, I decided to first try the petroleum jelly method, since it was less invasive. Thanks again to Marcel (vdrumtips).


Followed your tips to the letter and my pedal now works perfectly again! Thanks a lot!
I’ve also followed your steps exactly, and it’s sorted my pedal right out. Can’t believe the simplicity of the proportion jelly method! Thanks so much. Great pics and descriptions, too.
Obviously that should read ‘petroleum’… Grrr
Hi! Excellent post! I have had my pedal serviced for this same reason before I actually learned this tweak. It has lost its sensitivity again, and I am about to go get some vaseline and try your method. My question is: since the rubber part is not supposed to endure forever, where can I find a replacement for it? I have already found replacements for the sensor tape (http://www.fullcompass.com/search.php?parent=471&search_simple=true&txtAll=roland+fd-8), but not for the rubber. Any help?
Sorry, I don’t know where to buy a replacement. But you can just soften up your old one w/ the vaseline method, and it will work better than new.
Brilliant – thank you. My FD-8 is quite a few years old now and had gradually worsened. It is now back to its prime after 4 hours with vaseline in our airing cupboard.
I did not need to remove the wire connection, just laid the plastic top to one side.
I tried to do the process with Vaseline. I took off the rubber part, left overnight and the next day wiped and installed. It worked perfectly. After a day or two, again the same symptoms. Actuator, only works properly after treatment and at any time. I guess I purchase a new imminent. I’ll try again the same process, but if it does I know what to do. Thank you for your help.
Maybe it’s too cold. You need to get it warm enough that it feels flexible with the Vaseline on it, and let it sit for 24 hours. If that still doesn’t work for you, the next step is to drill some small holes horizontally into the narrow “bridge” section.. drill along the molded rubber seam, all the way through. This will make it more flexible. See the 2nd to last post on this page: http://www.vdrums.com/forum/forum/advanced/technical/17753-fd-8-hi-hat-controller-pedal-notes-on-improving-volume-and-feel/page10
Good luck.
Excellent all round, worked a treat, big thank you
I found that if you take the rubber actuator and over flex it back and forth and twist as far as you can it removes the stiffness and becomes very flexable
I had the same problem and I tried the heat and Vaseline thing which worked but only for a couple of weeks. I’ve looked up on Google how to cast things in silicone (which should remain flexible longer than rubber). Having never done this before I don’t know how it will go. I imagine that I’ll need to make sure the 2 pieces of the cast open up at one end of the hole in the part or it won’t come out of the mould 🙂 Just thought I’d share that suggestion for anyone who is in a hurry to fix the problem permanently. It looks like you can buy the product to this moulding at home.
I think if you drill more holes into the bridge between the thick parts, you can probably get it flexible enough. I didn’t resort to that yet. Mine hardened up again after several months. I’ve been too busy to play with my drum lately, so it will be a while before I try fiddling with it again. If your casting idea works, please keep us posted!
Hi,
Thanks for the tip. Turns out for me all that was needed was putting some lithium grease on the metal tongue – it was very dry and must have been catching the rubber foot. So for me a very quick fix. Thanks for the info!
same here!!!!! I didn’t have to do anything to the rubber foot.
Just applied lithium grease to the metal tongue.
I hope this fix lasts.
Just buy a new one.
http://shop.rolandus.com/p/actuator
you can buy one in the website of Roland. I bought one of these an received in only 3 days. =)
Tried this with my 13 year old TD-3. Perfect!
Thanks. 5* fix.
I tried everything and nothing worked. Gave in and ordered a new senor and acutator off amazon and they arrive today! I’ll repost and let you know how it goes.