Banggood.com recently had a special on the Gopher Technology CPS-3205 bench power supply. After searching for reviews, which were generally favorable, I decided to get one for $42.99 including shipping. At this low price, I figured it was worthwhile if it worked at all. The unit is small, fanless, and appears well-constructed. What convinced me to try it was Voltlog’s exhaustive video review of the CPS-3205C, which is a more expensive version with active PFC:
I am not able to use the CPS-3205C, because it only works on 240V, unlike the CPS-3205, which is dual-voltage 120/240V.
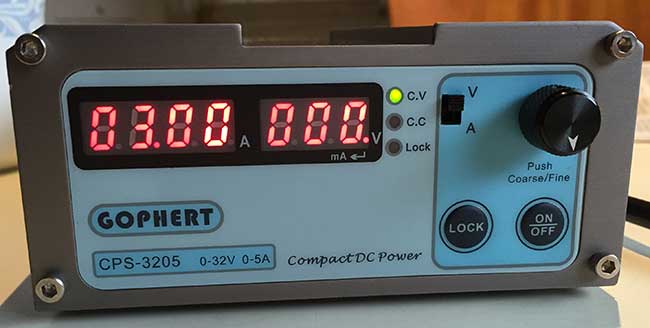
Upon unboxing, my initial impression of the CPS-3205 was very good. The unit is quite compact, nicely built, and easy to use. One trivial but annoying defect, however, is that the front panel meters are mislabeled. The voltmeter (on the left) is labeled A and the ammeter (on the right) is labeled V:
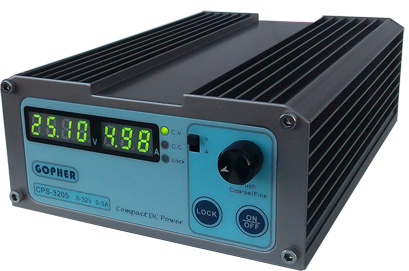
I can’t imagine how such a glaring error could have happened. The photos on Gopher’s website, and most photos from various vendors have the meters labeled correctly:
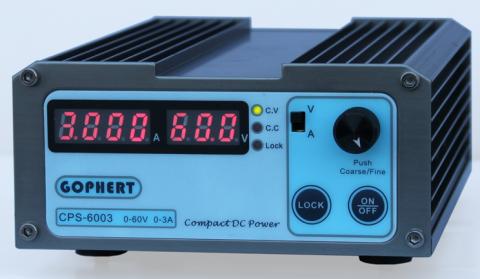
I started to wonder whether Banggood was selling counterfeits, also because mine is labeled GOPHERT rather than GOPHER. However, my fears were laid to rest when I found this photo on Gopher’s own website:
There are definitely genuine devices out there labeled GOPHERT and with the V and A reversed.
One important attribute of the CPS-3205 is that it doesn’t suffer from voltage transients at power up and power down, which can fry an attached circuit, unlike another cheap power supply I was considering, the PS-305D. Here is a test of the PS-305D’s nasty startup transient: Quick test of the PS-305D PSU. Although Voltlog’s testing shows that the CPS-3205 doesn’t suffer from startup voltage transients, there’s even a second layer of protection. By default, the outputs are disabled when it’s powered up. The ammeter displays OFF, and you must press the ON/OFF button on the front panel to enable the output. This further assures that the power is already stable by the time it reaches your attached circuit. Note that the ON/OFF button only controls the output. The main power switch is on the back of the unit. If, for some reason, you prefer to have the output enabled a power on, you can toggle this feature by holding the ON/OFF button depressed for 5 sec. If the ammeter displays dOn, then the output is enabled at power on, and if it displays dOF, then it’s disabled at power on.
The CPS-3205 has over current, over voltage, and over temperature protection, so it’s pretty robust.
I am not going to go into detail on operation of the CPS-3205, because it’s easy to read in the manual, and Voltlog demos it in his video. Suffice to say that the adjustment knob is very handy, because every time you press it, it shifts to a different digit to adjust, making it very fast to do fine or coarse adjustments. The LOCK button locks the adjustment knob and ON/OFF button from changes, and a nice feature is that it’s persistent even if you power the unit off/on.
WARNING: One attribute that’s not clearly stated in the manual is that in constant voltage (CV) mode, the current set in the constant current (CC) mode is an upper limit for the current that can be output. So, for instance, when the voltage is set to 25.00V and the current is set to 100mA, no more than 100mA can be output, so the output voltage will drop if you attempt to draw >100mA. I found this out the hard way, because mine had the current set to 000mA when I received it, so the output was zero in CV mode. I thought the unit was defective, as shown in my video:
After I played around with it some more, I realized that I had to switch it to CC mode and turn up the current before it would output any voltage.
Accuracy
I tested the accuracy of the CPS-3205 against a TES 2208 DMM. This TES meter has been my workhorse for the past 35 years or so, and has never been recalibrated. It’s no Fluke, but in my testing against other meters it’s been pretty good. That being said, I haven’t tested its accuracy in well over 15 years.
Out of the box, I tested a few random voltages in CV mode, and they were spot on. However, the ammeter displayed 5mA even when no current was flowing. Before running the tests below, I calibrated the CPS-3205 against the TES 2208 DMM, following the procedure at the bottom of this article. In the tables below, the readings are all shown to their maximum resolution.
The performance in CV mode was quite impressive, tracking to within .1V, and well within its rated spec of <=0.3% + 10mV.
| Setting | Panel Reading | TES 2208 DMM |
| 00.01 | 00.02 | .011 |
| 00.05 | 00.05/00.08 | .052 |
| 00.10 | 00.10 | .101 |
| 01.00 | 01.01 | 1.006 |
| 05.00 | 05.00 | 5.01 |
| 05.25 | 05.25 | 5.26/5.27 |
| 10.00 | 10.00 | 10.03 |
| 20.00 | 20.00 | 20.0 |
| 30.00 | 30.00 | 30.0 |
| 31.00 | 31.00 | 31.0 |
| 32.30 | 32.30 | 32.3 |
Generally, the voltage reacted to setting changes within a second, but when I dialed it down from 28.00V to 00.01V, it seemed like it took about a minute to ramp down and finally stabilize. Interestingly, at low voltages <=.10V, even though the panel meter displays on the high side, the actual output is actually quite a bit more accurate.
In CC mode, the performance was not as impressive, but within the rated spec of <=0.3%+20mA.
| Setting | Panel Reading | TES 2208 DMM |
| 001 | 005 | 5.7 |
| 005 | 009 | 9.7 |
| 10 | 15 | 14.8 |
| 20 | 23 | 25.1 |
| 50 | 53 | 55.1 |
| 55 | 56 | 66.8 |
| 60 | 65 | 66.8 |
| 70 | 75 | 77.0 |
| 80 | 90 | 87.2 |
| 100 | 104 | 105.3 |
| 180 | 185 | 187.2 |
| 190 | 197 | 197.3 |
| 200 | 207 | .20 |
| 250 | 254 | .25 |
| 1.00 | 1.00 | 1.00 |
| 1.20 | 1.20 | 1.20 |
| 1.21 | 1.21 | 1.21 |
| 1.22 | 1.22 | 1.22 |
| 2.25 | 2.25 | 2.25 |
| 3.25 | 3.25 | 3.25 |
| 4.00 | 4.00 | 4.00 |
| 4.05 | 4.05 | 4.05 |
| 5.00 | 5.00 | 5.00 |
| 5.10 | 5.10 | 5.10 |
While CC mode’s accuracy isn’t very good it’s still within its rated spec. The .3%+20mA accuracy makes it basically useless at low currents, so don’t use it for tiny loads, such as 20mA LED’s. The lower currents is where the PS-305D is a better performer.
I didn’t bother testing output ripple, because the accuracy of my CPS-3205 was very similar to that of Voltlog’s CPS-3205C, so I’m going to assume that the output ripple is similar. Also, I am not going to post teardown photos, because Voltlog’s video already goes over the innards of the CPS-3205C in quite some detail.
Summary
I am impressed that such an inexpensive piece of Chinese equipment is of such high quality. The CPS-3205 is well mode, easy to use, and surprisingly, comes from the factory fairly well calibrated. The user interface is well thought out.
Being a switch mode supply, it is light, compact, and quiet. Even though it’s fanless, it runs cool at the currents I tested.
One quibble I have is that the binding posts are in the rear of the unit. I wish that they were on the front panel, so I wouldn’t have to reach behind it. Also, the binding posts are lacking a hole drilled into the bolt for easy insertion of wires, and I wish the standoffs were a bit higher, so that they stood a bit farther away from the case.
The CPS-3205 not accurate enough for lab use, but for general hobby use, the performance is pretty impressive, as long as you can live with .3%+20mA accuracy on current control. It’s a great buy for the price. Currently, it can be had for <$50USD if you search around. It’s too bad that the current control isn’t better <100mA. It would have been nice to have the functionality to be able to run it between 5-25mA.
For those who want to re-calibrate the unit, it is easy to do, and the procedure is listed below.
Calibration Procedure
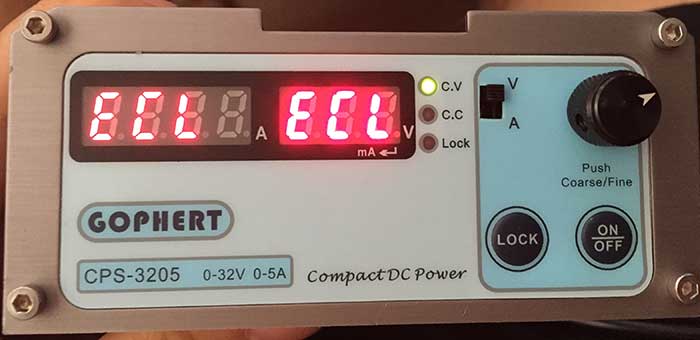
WARNING: ONCE YOU ENTER CALIBRATION MODE, YOU MUST COMPLETE THE ENTIRE PROCEDURE. IF CALIBRATION MODE IS ABORTED BEFORE COMPLETION, THE UNIT WILL ALWAYS DISPLAY ECP/ECP(OCP) AND BE NON-FUNCTIONAL UNTIL YOU COMPLETE A CALIBRATION CYCLE:


