If you have a hardware AVR programmer, such as the USBtinyISP, you can configure your Arduino IDE to use it for uploading sketches, rather than the standard USB interface. Why would you want to do this?
- it uploads faster
- your project will boot faster
- you can load bigger sketches, because you don’t need the bootloader anymore.
- it’s a lot more convenient when debugging communications between a host computer and the Arduino’s serial port, because you don’t have to share the port with the Arduino IDE and take turns accessing it.
- you want to build a project which uses the Rx/Tx pins on the MCU, which conflicts with programming via serial.
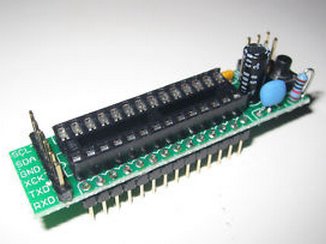
- you can use it to program stripped down AVR boards, such as the $2.99 board pictured below:
Windows users only: First, you must install the device driver. Follow the instructions here: http://www.ladyada.net/make/usbtinyisp/drivers.html
First, open your Arduino/hardware/arduino/boards.txt file in a text editor, and add the following lines:
##############################################################
usbtiny328.name=[usbtinyisp]ATmega328
usbtiny328.upload.using=usbtinyisp
usbtiny328.upload.maximum_size=32768usbtiny328.build.mcu=atmega328p
usbtiny328.build.f_cpu=16000000L
usbtiny328.build.core=arduino
usbtiny328.build.variant=standard
Note: The …variant=standard line is only needed for Arduino 1.0+. Older versions of Arduino will just ignore it.
If you’re using a programmer other than a USBtinyISP, substitute its identifier where I’ve typed usbtinyisp above. You can see the options in your hardware/arduino/programmers.txt file. In arduino-0022, the options are avrisp, avrispmkii, usbtinyisp, and parallel (beware, it’s case sensitive, so for instance, you must type usbtinyisp, not USBtinyISP). To support a different MCU, substitute it in the usbtiny328.build.mcu= line, e.g. atmega168. If you want to support more than one programmer/MCU combination, just add multiple sections with the different configurations to your boards.txt file.
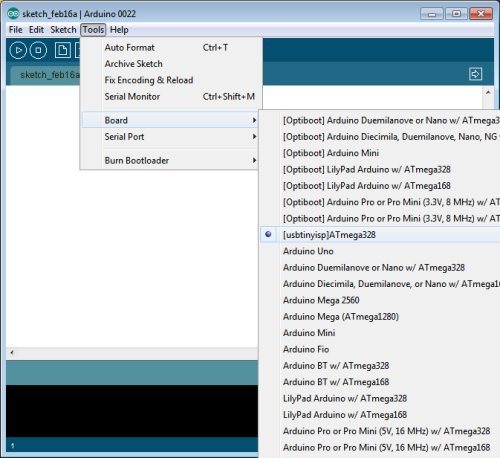
Next, hook up your programmer to the ICSP header on your board, and plug it into your computer. Select your new board configuration from the arduino Tools->Board menu:

Now, you can burn your sketch as usual, via the Upload button. Note that your bootloader will be overwritten, so you won’t be able to burn sketches to the same board without your programmer, unless you follow my instructions for restoring the bootloader below. On the other hand, after configuring your arduino software as described above, you can still burn sketches to arduinos which have the bootloader installed without your programmer. Simply pick the correct board from the Tools->Board menu.
———————————————————
Restoring the Bootloader
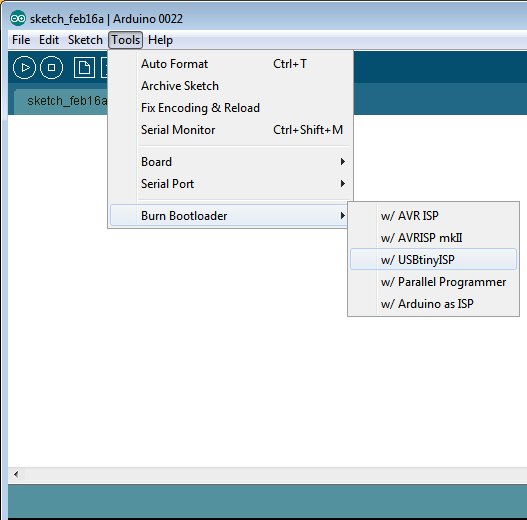
Once you’ve burned a sketch to an arduino via ICSP, the bootloader will be overwritten. If you want to revert to burning your sketch without a programmer, you must first restore the bootloader. With your programmer connected via ICSP, select Tools->Burn Bootloader:

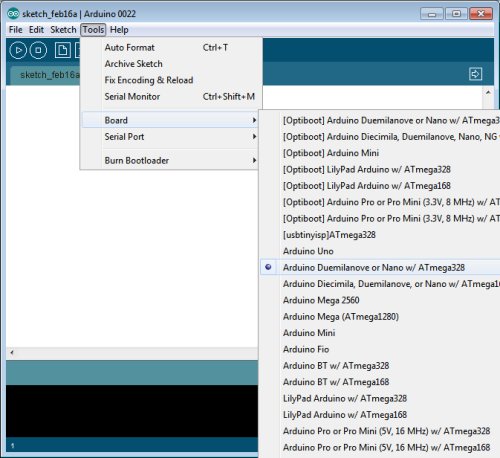
Now, you can disconnect your programmer and hook your arduino directly to the computer via USB. From the Tools->Board menu, select your board:

Now, things are back to normal, and you can burn your sketch via the Upload button.

Brilliant – thank you very much.
1 question though, is there a way to do this and also set fuse bits?
I am trying to write sketches to a atmega644P via ICSP. I would like it to use the external crystal at 16Mhz though, and I am just not sure how to set these with the IDE without setting them manually with something like Ponyprog or AVRStudio etc. Can it be done so the IDE sets everything required?
I assume when a bootloader is normally burnt to the AVR, it sets the fuses at the same time – so without the bootloader, it doesnt…?
Any help would be appreciate.
I basically want it to work like a Sanguino does, except programmed over ICSP rathe than FTDI.
Regards, J
The only way the IDE can set fuse bits is via the Burn Bootloader command.
I haven’t tried it, but I think this procedure would work:
1) install sanguino files
2) select sangiuno from the Board menu
3) use Burn Bootloader with the appropriate programmer selected. In case you’re wondering how the fuse bits are set, the Makefile in the Sanguino/bootloaders/atmega644p uses avrdude to set them, and you could use the same command that’s in the Makefile directly if you like, but Burn Bootloader is more convenient.
4) edit your Sanguino/boards.txt file and change the
sanguino.upload.protocol=stk500
to
sanguino.upload.protocol=usbtinyisp (or whatever programmer you’re using)
5) restart the IDE and then when you pick Sanguino from the Board menu, it will use your programmer via ICSP instead of the (stk500) serial USB protocol.
The first time you load a sketch, it will overwrite the Sanguino bootloader.
If you get more blank 644P’s in the future, you should be able to just use Burn Bootloader on them to set the fuse bits without having to re-edit the files.
Let me know if it works for you.
Correct – the answer is found here for anyone else who wants it also.
http://arduino.cc/forum/index.php/topic,53556.15.html
Thanks very much for your assistance.
HI,
Great post! Helped out a lot! I did everything in your instructions, but I can’t seem to be able to upload a simple blink example code from arduino onto my barebones Atmega328. My setup is simple: a breadboard, an ATMega328, an oscillator, and the USBtinyISP. I don’t know if it has to do with the serial port: the “serial port” option in Tools is greyed out. I’ve looked everytwhere but I can’t seem to find anything that relates to my setup. My device manager in Windows 7 doesn’t even show a ports menu (COM & LPT). Am I missing something?
You won’t see a serial port in the Tools menu. Did you select [usbtinyisp]ATmega328 from the Board menu?
Yes I did. I actually got it to upload sketches onto my barebones setup. I can get all the sketches to work except the ones that involve a serial monitor. This bugs because I need that to communicate serially with the chip after upload. I know the USBTiny can’t have its own serial monitor because it isn’t a USB serial device. Is there any way I can communicate with the chip using the USBTiny? Or will I have to break and get one of their fancy UNO’s or Diecimilla’s?
No, you can’t do serial w/ the programmer. I use serial w/ my barebones chip via a USB->serial converter (e.g. FTDI cable).
Ooh! So you don’t need a programmer between your serial computer port and the breadboard? No need to parse the I/O bits rushing back and forth? And you get a serial monitor that way? So what’s the ISP even for? Or any programmer for that matter…
If you want to program it with serial, then you need to first use an ISP programmer to set the fuse bits properly and install the Arduino bootloader (which takes up precious memory). I like to use an ISP programmer when I’m developing an app that uses the serial port to communicate w/ the host, so I don’t have to keep switching the serial port on the host between programming and talking to my app.
I can understand about the bootloader. Fortunately, My Atmega328 came with the bootloader on it. I guess I should put aside my USBtiny and get me an UNO if for no other reason to communicate with the chip via the Arduino IDE serial monitor…
Hey, here’s a question you might be able to help on:
Ihave a high torque digital servo that I’m trying to control through the atmega328. Specifically, it is a Hi-Tec HS5625MG. I’m trying to make it go from 0deg to 45deg, pause, then 45deg to 90deg, pause, 90 to 180deg, pause, and then come back to its original position at 0deg and stop.
I’ve looked everywhere for specifically this type of answer, and asked around but no luck. I know how to get it to go from 45 to about 90, but neither the rest of the range nor any further in either direction. 🙁
horrible!
Try this: http://arduino.cc/forum/index.php?topic=56704.0
Here’s a spec sheet http://servocity.com/html/hs-5625mg_digital_speed.html
it needs 1500-1900us pulse width
Dear lincomatic
How to do all this in ARDUINO 1.0 IDE? it even does not compile! Your advice please. And have a great new year.
Hi, I haven’t tried on Arduino 1.0. I think I read somewhere that you have to replace the #include for WProgram.h with Arduino.h or something like that.
Hi.
I use Arduino UNO and try this and.
Get error of avrdude.
avrdude: verification error, first mismatch at byte 0x0017
0x00 != 0x0c
avrdude: verification error; content mismatch
This works with UNO ?
Tks.
Yes, it works w/ UNO. Sounds like the data are getting corrupted by your programmer. Strange. Maybe you should try a different cable?
Hi,
Did everything as per your excellent script. Get not in sync error when trying to down load Blink. I have noticed that the “Scrip” run by Arduino 1.0 calls avrdude with the -c switch set to “arduino” not to usbtiny. When I use the burn boot loader option on the same chip the avrdude is called with the -c switch set to usbtiny. This happens with ATmega 328P chips both on a UNO board and on a nano board. I have changed the boards .txt file in Arduino. Help please.
Regards
John
Sorry, I haven’t figured how to make it work with Arduino 1.x .. use an older release, such as 0023.
I finally got this to work with Arduino 1.0.1 and Windows 7 using the SparkFun AVR Programmer. The driver from this ladyada link works with this combination: http://www.ladyada.net/make/usbtinyisp/usbtinyisp_libusb-win32_1.2.1.0.zip You need to unzip to a directory, plug in the programmer, then manually install the driver from the unzip directory because the install.exe file doesn’t work. Further, to get it to program, I had to power the 328 from the USBtinyISP while programming for some reason rather than power the 328 externally. Don’t know why. Also, add “usbtiny328.build.variant=standard” in boards.txt along with the lines shown above. Otherwise, the compiler cannot find “pins_arduino.h” I don’t understand why this hasn’t come up before. With these changes/additions, I was able to upload a sketch directly into the 328, and also upload the bootloader. Thanks a lot for the post. Very cool once you get it running!!
Thanks for the legwork. I will try it this weekend. I don’t have any problems switching back & forth among external/USB/USBtinyISP power, using my generic programmer, which I bought on eBay. What are you using to power the board, and which board are you programming?
It is a homemade basic basic breadboard consisting only of a 328, crystal and capacitors, reset circuit, power, and the jumpers needed for the programmer. It is currently powered by an Arduino Mega. If I unplug the Mega power, and use the Vcc and GND from the SparkFun programmer it programs great, but not when hooked up to the Mega power. Maybe I should retry that. There is no reason why that shouldn’t work!
Strange, I added “usbtiny328.build.variant=standard” to boards.txt, and it compiles fine, but when it tries to call avrdude to flash the hex file, it errors out with “avrdude: usbdev_open() did not find any USB device “usb”.” Have you seen this error?
I have not. And everything was working fine before you added that line?
No, I hadn’t tried it with Arduino 1.0+ until you posted your solution. Adding the variant line fixes the compilation, but then avrdude seems to get the wrong parameters.
Maybe it’s a Windows 8 problem. I’ll try on a different OS.
Hi,
I followed these instructions and this mostly works for me with an ATMEGA32 and Arduino IDE 22. I am using the usbTiny programmer.
My issue is that I need to set the fuse bits. So I download the bootloader which also sets fuse bits. Then I download my sketch with the usbTiny programmer, and this works the first time that I download. All subsequent downloads do not work.
This means each time I need to download, I must first download the bootloader, then download the sketch (both using usbTiny).
I guess my problem is with the fuse settings, but I am not sure how to modify them. My bootloader fuse settings are shown here in the “boards” file.
Thanks in advance for any help. I am pretty thrilled that with your blog that I am able to download at all. But it seems like this is so close to working correctly that I do not want to give up yet… : )
##############################################################
usbtiny-dev40a32.name=[usbtiny]AVRBoards Dev40A-32
usbtiny-dev40a32.upload.protocol=usbtiny
usbtiny-dev40a32.upload.maximum_size=32768
usbtiny-dev40a32.upload.speed=38400
usbtiny-dev40a32.bootloader.low_fuses=0xFF
usbtiny-dev40a32.bootloader.high_fuses=0xDA
usbtiny-dev40a32.bootloader.path=dev40a
usbtiny-dev40a32.bootloader.file=ADABoot_32.hex
usbtiny-dev40a32.bootloader.unlock_bits=0x3F
usbtiny-dev40a32.bootloader.lock_bits=0x0F
usbtiny-dev40a32.build.mcu=atmega32
usbtiny-dev40a32.build.f_cpu=16000000L
usbtiny-dev40a32.build.core=arduino
The fuse bits get saved each time you set them, and should not get changed when you reflash the firmware.
You can set/read them directly using avrdude.
Since you are programming with the USBtinyISP, you really don’t need a bootloader.
Thanks. I got an AVRTiny (a friend bought two but he needed just one) and now I´m starting with arduinos after 6 years using just PIC´s. This post told me just what I wanted to know.
Has anyone got this to work using Arduino 1.0.1, or is it true that you need to use prior to Arduino 1.0….Thanks!
I am on Windows 7 64bit
Funny, I tried it on both Windows 8 x64 and Mac OSX 10.7.5, and had the same error about not finding device “usb.” To reiterate… is the only modification you did exactly my edits to boards.txt above?
Yes, that’s the only change I made. Also, I reported before I could not get it to work without using the programmer on board power supply. That is not true. It works fine using the same power supply as the 328 normally uses. I wonder if the problem is with your programmer. I read somewhere that some of the programmers from China do not incorporate the autoreset feature?? I am using the Sparkfun programmer.
Lincomatic,
Were you ever able to determine the reason behind the avrdude: usbdev_open() did not find any USB device “usb”? I have tried different arduino versions as well as both linux and windows and I get this each time after compiling.
For Arduino 1.0+, put these lines into hardware/arduino/boards.txt:
##############################################################
usbtiny168.name=[usbtinyisp]ATmega168
usbtiny168.upload.using=usbtinyisp
usbtiny168.upload.maximum_size=16384
usbtiny168.build.mcu=atmega168
usbtiny168.build.f_cpu=16000000L
usbtiny168.build.core=arduino
usbtiny168.build.variant=standard
##############################################################
usbtiny328.name=[usbtinyisp]ATmega328
usbtiny328.upload.using=usbtinyisp
usbtiny328.upload.maximum_size=32768
usbtiny328.build.mcu=atmega328p
usbtiny328.build.f_cpu=16000000L
usbtiny328.build.core=arduino
usbtiny328.build.variant=standard
##############################################################