Updated 2014-03-14
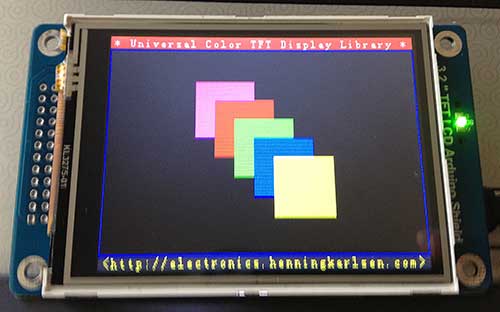
I’ve been looking for a way to add a touchscreen UI to my projects. To this end, I purchased a UCTronics 3.2″ TFT LCD Arduino Shield. Most of the cheap TFT touchscreens that I found need about 38 pins, and therefore, need to interface with an Arduino Mega. What makes this UCTronics shield unique is that it uses an onboard latch to convert the onboard SSD1289 TFT driver data bus from 16-bits to 8-bits. This allows it to connect to an Arduino Duemilanove or UNO. The board I received is a RevB board, and it looks somewhat different from the board pictured in the UCTronics product description. The resistive touch panel on top of the TFT very similar to the touch panel used in the Nintendo DS. Below is the board running UTFT’s demo (UTFT_Demo_320x240):
When I purchased this display, I had to use a specially modified version of UTFT downloaded from UCTronics: 3inch2_RevB.zip. This is because at the time, UTFT only supported the SSD1289 in 16-bit mode. However, as of 2014/14/03, the shield now works with the official UTFT distribution. The key is to supply the correct parameters to the UTFT constructor:
[code lang=”c”]
UTFT myGLCD(SSD1289_8,A1,A2,A0,A3);
[/code]
SSD1289_8 specifies that we’re using an SSD1289 controller in 8-bit mode. The rest of the parameters are the pin assignments.
When compiling for an Arduino Duemilanove or UNO, the IDE will complain that the sketch is too big, unless you comment out all of the #define DISABLE_xxx except for #define DISABLE_SSD1289 in UTFT’s memorysaver.h.
While UCTronics’ version of UTFT comes preconfigured, it is based on an older version of UTFT, which is slower. On my Duemilanove, the UTFT_Demo_320x240 sketch takes 57.7 sec to execute with UCTronics’ UTFT, and 48.6 sec with the official UTFT library. This is mainly because the latest UTFT has a new function called _fast_fill_8(), which speeds up certain fills. However, the sketches built with the newer UTFT library are bigger. With UCTronics’ UTFT, UTFT_Demo_320x240 compiles to 27248 bytes, and 30092 bytes with official UTFT.
Here is a bottom view of the shield:
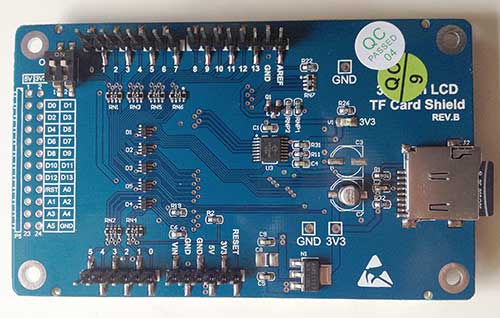
At right is the integrated micro SD card reader, which is handy for storing bitmap data to load into the screen.
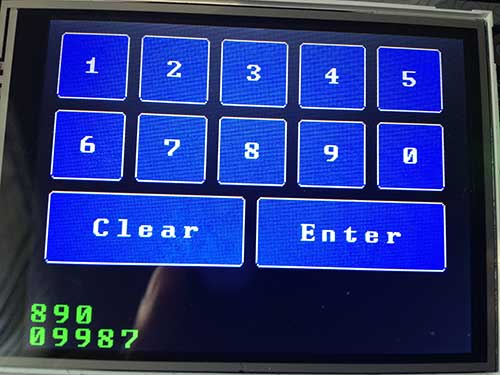
UCTronics supplies ArduCAM_Touch to support the touchscreen. However, I decided to just use UTouch, instead. Below is the UTouch_ButtonTest example sketch:
To use UTouch, you must configure the following lines in the sketch:
[code lang=”c”]
UTFT myGLCD(SSD1289_8,A1,A2,A0,A3);
UTouch myTouch(13,10,11,12,9);
[/code]
I was able to operate the buttons by pressing firmly with my fingers. Note that the touchscreen is resistive, not capacitive, so it works by pressure. A stylus gives you considerably more control. The touchscreen is very similar to the one found in a Nintendo DS.
At first, I was disappointed by the bitmap display. This is the output of the UTFT_Read_BMP demo sketch supplied by UCTronics:
There is severe quantization of the colors. This is the way due to the way that UCTronics implemented the UTFT::dispBitmap() function in their modified UTFT library. I wrote my own function, dispRaw(), to instead display .raw files generated by UTFT’s ImageConverter 565:
[code language=”c”]
// display a raw bitmap that was processed with ImageConverter565
#include <UTFT.h>
#include <SD.h>
#include <Wire.h>
#define SD_CS 8
//UTFT(byte model, int RS, int WR,int CS,int RD)
UTFT myGLCD(SSD1289_8,A1,A2,A0,A3);
void dispRaw(UTFT *utft,File inFile)
{
char VH,VL;
int i,j = 0;
cbi(utft->P_CS, utft->B_CS);
for(i = 0; i < 320; i++)
for(j = 0; j < 240; j++) {
VL = inFile.read();
VH = inFile.read();
utft->LCD_Write_DATA(VL,VH);
}
sbi(utft->P_CS, utft->B_CS);
utft->clrXY();
}
void setup()
{
myGLCD.InitLCD();
if (SD.begin(SD_CS))
{
char VH,VL;
File inFile;
inFile = SD.open("ade.raw",FILE_READ);
if (! inFile)
{
while (1); //if file does not exsit, stop here.
}
dispRaw(&myGLCD,inFile);
inFile.close();
}
}
void loop(){}
[/code]
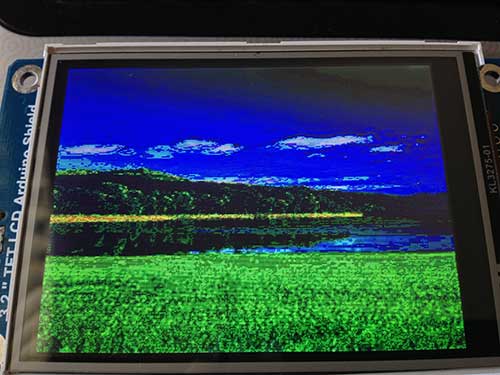
The output looks a lot better:
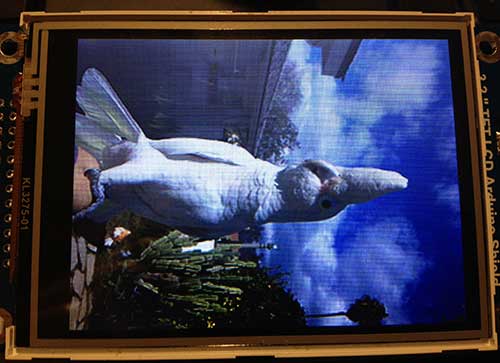
The display is actually much higher quality than the photo above. The photo contains screening and moire patterns that you don’t see with the naked eye. To create a RAW file, first create a 240×320 pixel jpg,png, or GIF file. Run it through either imageconverter565.exe or the online ImageConverter 565 make sure to select Convert to .raw file and Target Platform Arduino (AVR). Copy it to a FAT-formatted uSD card, and insert it into the uSD slot.
It takes about 6 seconds to load a fullscreen RAW file. I’m think the bottleneck is the reading of the data from the SD card. Clearing the screen takes almost 1 second. The speed is acceptable when running UTFT_Demo_240x320. This is board is no speed demon, but the speed seems adequate for implementing a graphic touchscreen control panel. If you need a fast display, look elsewhere.
Resources:
Hello!
I got used to working with the TFT LCD shield v.1 and now i just received a REV. B shield. Do you happen to have a user guide for it? I see that the pin definitions have changed and i am very frustrated with this. I can’t find any info on the net.
If you happen to know the pin defs please share
Thanks
These are all of the links that UCTronics sent me for RevB:
http://www.uctronics.com/download/arduinolcd/3inch2_Arduino_LCD_Shield_UG.pdf
http://www.uctronics.com/download/Arduino_shileds/3inch2_RevB.zip
Thanks man, they sent me the link for the REV B:
http://www.uctronics.com/download/Arduino_shileds/3inch2_Arduino_LCD_Shield_RevB_UG.pdf
Good’day lincomatic,
Thank you for posting your experience with the 3.2 TFT Display around here. I’m sort of passing by and am very temted to ask a question about displaying a bmp on the display. The libraries seem to work wto some extend with this revision B and I also got the utouch library working and the calibration sketch. All in all it seems to work. Did you have strait foreward sucess with the bmp displaying? I used a 320×240 bitmap but don’t get anything properly. I’m using the arduino uno and have set the controller to SSD1289 in the sketch which doesn’t make things better. Trying with different resolutions…hmm still nothing but random unclear pixels. I tried to include the dispRaw() function in the .h and .ccp files and to great pain I still get fuzzy pixels that don’t represetn much of the original image. Have you made any adaptations to the library for the UTFT_Read_bmp sketch to work out fine?
Greetings,
Rob
The problem is solved by trying and loads of time, the key is just to now that the image on the SD card has to be in portrait orientation and if a Bitmap is used it needs to be in 16-bit color depth. How to know.:-).
Kind regards,
Sorry it took me so long to reply! I just answered your original question! For some strange reason, WordPress stopped notifying me of pending comments.
If you want to display BMP’s they need to be 320×240 16-bit format. However, they will look horrible. If you want to use my dispRaw() function, you need to run a 320×240 BMP through the imageconverter565
Hello,
Hello,
Recently, I bought a 3.2″ TFT LCD with card shield for Arduino and , but this shield is rev. B ,and this revision is different that the other versions, so I had to download the UTFT library for the graphic library, and the ArduCam Touch for the Touch library. The LCD is working fine with the UTFT library, I´m able to draw, write, etc, but the touch library is not working correctly,the LCD detects when I touch the screen, but I´m not able to get the (x,y) coordinates, also I checked and the ArduCAm Touch library only uses 2 pins for the touch feature. Can you please help me to get the (x,y) coordinates? Can I use the UTouch library for this shield rev.B(this library uses 5 pins for touch feature)?
Comment:I’m using Arduino Mega 2560 for programming the LCD with Shield
Best Regards
Yes, I used UTouch. Just use these lines
UTFT myGLCD(ITDB32S,A1,A2,A0,A3); // Remember to change the model parameter to suit your display module!
UTouch myTouch(13,10,11,12,9);
to initialize it in UTouch_ButtonTest.pde (Warning, I tested with a Deumilanove/UNO.. not sure if the pins change on the Mega .. they shouldn’t).
Why are you using this shield with a Mega? It’s modified to work with the lower pin count of the Deumilanove/UNO … you could get better performance
by using a 16-bit shield instead.
UTFT myGLCD(ITDB32S,A1,A2,A0,A3); // Remember to change the model parameter to suit your display module!
UTouch myTouch(13,10,11,12,9);
I used this and still white screen.But the touch works.Just no picture.
UTFT myGLCD(ELEE32_REVB,A1,A2,A0,A3); // Remember to change the model parameter to suit your display module!
UTouch myTouch(13,10,11,12,9);
I tryed this also according to the directions and still white screen.
What UFTF version did you use
I found my problem. I didn’t read the instructions. It is supported by the original UTFT library.In the zip file are included instructions .One was to look HW_AVR which is in the hardware file of the UFTF folder.You uncomment a line allowing it to use a UNO setup on a MEGA .(allows PortA transfer to Mega digital pins 0-7).
If you’re using this shield with a MEGA, it’s kind of a waste, because the special feature of this particular shield is that it has a latch, so that it can be used with an 8-bit data bus. This makes it compatible with boards that have fewer I/O pins, such as the UNO & Deumilanove. If you’re using a MEGA, there are lots of boards out there that use a 16-bit interface, which will give you better performance.
Is it possilble to load any size of image? and also to rotate it?
No, it only handles fixed size images w/ the code that I tried, but you could write code to scale it & rotate it.
I want to use de Utouch library but when i touch the screen at the number one or any number in the screen see it other number that i didn’t touch.
I copied the code after paste the code in the library UTFT Revb because the library Utouch gave me an error.
Can you help me?
other question, you know which pin is available for using of the other things?
You probably have TOUCH_ORIENTATION set wrong. Also, you need to run the calibration sketch.
excuse me, is possible to occupy one analog pin to connect any sensor or anything when the lcd works?
It uses A0-A5, so you can’t use any of those pins
excuse me, is possible to occupy one analog pin to connect any sensor or anything when the lcd work?
Hello,
I dont know wheter this helps you since it is not explicitely what you asked for, but one pin I do use in combination with the shield and the Arduino Uno to attach a sensor is D8 pin. It is digital and for my sensor this is what i need.
Cheers.
Hi, Im currently working with UTouch library for 2.4 TFT LCD. UTFT is working fine for me as I use the examples given in the library except the UTouch. I’ve changed the part UTouch myTouch(15,10,14,9,8); to UTouch myTouch(A1,8,A0,9,10); so that it will be compatible both duemilanove and Mega. But I cant make it work with both. Is there any further modifications in the code or library for that? thanks
by the way I’m using the one from Elecfreaks
You should be using myTouch(15,10,14,9,8) for the board I reviewed. I don’t know the parameters for Elecfreaks board.
Very good contribution ………………………
I have a problem with screen 3.2 “TFT LCD touchscreen Arduino Shield version 2.0 REVB the problems is that I’m utilisando the UTFT, tinyFAT, UTFT_TinyFAT, uTouch UTFT_Buttons libraries and the problem is that by combining these libraries displayed image is me and Touch me with the buttons not working anyone can help me I will be very grateful to your cooperation I hope your answers ………….there is a problem between tinyFAT uTouch libraries and library as these use the same MOSI, MISO and SCK porfa someone can help me ……………
Estimates
It happens the same as Santiago Llerena, combining tinyFAT library and uTouch the pictures are displayed correctly stops working but the touch part must be that both the touch part to the SDcard used the same pins MOSI, MISO and SCK , note that I’m using ARDUINO MEGA board. (separate libraries work properly)
Please show your support and fix this, or another way to handle images in raw format and can be used uTouch .. thanks for your help
Hi I m Manoj, I m using 3.5 inch TFT-LCD with UTFT and UTOUCH libraries. When I call initFAT picture from SD card is displayed correctly but touch stops responding and touch does not respond. Please help.