My house isn’t wired for Ethernet, so I needed to get my Raspberry Pi networked via WiFi. USB WiFi dongles are cheap, and can easily be found for less than $10. I just happened to have an Airlink101 AWLL6075 laying around. By coincidence, it uses the RTL8191SU chipset, and the official Raspbian distribution is preloaded with the appropriate driver (module r8712u).
USB WiFi dongles use quite a bit of current, and some web references said that they could only be used with the RPi via a powered USB hub. However, some people reported success without the hub. I couldn’t find a working powered USB hub in my house, so I tried connecting my dongle directly to my RPi.
While googling around for instructions on how to configure Raspbian for my WPA2-PSK network, I found several different sets of instructions for configuration, and none of them worked. After wasting a whole afternoon with no luck, I found out that early RPi boards had 140mA polyfuses to limit current draw on the USB ports. In addition to limiting the current too severely, the polyfuses lower the voltage below spec. Therefore, later boards have 0 ohm resistors instead of the polyfuses. Here is an official blog post which shows that the later boards don’t have the fuses: http://www.raspberrypi.org/archives/1929
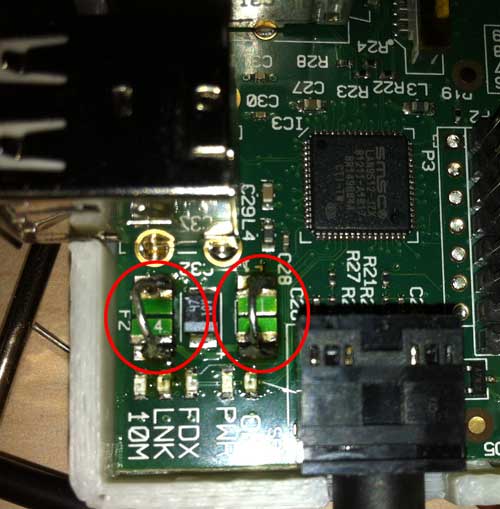
The fuses in question are F1 and F2. The polyfuses are green, and have 14 written on them. The 0 ohm resistors are black. If your RPi has the resistors, then you don’t need to modify it. My board had the polyfuses, so I shunted them by soldering in jumper wires:
Bingo! The WiFi fired right up and connected to my AP on the first boot after the fix.
The easiest way to configure the SSID and password for your network is to edit the file /etc/network/interfaces:
$ sudo nano /etc/network/interfaces
Add the following lines to the file:
auto wlan0
iface wlan0 inet dhcp
wpa-ssid “YOURSSID”
wpa-psk “YOURPASSWORD”
Substitute your network’s SSID and password in the quotes above. If present, remove the 70-persistent-net.rules file:
$,sudo rm /etc/udev/rules.d/70-persistent-net.rules
Upon rebooting, your WiFi should connect up automatically. If you want to start it without rebooting, type
$ sudo ifup wlan0
Here are some useful commands related to your WiFi configuration:
$ iwlist wlan0 scan
scans for and displays available WiFi networks.
$ iwconfig
shows WiFi connection info, such as ESSID, bit rate, and frequency.
$ ifconfig
displays network information, such as IP number, MAC address, and packet errors.

Model B Hardware Revisions and USB Power limits Hardware Revision 1.0 The original Model B board had current limiting polyfuses which limited the power output of each USB port to approximatly 100mA. USB devices using more than 100mA had to be connected via a powered hub. The PI’s PSU was chosen with a power budget of 700mA of which 200mA were assigned to the USB ports, so the Raspberry Pi’s (poly)fuses were designed only for devices up to 100mA, and typical 140mA polyfuses will have as much as 0.6 volt across them when drawing currents near the 100mA limit. As a consequence the USB ports are only directly suitable for “single current unit” USB devices which, according to USB specifications, are designed to work with just 4.4 Volt. Not only do non single current unit devices draw more current (causing greater Voltage drops, and greater stress on the fuses), they also might require 4.75 Volt to work.
I just modified my RPi by solderong on a wire over the 140 mA resistor exactly as you described, and it seems to have enabled the use of my EdiMax wifi adapter without random shutoffs. I only modified one of the USB slot resistors, as I had no need to draw more power on a second one. Thanks for the images and the explanation!