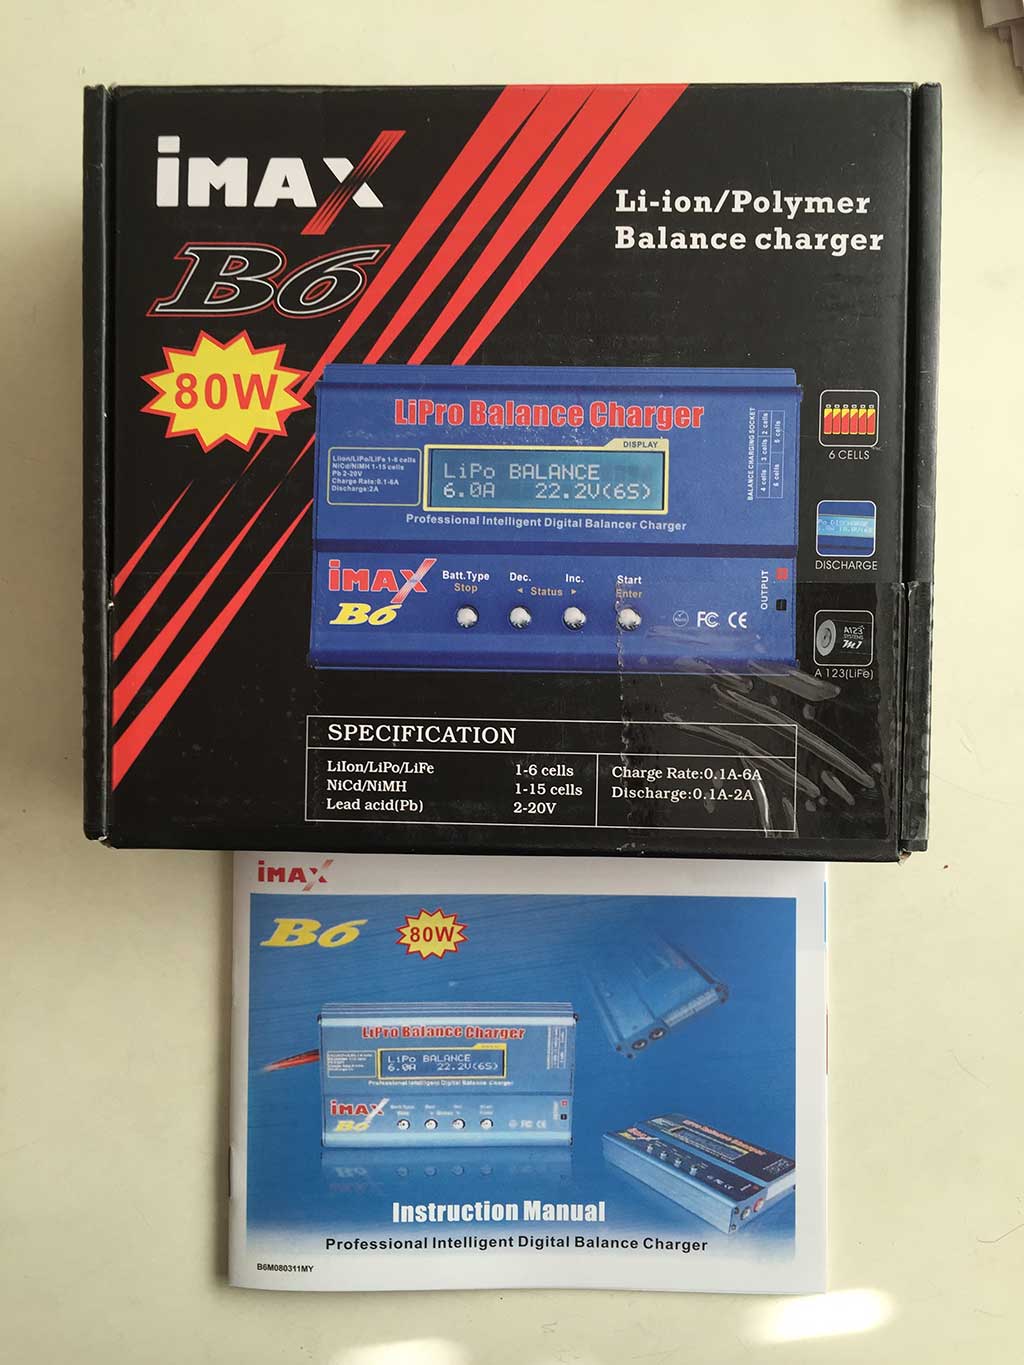
After reading about the SkyRC iMax B6 Charger on rcgroups, I decided to buy one. I chose a US-based seller, globalexcellent_ltd on eBay, and paid $17.99. The listing claimed that had a max charge power of 50W, and due to the low price, I figured I was getting a clone. I didn’t mind if it was a clone, because my plan was to install cheali-charger on it if it didn’t behave properly. I was surprised when a couple of days later, I received an 80W model:
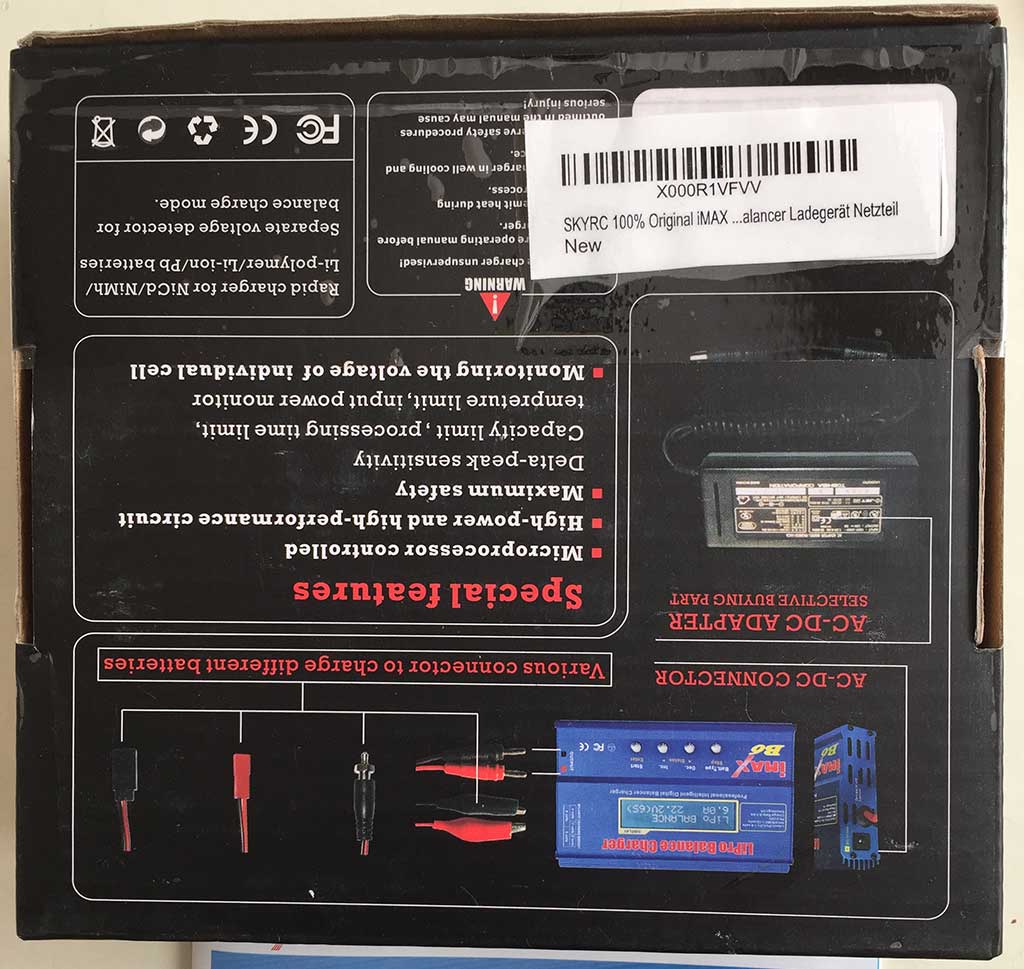
I was also surprised (but skeptical) that there was a label on the back of the box claiming that it was a genuine SkyRC product:
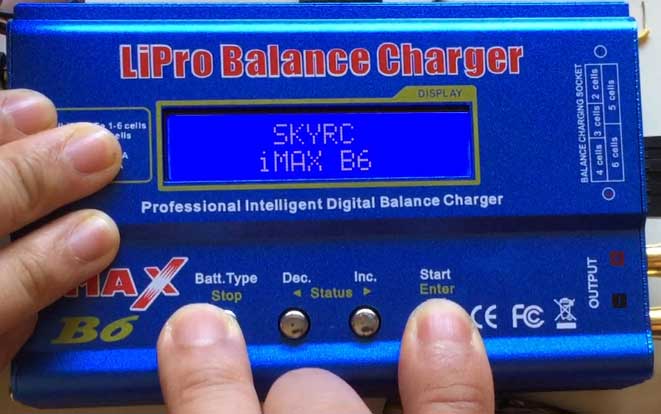
However, the box lacks the hologram which can be used to confirm a genuine product on SkyRC’s website, so I’m pretty sure it’s a fake. This is the start up message:
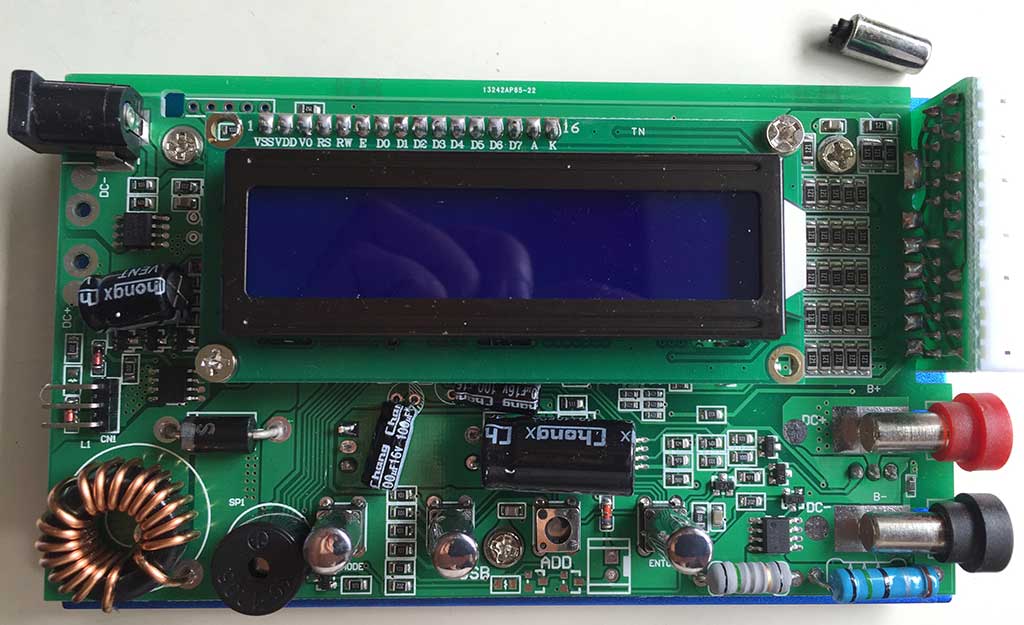
I did some initial testing, and found that it was almost half a volt off in its readings. My first thought was to try calibrating it via the Calibration Menu, which is supposed to be accessible by powering it up while simultaneously holding down the Dec and Start buttons. Much to my chagrin, I could not activate the calibration menu. Also, the Balancing Calibration Menu, which is supposed to be accessible by powering it up while holding down Stop and Inc didn’t work. After doing some searching, I found a discussion on the cheali-charger google discussion group about a Clone iMax B6 SKYRC (80W). It turns out the model in question has a mystery MCU which is not labeled, and is not compatible with cheali-charger. I took mine apart to see what PCB was inside:
I forgot that the buttons were protruding from the case, so after I took off the end caps, I tried to slide out the PCB. Big mistake! I broke all 4 buttons! The proper way to remove the PCB is to carefully bend the case until the PCB can be pulled out the bottom of the case, rather than sliding it. Another diversion … I had to fix the broken buttons with super glue. After carefully examining the PCB, I figured out that I am unlucky, and mine is definitely the model with the unknown CPU that’s not compatible with cheali-charger. So, I had to find another way to make it functional.
CALIBRATION
It has come to my attention that there are versions with different firmware from mine. Apparently, some of them use a different calibration procedure. See Update 2017-02-01 below for the alternate calibration procedure. Currently, I don’t know how to tell which version you have.
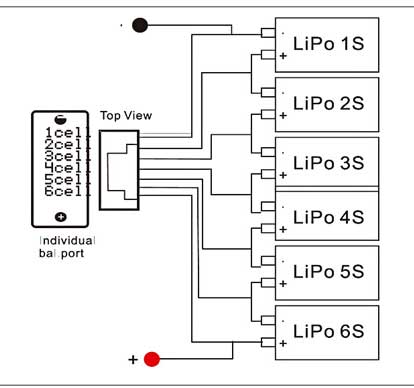
From the google discussion thread, I found out that this particular version of the B6 has only one calibration menu, and it’s accessed by holding down the Stop and Start buttons while powering it up. It looks like the balance calibration menu on a normal B6 charger, showing 6 voltages. WARNING: DO NOT PRESS START AND STOP WHILE POWERING UP UNLESS YOU HAVE A CALIBRATION CIRCUIT HOOKED UP. OTHERWISE, IT WILL COMPLETELY MESS UP YOUR B6’s VOLTAGE CALIBRATION. Many people use a precision 25.2V power supply and 100 ohm .1% resistors to do the calibration (see Joe Rouvier’s post for this method), but having neither of those available, I decided to instead build up a 6S pack of fully charged LiPos. Here is the battery hookup:
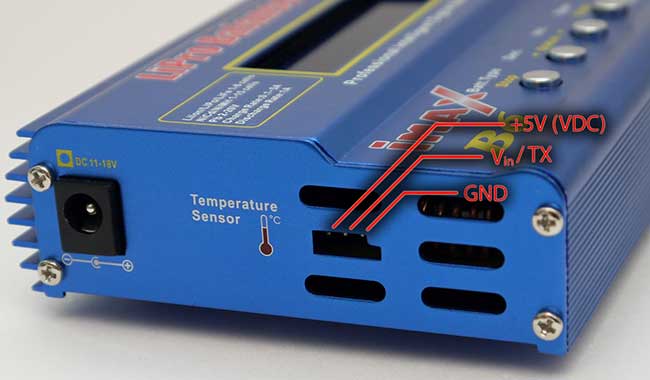
I charged each individual cell on another charger to exactly 4.19V. Also, according to Joe Rouvier’s post in the cheali-charger discussion, the temperature input also needs ~1V during calibration. The temperature port is located on the left side of the unit, and consists of a 3-pin header:
[above image copyright the owner of: http://sysmagazine.com/posts/150213/. Note, the TX function does not apply to fake 80W iMax B6’s. AFAIK, it is only for temperature input on this clone]
I hooked up a 5K potentiometer, outer terminals across the +5V and GND on the temperature port, center terminal (wiper) to Vin, and adjusted it to 1.00V between Vin and GND. I think if you don’t plan to hook up a temperature sensor, you can skip this step. The voltage calibration seemed to work OK without hooking anything up to the temperature port.
Once you have everything hooked up, power up the charger while holding down the Stop and Start buttons:
(Note, in the video, the temperature calibration circuit is not hooked up… I redid the calibration after I shot the video). After the voltages stabilize, calibration is complete, and the power may be disconnected. Interestingly, after the display stabilized, the iMAX B6 displayed all of the voltages exactly at 4.19V… spot on. This is different from I was expecting, because Joe Rouvier had mentioned that the charger just assumes every cell is 4.2V during calibration.
After calibration was complete, I tried test charging the battery that I used for calibration. I tried both Charge and Balance modes. In both modes, the main screen displayed the voltage as 25.1V, and after less than 1 minute, displayed FULL. But strangely, the cell voltage screen (press Inc during a charging session) was showing mismatched voltages (e.g. 4.20/3.94/4.18/3.98/4.19/4.12). In Balance mode, the voltages would start at the mismatched values, but then finally stabilize to be equal. However, after the charge session ended, if I started Balance mode again, the voltages would again be mismatched when the session started.
Next, I tried charging a single 3.7V/2000mAh LiPo cell. During charging, the 4.20V was always displayed, regardless of the actual voltage across the charge terminals. During the constant current phase, the voltage fluctuated, and often went above 5V. After ramping down the current charger stopped and displayed FULL and 4.20V. However, when I measured the cell with my DVM, it was 4.00V. I guess it’s good that it doesn’t overcharge and destroy your cells, but .2V low is a pretty big discrepancy. I tried restarting the session and playing with various charge currents from 2A-.2A, but it just kept stopping with the cell voltage exactly 4.00V.
Next, I hooked up my hand built 6S balancing pack again. Before charging, I verified that the cell voltages were still at 4.19V and triple checked the wiring. A normal Charge session ended with the both the battery and display at 25.1V, but the cell voltage screen was again displaying mismatched voltages. Next, I tried a Balance charge session again. This time, the charger started to smoke around the balance inputs! I quickly unplugged everything, but it was too late. The charger is now toast, as well as one of my one my LiPo cells, which now reads 0.00V.
Sheesh, what a short-lived charger. I don’t know if I just got a defective unit, or if this thing is junk, but I’m wondering whether I should try another iMax B6 or buy a different charger.
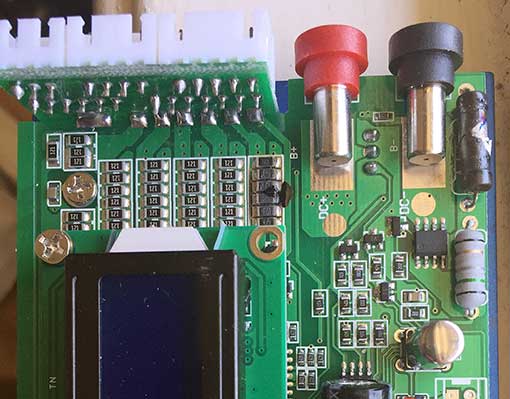
UPDATE 2015-07-28: Amazingly, the charger still works when not in Balance mode. At least, I’ve been charging single LiPo cells. It still charges them up to exactly 4.00V (though the display still always shows 4.20V during and after charging). This is what the board currently looks like:
The rightmost row of balancer resistors is fried, as the power resistor at the top right. I’m not sure if I’m going to bother trying to fix it, since I can’t change the firmware to fix the 4.00V charge voltage bug.
Update 2015-08-04: OK, I’m a moron. I bought a genuine SkyRC 50W iMax B6 on Amazon, and it too seemed to be charging to exactly 4.00V as measured from the battery terminals. Then I found that during charging, the voltage at the charging terminals was 4.25V, while the voltage at the battery terminals was 4.00V. So, I tested the resistance of my charging jumpers, and found about 3 ohms resistance! The 4.00V terminal charging voltage was caused by excessive resistance in my charging jumpers! After swapping to some new jumpers, the genuine SkyRC iMax B6 charges 1S LiPo cells to 4.19V. Pretty good calibration from the factory. Next, I tried the fake 80W iMax B6 that I calibrated, and it too, charges to 4.19V. But there’s a big difference during charging. While adjusting current, the genuine iMax B6 never exceeds 4.25V while it’s adjusting the charging current. On the other hand, the fake 80W iMax B6 often overshoots in excess of 5V while adjusting down the charging current. I’m not sure if these temporary voltage spikes will damage your batteries or not, but to be on the safe side, I would avoid the 80W clone, until someone figures out how to get an open source firmware into it.
For those who want to keep up to date on developments with this charger, there is an ongoing discussion thread in the cheali-charger forum: Clone iMax B6 SKYRC (80W) . Perhaps someone will figure out how to program it.
Update 2017-02-01: It seems that there are different versions of firmware on some of the newer models. Here is some info posted by MoPaZoDoZ92 on my YouTube video that may be helpful:
i had no calibration options on my fake Imax B6 2016 from ebay so i tried this video tutorial properly with 6s fully charged lipo batteries . The Imax displayed some random solid voltage (4.4v +- 0.2v) on each battery. Nothing else happened so i restarted the Imax. After that the imax automatically went to discharge lipo 1.0A S1 and of course gave me an “BATTERY CHECK HIGH VOLTAGE” error because all the 6S batteries was still connected with the balance cable and banana connectors. No buttons worked, though the Imax was broken. But i FOUND A SOLUTION on this particular Imax fake model.
Step 1: Follow Linco matics video tutorial properly with 6S fully charged batteries connected. Keep in mind that no buttons works under this process.
Step 2: Shutdown the Imax and connect only one S1 fully charged lipo battery with banana connectors.
Step3: Restart the Imax and it will automatically go to discharge lipo 1.0A S1 mode. It will discharge the battery for 10 SECONDS. After that the Imax will automatically cancel the discharge S1 mode and go to balance charge lipo 1.0A 6S mode. Here’s the tricky part, you have like 1 SECOND( until it display “BATTERY CHECK WAIT…”) to disconnect the S1 lipo Battery from the Imax and connect the fully charged S6 batteries you used for Lico Matics video tutorial with the balance cable and the banana connectors. If you fail this difficult task, the Imax will display an error and you need to shutdown the Imax and you’r back to step2.
You have to figure it out how to rapidly change the batteries. If you succeed the Imax will try to balance charge the S6 batteries in few seconds until the batteries are fully charged. After this process the calibration is completed and the buttons are enabled.
I have not yet found any solution on internet for this particular Imax fake model with no calibration option. So if you have the same symptoms i had with my fake Imax after following Lico Matics video tutorial you should try this out.
Sry for my bad english:)
Thanks. This worked for me. Works well without temp input 1v voltage. I have burnt upper right big resistor too. Burned when i discharge battery while a go. Only 6s LiPo connected to balance and Voltage port during calibration process.
Was changing the resistor enough to fix it? I haven’t tried any balance charging after the resistor burned, but it seems to still behave the same as before when doing regular non-balance charging. However, I don’t like to use this charger anymore, since the voltage goes too high during charging.
I also broke the 4 buttons when I opened the cover. Sorry not reading your page before. The bigger problem was when I unsoldered the buttons, the pcb trace of the stop button was snapped off and it doesn’t communicate with the mcu anymore.
I also ordered the genuine imax v2.
just bridge the break with solder, or if it’s too long, clip a wire off a resistor and solder that in
I tried to get it calibrated UNLESS HAVE A CALIBRATION CIRCUIT HOOKED UP..The problem is that charger is hard looped now like: LiPo6 Discharge mode >> battery check >> “Connection Error” message.
And can not change this behaviour.
Sorry not reading your page before.
has anyone a solution?
what do you mean you can’t change the behavior? the buttons don’t work? or you just mean you always get connection error when you try to charge something?
wen power up there is message SKYRC IMAX B6
then after 2 sec Lipo discarge 1.0A 3.0V (1S)
after 2 sec Battery check wait …
after 2 sec connection breack
when I press a button nothing happens
I tried what slyfox suggested.
Now the charger is working again.
https://groups.google.com/forum/#!topic/cheali-charger/5hD6g_MNPdY
I’m having trouble finding slyfox’s solution from your link. Would you mind typing it in here so others may benefit? Thanks.
Can you please tell me how you fixed this problem ?? Today I tried to CAlibrate my Charger before reading this! with no battery connectoted 🙁 now when charger is on it automatically has selected 2S discharge and it tells me the voltage in battery is high because i have connected 3S lipo… I only own a 3S lipo 🙁
read its input from slyfox net of 17 dec.
sorry for my bad English
You can improve this text.
further experiments with the charger.
Before performing calibrating !!!!!!!!!!!
1 – very important
select “Lipo BALANCE 22.2V 2.0A (6s).” and disconnect power.
6s is important, gives discharge after calibration key press.
2 – Connection 6 loaded cels and balancing connector.
I also connect an external power supply and line it up 25.14v (100mA max)
3 – Press the start and stop together and connect to power.
menu shows six times: 3.2 … 3.5. this is normal.
wait 10 seconds and disconnect power.
4 – External power connected but remove the red (+) power terminal of the charger.
connect power to start and see if discharge for 6sels (6s).
Remove power
5 – if not correct solution look behind at the end.
if ok connect red (+) wire to back (to the + of the 6th sel)
6 – connect power back on and see the following screens.
SKYRC IMAX B6
then after 2 sec Lipo discarge 22.2V 2.0A (6S)
after 2 sec Battery check wait …
after 2 sec LI6s 0.4A 25.00V Dis 00:00 000 000
after 10 to 15 seconds Ball or ot similar.
normal is the charger calibrated now.
as point 4 incorrect
1 – look how many sel 1,2,3 …. 6
leave external power connected (6th sel).
connect red (+) to the place depending on the number of expected sel. (probably sel 1 (1s) )
2- connect power and take the red thread and move it immediately to the next requested sel when prompted. probably sel 4 (4S)
Continue doing this until the scharger denoting Bal.
the buttons of the charger can now be used again.
recalibrate the charger again
Thanks for the translation! That is very interesting. All I did was steps 1-3, and then my charger was working OK. I wonder if there are different versions of the firmware. I can’t even try your procedure now, because mine has burned resistors. Hopefully it will help someone else.
Was able to get menu back somehow.
This is my only charger and I do not have a 6S battery. How do I calibrate this one to fix the voltages now.
I have an adjustable power supply that can go up to 30v. Can I use this, and if so, how?
Alternatively, you can use a precision voltage source and resistor bridge to do the calibration: see Joe Rouvier’s post at
https://groups.google.com/forum/#!msg/cheali-charger/5hD6g_MNPdY/lj4DFAqODB0J
Unable to follow slyfox net solution.
Originally entered the calibration menu (Start/Stop) using 2S settings at 2.5a.
Now getting over voltage error when it reboots to the discharge menu and can not get out of this loop.
After power up.
you get a message “LiPo DISCHARGE”.
what is the second rule?
how much volt and how many cells ?
if it fails (overvoltage error), calibrate again (start / stop) but short-circuited with the power wires.
then try to connect the specified sells (look explanation above). the sens wires need not be connected.
sometimes it is necessary to connect the power wires sells less than specified in the menu. you must quickly follow the menu.
as he starts back you will see that the cell voltage is too high (Check with meter)
back calibration (start / stop) of connected cells, but take 4.19v per cell. (Controlling with additional power being void filler).
Remove external power and dischearge loop.
Hi
I’m trying to calibrate IMAX B6 with unknown voltage. I have checked that all default settings are 6S (Discharge/charge/balance). I connect a 6S battery (4.20v per cell) to the balance port and +/- main port. I start the calibration process (press button 1 & 4 while powering up) and see the bank values rise to 4.20 and then settle to 4.19v.
Then I restart the IMAX. It does not “automatically” do a discharge/charge/balance etc. If I select “DISCHARGE 6s”, it gives overvoltage error.
I have also tried calibrating using a 6s battery connected to the balance port, but using a voltage source to provide 24.2 to 25.2 volts input to the main battery port (and I join power supply earth to balance port earth). After bank calibration, restart still does not “automatically” start any charge/discharge/balance. If I manually choose DISCHARGE 6S, I still get overvoltage error. If I manually choose DISCHARGE 3S (or charge), it seems to start, but the voltage readings are way off.
Could it be that there is another fake IMAX B6 type that does not “automatically” start the discharge as described by Albert, alex alex, slyfoxnet etc?
Or am I doing something wrong?
The translations from Russian are unfortunately difficult to understand but I am determined to get this thing calibrated!
Thanks for any help 🙂
Hi
Of course first sentence should be:
I’m trying to calibrate IMAX B6 with unknown PROCESSOR.
Thanks
Did you connect the charger ground to balance ground? I was trying to calibrate using only the balance port and also was getting over voltage error. I noticed that if I connect the charge port ground and balance port ground the voltages shown during calibration are higher, so I did the calibration with that connection (also connected charger + to battery)
You can open an old laptop battery (carefully).
load cells individually with a voltage of 4.2v. current up to 100 ma.
This tension must be very exactly (4.1 up to 4.2v).
put down not above 4.2v.You can open an old laptop battery (carefully).
load cells individually with a voltage of 4.2v.
current up to Max 100 ma.
This tension must be very exactly (4.1 up to 4.2v).
put not above 4.2v !!!
anyone know what the part number of the 8pin IC next to the power out banana jacks is, I loaned my charger and balance plate to to a friends kid so he charge 4 packs at once, it came back smelling of magic smoke that makes electronics and the charge leads plugged in backwards with the comment that it does not work
Sorry for the double post email in previous post is wrong (typo)
I have the clone 80w charger I tried to get into the service mode from the dec and start but don’t work that way and I hit the stop and start button while powering on and goofed up the programming do I just have to recalibrate this with the 6s battery and also the temp to get this thing to working again all I am getting is discharge and the buttons don’t respond at all but still can get into the calibrate menu from what I am reading I need the 6s battery fully charged and hook up the resistor to the temp probe connection but I am wondering what Value for the temp to calibrate it?
Yes, you will need to recalibrate with a 6S battery. To calibrate the temp, follow the procedure in my post.
ok thanks ill do that thanks for the help
Hey so I did something wrong and now my charger is on a sort of loop I press Stop + Enter button without a 6S battery connected to the charger now when I turn the charger on it comes to the start up welcome note and goes to 3s (9V) Discharge at 2A mode automatically and says Battery Check : Overvoltage then I tried connecting the 3S lipo balance port + 2 terminal ports (+ and -) and I pressed Stop+ Enter and power on the charger then it goes to balance mode calibration ( I think ) ((it look same as yours on the video but only the top 3 reading are there the bottom 3 readings are zero as i have not connected a 6S)) Ok back to what is happening as I Keep holding the 2 buttons the voltages don’t get corrected like yours in the video just stays the same… and then I power off and power on again without holding the two buttons and same thing! on a loop and says battery over voltage ! Please tell me how to fix this.
I don’t know how to do it without either a 6S or resistor bridge connected as in my article. Sorry.
you can try to connect with three cells.
if he still gives over voltage, you can try to short-circuit the power wires.
as he starts back you better back perform a calibration but connected with 6 cell before pressing the calibration keys.
Short Circuit ?? you mean the + and – from the Charger output ??
Yes,
Read This Blog
albert says:
DECEMBER 28, 2015 AT 2:02 PM
sorry for my bad English
You can -improvesleep this text ……………………..
albert says:
FEBRUARY 6, 2016 AT 4:36 PM
if it fails (overvoltage error), calibrate again (start / stop) but short-circuited with the power wires……………
Short circuiting output + and – didn’t work my friend it said again Overvoltage 🙁 when battery not connected it says connection error can I please and you on skype I do not understand what you are saying sometimes please help
1st Step I short circuit + and – from Charger output and power on holding the start / stop button charger went to calibrate mode I hold it for 10 sec all six figures show 0.00v and I turn it off
2nd step I don’t press anything and + and – are still in short circuit and I turn charger on it goes into discharge mode and it still says Overvoltage.
What am I doing wrong ?
I only have 1 3S lipo 5200 Battery I do not have 6S
I don’t think it’s a good idea to short circuit the charger outputs. It might damage it. Do you have more than 1 3S battery? if so, you can connect them in series to make the proper 6S battery pack for calibration
I dont own any more Lipo batteries it is forbidden to bring Lipos by airmail to my country so its very hard to find Lipo batteries here. Can I flash this Charger in this state ? or I will have to fix this problem first ? if I can flash it can you please be a gentleman and Link me that USB gadget we need for the process from ebay I’m a tad confused Thank you 🙂
You can open an old laptop battery (carefully).
load cells individually with a voltage of 4.2v. current up to 100 ma.
This tension must be very exactly (4.1 up to 4.2v).
put down not above 4.2v.You can open an old laptop battery (carefully).
load cells individually with a voltage of 4.2v.
current up to Max 100 ma.
This tension must be very exactly (4.1 up to 4.2v).
put not above 4.2v !!!
I am not aware of anybody having successfully flashed any firmware for this charger. What firmware are you trying to flash in? cheali-charger is currently not compatible.
if discharge is on the screen it can not hurt that the output short-circuit.
you must first battery (s) connect enophet moment he logged discharging remove the wires from the battery (s) and connect the output short.
this is the only way to initialize the back scharger if there is about volt comes on the display.
I have my charger thus recovered into force.
You can try to translate this link.
https://groups.google.com/forum/#!topic/cheali-charger/5hD6g_MNPdY%5B51-75%5D
Look at page 3
Slyfox net 17-12-15
you must first battery (s) connect and at the moment he shows discharging remove the wires from the battery (s) and connect the output shorts.
this is the only way to initialize the backup scharger if there’s about over-voltage on the display.
Thanks for the clarification. Good information.
lincomatic can you please translate me the things albert is saying with all respect I can not understand the steps thanks
He’s telling you that you can build a 6S by taking apart an old laptop battery. He’s saying if you have a regulated power supply, you can charge each cell with 100mA current, until you get to 4.1-4.2V. Then use these cells to build a 6S for calibration.
To clear the overvoltage problem he’s saying to set the charger to Discharge mode with your battery hooked up and hit the start button. The instant the display says “Discharging,” disconnect your battery and short the output.
@ lincomatic please have a look here the clone can be flashed now 🙂 https://groups.google.com/forum/#!topic/cheali-charger/_godAO7tDT0
That’s not for the 80W clone that we have with the mystery MCU
Ok so I got out off the Loop today! Connected a 6S lipo but the friends 6S lipo had one bad sell so calibration was not good. Next step is to calibrate this correctly ! Thank you too for the help! I will be needing your help in the future soon
Have a look
https://groups.google.com/forum/#!topic/cheali-charger/ZN2LWIHepwg
There is a FW for the 80W
No, it is not for our charger with the UNKNOWN MCU!
Thanks Albert and Lincomatic. I had uncalibrated clone with unknown mcu. I made a 6S using 6 18650 cells. I forced the calibration like in the movie, it asked for 6s and after to move the + to 1S. And thats all! You got a beer from Romania. 🙂
I also got one those fakes. However, I can’t calibrate it, if I connect 6 batteries it just display a wrong voltage, and after exit from “calibration” mode, it just displays “over voltage”, but sometimes, if I connect just 1 cell, it finish the discharge, then after reset it’s the same history
how much is the deviation?
6 Connection load cell and balancing connector.
I also connect an external power supply and line it up 25.14v (100mA max)
and calibration.
if differ persists, adjust the external power supply higher down lower.
read the description higher in this blog
I got it calibrated connecting 6 cells in series. At the moment of calibration the voltages shown are still wrong, the voltages shown are about 3.4–3.8v while multimeter reads above 4v. However in normal operation the charger read voltage values closer to the real ones.
Thanks.
Thanks.
With the help of this page I was able to fix my fake B6 with unknown-unmarked MCU.
Hi, i did buy that fake b6ac 80W. last i did was press the stop/enter button while power on. and m menu is not functioning anymore. it does the auto discharge 1S then over voltage. i tried to copy the solution, made a 6s battery saidly my lipo seem dying it can only be charge 3.9v. and it failed. i decided to open b6ac. saw the resistor near the charge out a bit burnt.
i replaced it and still the same bug.
am not good in electronics. but i decided to remove the irfz44n. the one near the charger output terminal.
w/o that part i test and it did not cause over voltage. i connected a 1s battery. and it discharge. and i got the menu back 🙂 i put back the irfz44n and upto today ba6c working 🙂 Hope this info helps other.
Hello,
I also seem to have been sold this version of B6. The problem I have is that my charger is stuck at LiPo discharge, and as soon as it is powered on, it automatically goes to battery check, and reports either over voltage or connection break, depending on whether I have a cell hooked up to it or not.
The only ‘hidden’ menu I can access is stop+start.
So, to try and fix this, I got six cells, all charged to 4.19V – 4.21V, connected them in series and started the charger while holding down buttons one and four. The screen which appeared displayed six voltages which were waaay off, and then just stayed there and none of the buttons did anything. All six cell voltages showed somewhere between 2.5V and 2.9V. If I connect two 4.2V cells in series to one pin, it will show about 4.05V on that pin, while other five cells will read the same 2.5V – 2.9V. This gave me an idea to connect 12 4.2V cells in series and then hook up the seven balance-charging pins to every other serial connection (plus first and last + and -), but I haven’t tried this, yet. I am still a beginner in the world of electronics, and this seems like a lot of voltage to be playing around with.
So, effectively, my charger is dead. It doesn’t do anything now, except beep eight times as soon as it powers on and detects either over voltage or connection break. stop+inc do not work, and neither do dec+start.
Has anyone had a similar experience ? Can anyone offer me an advice ?
Thanks in advance!
Best regards,
Nikola
I have the same charger. Seems like this fake one is a little different in calibrating than the other ones. the values around 3-4V is way off but apparantly this is correct.
Then It shows discharge because it’s not done calibrating.
Give it 4.2V from a supply, and it will “discharge” this for 10 seconds. Then it starts a new discharger. Now you give it 25.2V. You must also have the resistor bridge (or alot of power supplies) connected to the 6C balance port. Mine gave some weird error message when i did this, but now it’s callibrated and works fine.
Hallo Albert! Frohes Fest!
Ich habe auch diesen diesen Batterie check – connection break Fehler. ich komme zwar mit Start Stop gleichzeitig beim Hochfahren in eine Anzeige wo jede Zelle mit 0,00 V steht, aber die Kiste reagiert auf keinen Knopfdruck. Ich würde mich freuen, wenn Du das ganze einmal auf Deutsch schreiben könntest.
Ich habe einen 6s und ein paar 3S lipos und noch ein funktionierendes Ladegerät. Ach ein gutes Messgerät habe ich auch. Gruß
Christian
Sup guys. I’ve probbably gone through every possible google result about “stuck imax b6” and here you guys seem to be the closest to an answers. So I’ve got two (yeah i managed to do that) B6’s with unknown MCU’s. One is clearly chinese B6 and other one is more legit B6AC. SO, as I said, I’ve got both of them stuck in over-voltage thing.
I’ve made great 6S LiPo pack, exactly 4.1v each cell. When I enter the calibration mode, it shows these off-values. Numbers do not change. Sometimes I manage to do some kind of On-off sequence so I’ve got like 4.09 v readings on every cell. But that did not really changed anything. It still does not respond to any buttons. The mode it’s stuck is discharge 1s 2a (usual) so I’ve connected only one cell and it started discharging, but after like 27 seconds it suddenly started beeping with text sth like LOW VOLTAGE.
I am a bit confused. I really need to get these chargers unstuck (one I’ve borrowed). Should i try the temperature thing? I would be really happy to hear any advice’s.
tomorrow going to try use power supply instead of 6s pack
I don’t think the power supply is a good idea. Have you seen the comment I pinned?
Check out the pinned comment in the video. Maybe it will help you
As i mentioned, numbers does not change for me at all. I will try a method someone mentioned before with 1s discharging for 10seconds and then switching it to 6s. I have tried so many things already, only this one seems the most hopeful. (p.s. I’m a tech guy so don’t worry if i sound a bit noobish, i do know what i am doing 😀 )
Hi George!
When you have tried it with the 6s lipo. First of all you can forget what is shown in the display during calibration. What was shown in the display after the discharge 6s? Balance 2s? 3s? Is there anything else without low voltage? To me it looks like you have missed to start the charger without the plus cable of the lipo but balace cable still connected.
Cheers Christian from Germany
Thanks! Worked fine!
Hi. I have the same problem! I have the Imax B6 clone and after going into calibration mode, (Stop+Enter) it just goes into lipo discharge 3s mode on startup and won’t respond. I rigged up a 6s pack from 2x3s and folowed the advice above. I plugged in the pack, powered up in calibration mode and the display showed the 6 cells at around 3.2 volts (they are actually around 4.1-4.2v/cell). I power down, disconnect 6s pack and power up. If a 3s/2s/1s pack is connected or the leads shorted, it shows overvoltage. If nothing is connected it shows connection break. What am I doing wrong? Thanks for any help!
It seems that there are now more versions of the fake iMAX B6. Sorry, I can’t help. See the comment from Erlund below
Hi,
i just bought also a B6AC 80W with unlabeld MCU,
the first thing i tried was to get an serial data connection for using labview, i spend some hours of reading in the www, tried different usb-serial converters but nothing of data is sending…
the temp/usb setting is set to usb ofcourse.
After looking for the tx signal in the B6AC using a scope i found that no data but only some spikes are coming out.
I even assembled those missing parts labeld as USB ADD , 1 resistor 1K and two BC847 Transistors.
Still no serial data.
Somewhere at least i read, this model doesn`t work for serial data.
Does anyone have the same problems?
To calibrate it is (maybe) the next part i will try,
but i am looking for another charger with atmega32.
Because i am more into hardware-design i will start a complete new charger using an ATMEGA2560 and the Arduino IDE, some good DA and AD-Converters and a nice SPI-TFT.
Are you also interested developing such a new charger?
email me…
hi
check out my video there is complete calibration
https://youtu.be/mL3TbBVQ-tk
I know this thread is a little old now, but I bought one of the 80w clones and the voltages are off (no surprise), so tried the calibration startup buttons for the older version (which did not work of course). I then googled and found your excellent blog. Got everything set up with a precision voltage and resistor divider, made sure all charge/discharge programs were set to lipo and 6s, and held down start and stop while powering on. It just started up as normal. No calibration menu or options. Seems there are even more versions of this charger that don’t even allow any form of calibration. I got a refund and bought a genuine SkyRC charger instead. If anyone does know of other calibration options for these cheap chargers, I might just have a play (the seller did not want the charger back). However, I won’t be using that charger for any actual charging I think….
Yes, unfortunately, there are more and more clones sprouting up, and many of them either can’t calibrate, or do it in some other way from mine, unfortunately. The designs can vary quite a bit on the side, too. I actually also bought a genuine SkyRC model in the end, as well.
Cool I had the EXACT same issue but mine was when standard charging my 12 cell 6s battery for my drone ..it fried a bunch of stuff ..I fixed it but the logic is fried and it won’t apply amps and goes flat while charging….mine had no MOSFETs on the rear side ..I just purchased another knockoff and it’s got the proper large MOSFETs on the rear of the PCB…so I cut a hole in the base ..mounted a 3-12v 40mm cooling fan pulling down and extended the legs and I’m running it on the 5v supply on the extra free pins by the screen ..it runs cool as now
Cool. I still use the 2nd clone I bought occasionally, but I’ve moved on to other chargers, because the B6 doesn’t give you any control at all over voltages. I don’t like to charge my lithium ions up all the way, since I don’t use them much