Last month, I bought a Nissan Leaf EV. It’s pretty cool driving around in an all-electric car. Luckily, there’s a great forum called MyNissanLeaf, where Leaf owners can learn a lot, and share information. I’m currently collaborating with one of the forum members to design and build a Level 2 EVSE. I will document that project on this blog at a later date. Having a serious case of project ADHD, I discovered that forum members had set about hacking the Leaf’s CAN buses, and couldn’t resist joining the fray.
Being most familiar with ATmel AVR microcontrollers and Arduino, I decided to use that platform for this project. ATmel has a subtype of the AVR with CAN bus capabilities, the AT90CANxxx. I found an interesting development board containing an AT90CAN128 and headers for access to all the pins on the MCU. I ordered one from Sparkfun for $29.95. They also sell another board, the AVR-CAN, but it contains things that I don’t need, such as an RS-232 interface, and can be programmed only via JTAG – I only have a USBtinyISP, which is an ICSP programmer. Unlike the AVR-CAN, the AT90CAN128 Header Board doesn’t contain a CAN Bus transceiver. I decided to go with the Microchip MCP2551, since that’s what the AVR-CAN uses.
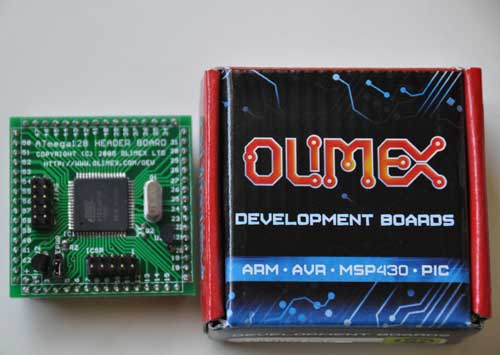
The AT90CAN128 header board is from Olimex, and comes in a cute little box:
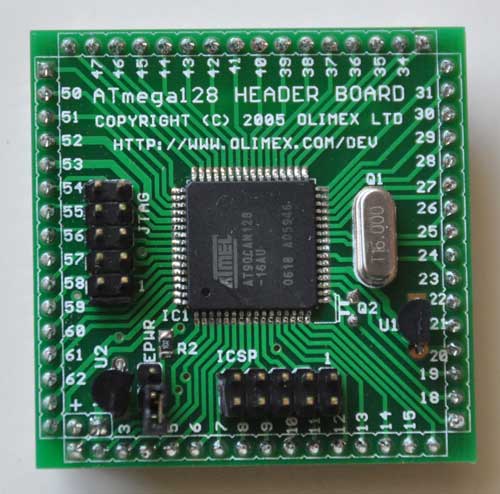
Here’s a closeup of the front:
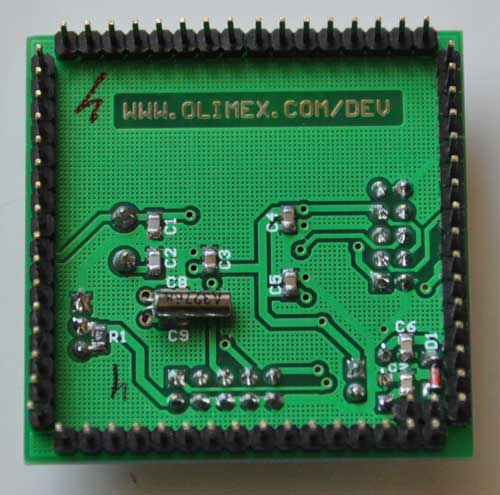
and the back:
I decided to try to get this board working with Arduino, since it’s a lot easier to set up than WinAVR. The first problem to solve is how to adapt the Arduino IDE to work with the AT90CAN128 and my USBtinyISP. After much Googling, I found SuperCow had already done the dirty work and posted it to the Arduino forum. He packaged the core files, bootloader, and a couple of examples into a handy zip file (which has since been taken offline). Since he used an unknown JTAG programmer, I had to adapt his files to work with the USBtinyISP and JTAG ICE mk1. Also, I modified them to work with Arduino 1.x+.
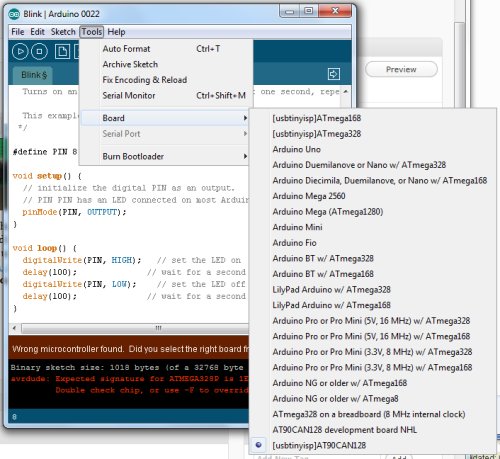
You can download the latest version from github: https://github.com/lincomatic/AT90CAN To install it, simply unzip the atcan90 directory into <your arduino directory>/hardware/at90can. Next time you restart Arduino, you can select it from Tools->Board->[usbtinyisp]AT90CAN128.
If you have a JTAG ICE mk1 programmer instead, select [JTAG ICE mk1]AT90CAN128.
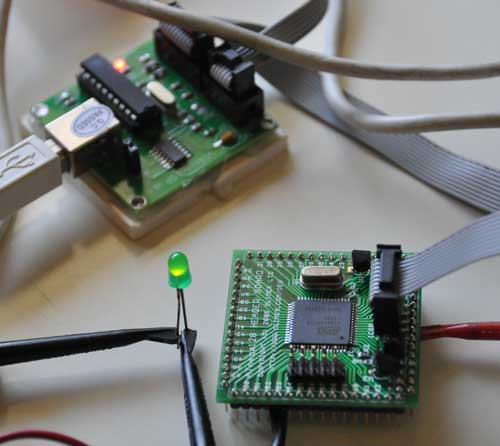
I connected up my USBtinyISP via the 10-pin ICSP header, burned the Blink sketch, hooked up an LED, and bingo! It’s working flawlessly.
In at90can/cores/at90can, I found can_lib.h and can_lib.cpp, which appear to be all we need to interface to the CAN bus. Since I currently know ZERO about CAN bus, I have a lot of reading to do before I can commence programming. SuperCow’s original zip file contains a couple of rudimentary examples.
Before I start programming, I need to build a little interface board containing the MCP2551 CAN bus transceiver, which should arrive next week. I already have an OBD-II cable to tap into the Leaf CAN bus via the OBD-II connector. Currently, obdcables.com is having a special on the 9-ft model.
Downloads: https://github.com/lincomatic/AT90CAN
Next: AVR CAN Bus Project – Step 2: Programming Low Fuse
Nice your using my school project’s at90can to arduino.
Yup, thanks!
The link to the SuperCow lib is down.
God work. Very interesting.
You should use my adapted file instead: http://blog.lincomatic.com/wp-content/uploads/2011/07/at90can_arduino.zip
Can you put the JTAG programmer to arduino? Please.
Thanks
Check the article above. I just added info on how to use Arduino with JTAG ICE Mk1
Thanks but now I have a problem when I upload the program. The program shows me a sincronize error. Have I made a mistake? Which can be the reason?
Are you using a JTAG ICE Mk1? Does it work when you use avrdude directly from the command line?
My error is this:
Binary sketch size: 1086 bytes (of a 126976 byte maximum)
avrdude: jtagmkI_open(): failed to synchronize to ICE
avrdude: jtagmkI_close(): unsupported baudrate -1
Can you help me? please
I using this USB JTAG debugger:
http://www.olimex.com/dev/arm-usb-ocd.html
Regards
I don’t have one of those. If you can get it to work with avrdude, then I can help you get it working with Arduino. But it has to work with avrdude, or you’re out of luck.
Hello.
I´m a frind of Ivan. We are looking for a new programer, may be this?
http://www.atmel.com/Images/AVRISPmkII_UG.pdf
It seems to be a 6 pins connector and the board is a 10 pin one…
You can adapt it for a 10-pin.. http://www.hardwarebook.info/AVR_ISP
But I thought you guys wanted JTAG. The AVRISP is an ICSP programmer, not JTAG.
Hi lincomatic,
glad you continued supercow’s work. I downloaded the repo and copied the at90can dir into the hardware subfolder of the arduino installation. I tried to do a dry-test (no hardware yet, but compiling should be successful). So I selected the USBtinyISP and the corresponding board entry but compiling fails for the blink example:
C:\Program Files\Arduino\hardware\at90can\cores\at90can\main.cpp: In function ‘int main()’:
C:\Program Files\Arduino\hardware\at90can\cores\at90can\main.cpp:5: error: ‘init’ was not declared in this scope
C:\Program Files\Arduino\hardware\at90can\cores\at90can\main.cpp:7: error: ‘setup’ was not declared in this scope
C:\Program Files\Arduino\hardware\at90can\cores\at90can\main.cpp:10: error: ‘loop’ was not declared in this scope
Can you imagine what I have done wrong?
Another question: I’ve got a AVRISP mkII programmer. Is ist enough to define following in the programmers.txt:
avrispmkii.name=AVRISP mkII
avrispmkii.communication=usb
avrispmkii.protocol=stk500v2
and this in boards.txt:
aat90can128.name=[avrispmkii]AT90CAN128
aat90can128.upload.using=AVRISP mkII
aat90can128.upload.maximum_size=131072
…(and the rest corresponding..)
Thanks,
juergen
(heavily trying to learn about Atmel/Arduino world of programming)
Did you restart arduino after copying the files? It should work.
You can try this pre-configured version and see what you did wrong:
http://www.reprap-usa.com/download/arduino0022.zip
I don’t have an avrispmkii, but it looks like your configuration should work.
Hi, i’ve tryed your method for an AVR-CAR, i made an adapter with this schematic
https://dl.dropboxusercontent.com/u/12305643/Adattatore.jpg
But i had no connection with the USBtiny, what i should try ?
Sorry, I’m not familiar with AVR-CAR. What is it?
Sorry, misspell the AVR-CAN 🙂
I bought the AVR-CAN instead of the board that you’ve used hoping that it could had worked the same but with no luck.
I’ve tryed to map on an adapter the same pin that in your board are mapped to the ICSP connector according to the schematic i’ve posted but i had no luck and i don’t know what is the problem.
I was suprised it didn’t worked since the IC is the same an all the pin that the ICSP uses on the header board are unused in the AVR-CAN board, i just connected the to the USBtinyISP connector.
I’ve ordered a Jtag programmer to see if with that i will be able to burn the arduino boot loader, but i still don’t figure out why it does not work like i did.
Thanks for your help.
The AVR-CAN really is compatible.. I based my design on it. Also, I have a friend who uses it, instead. You don’t need a JTAG programmer to burn a bootloader – a USBtinyISP will work just as well.
OK, now I see what you meant in your original post.. your wiring for the ICSP looks correct. Unless you hooked it up wrong, the problem might be that the SPIEN bit is turned off in the high fuse, which would disable serial programming.
Ohh that’s a good news, i will have back a look on the wiring if i done them well, in case how i change the bit you are mentioning about ? Sorry for the silly question but i’m not that much in the arduino low level stuff.
Thanks again for your help.
Cheers.
If SPIEN is turned off, then your easiest option is to use a JTAG programmer. You can switch on the fuse bit with the JTAG programmer, and then you can use either programmer. Just make sure that you don’t turn off the JTAGEN bit when you turn on the SPIEN, or JTAG will be disabled. This is not the vendor I bought from, but a cheap JTAGICE clone like this one is what worked for me: http://www.ebay.com/itm/51-AVR-JTAG-USB-Programmer-ISP-Downloader-Emulator-Debugger-ICE-Buffer-Chip-/171310889811?pt=LH_DefaultDomain_0&hash=item27e2ecbb53
Thanks for your help, i’ve asked to Olimex what is the default fuse configuration and meanwhile i’ve orderd this jtag, i hope it will work aswell.
http://www.ebay.com/itm/191216441825?ssPageName=STRK:MEWNX:IT&_trksid=p3984.m1439.l2649
I think it should work … avrdude works with JTAG ICE. But they don’t say which version it is. It might be prudent to ask them if they know which programmer option to use with avrdude, as there are many options:
jtag2dw = Atmel JTAG ICE mkII in debugWire mode [C:\WinAVR\bin\avrdude.conf:454]
jtag2isp = Atmel JTAG ICE mkII in ISP mode [C:\WinAVR\bin\avrdude.conf:446]
jtag2 = Atmel JTAG ICE mkII [C:\WinAVR\bin\avrdude.conf:438]
jtag2fast = Atmel JTAG ICE mkII [C:\WinAVR\bin\avrdude.conf:430]
jtag2slow = Atmel JTAG ICE mkII [C:\WinAVR\bin\avrdude.conf:422]
jtagmkII = Atmel JTAG ICE mkII [C:\WinAVR\bin\avrdude.conf:414]
jtag1slow = Atmel JTAG ICE (mkI) [C:\WinAVR\bin\avrdude.conf:407]
jtag1 = Atmel JTAG ICE (mkI) [C:\WinAVR\bin\avrdude.conf:399]
jtagmkI = Atmel JTAG ICE (mkI) [C:\WinAVR\bin\avrdude.conf:391]
I got the JTAG and trought AVR Studio i can read and write the fuses, i’ve wrote them as per the github readme.
I’ve then tryed to program the AT90CAN for the bootloader but i got an error message and i guess if from the newer arduino ide (i’m using the 1.5.7).
Arduino:1.5.7 (Windows 7), Scheda:”[JTAG ICE mkI]AT90CAN128″
java.lang.NullPointerException
at java.util.HashMap.putAll(Unknown Source)
at cc.arduino.packages.uploaders.SerialUploader.burnBootloader(SerialUploader.java:258)
at processing.app.Editor$47.run(Editor.java:2569)
at java.awt.event.InvocationEvent.dispatch(Unknown Source)
at java.awt.EventQueue.dispatchEventImpl(Unknown Source)
at java.awt.EventQueue.access$200(Unknown Source)
at java.awt.EventQueue$3.run(Unknown Source)
at java.awt.EventQueue$3.run(Unknown Source)
at java.security.AccessController.doPrivileged(Native Method)
at java.security.ProtectionDomain$1.doIntersectionPrivilege(Unknown Source)
at java.awt.EventQueue.dispatchEvent(Unknown Source)
at java.awt.EventDispatchThread.pumpOneEventForFilters(Unknown Source)
at java.awt.EventDispatchThread.pumpEventsForFilter(Unknown Source)
at java.awt.EventDispatchThread.pumpEventsForHierarchy(Unknown Source)
at java.awt.EventDispatchThread.pumpEvents(Unknown Source)
at java.awt.EventDispatchThread.pumpEvents(Unknown Source)
at java.awt.EventDispatchThread.run(Unknown Source)
Questo report potrebbe essere più ricco
di informazioni con
“Mostra un output dettagliato durante la compilazione”
abilitato in “File > Impostazioni”
With 1.0.5 i got this error
avrdude: jtagmkI_read_byte(): timeout/error communicating with programmer (resp
Actualli i make it working with the JTAG Mk I, i still got the error message burning the boot loader but it worked, i loaded the blink example changing the led pin and it worked flawless.
Thanks !
Hi Lincomatic, i would like to ask you a question, what is the can library i should go for to start my project on the AT90CAN, i will have to read and write can messages on a racecar canbus at 500kbit, any suggestion ? I would like something as high level as possible….
thanks.
You can just use the CAN library that’s included in my Arduino distro. I have example code in my blog.. I wrote a CAN monitor for my Nissan Leaf.
http://blog.lincomatic.com/?tag=at90can128
Thanks ! I had a quick look to it, it looks like derived from the orginal ATMEL one, what were the main changes you did to it ? did you fine someware in the atmel website some documentaion about the this library ?
Thanks !
I found the files in the Arduino forum. I didn’t modify them much.. just some minor changes to allow compilation on Arduino 1+. I didn’t find any documentation… I’ve just been working
from the sample code that came with it, and by reading the library code.
Hi Lincomatic, i had a look to the canspy and unfortunately for my programming skill the can lib looks a bit too “low level” , looking around i’ve run into this that i wonder if can be adapted for the AT90CAN with Arduino.
http://www.kreatives-chaos.com/artikel/universelle-can-bibliothek
It’s mainly in german but can be google translated.
This library looks a bit easier for newbies like me…
Thanks.
You should be able to just put the files into the same folder as your Arduino sketch and use them.
Cool, i will give it a try, i don’t need to install them as libraries then in the Arduino IDE.
Thanks So much for your help.
Cheers.
Installing code as libraries only makes it so that you don’t have to copy it into every sketch folder. Otherwise, copying them to the sketch folder is equivalent
Gosh i think my knowledge of the Arduino platform in not good enough to make other libraries or other version of the IDE working so i will try to use the ATMEL library you are using therefore i woule like a little of help from you if you can about the canspy code:
{
st_cmd_t msg; //i guess this is the definition of the can commands.
uint8_t buffer[8]; //this will be the variable array that will contain the data
uint8_t i,tmp;
//- CAN ECHO: WAIT FOR RECEIVED
// — Init Rx data
msg.pt_data = &buffer[0]; // this i don’t understad what it doeas
memset(buffer,sizeof(buffer),0); //neither this
// — Rx Command
msg.cmd = CMD_RX; //here you send a command to the can and i guess is I’m ready to receive
// — Enable Rx
while(CAN.cmd(&msg) != CAN_CMD_ACCEPTED); // I don’t undestad here the CAN.xyz
// — Wait for Rx completed
while(1) {
tmp = CAN.get_status(&msg);
if (tmp != CAN_STATUS_NOT_COMPLETED) break; // Out of while
}
//
what i should archive is with my little project is read a single frame on the canbus that will contain car speed (of course i know wich frame and wich bytes) and use this valute to feed an averagin calculation routine.
Thanks.
Sorry, but I really don’t have time to figure out how to write you code for you. And the questions you ask are just basic C.
I will answer them, but if you don’t have a basic grasp of C, you will have a lot of trouble trying to write firmware.
Have you tried using CANSpy as is to read data on your CANbus?
msg.pt_data = &buffer[0]; <- this just sets the data pointer to point to your data buffer memset(buffer,sizeof(buffer),0); <- this zeros the buffer while(CAN.cmd(&msg) != CAN_CMD_ACCEPTED); <- this just loops until the read command is accepted
Hi Lincomatic, i would really thank you to pushim me a little bit and study a bit more of C. i’ve mangaed, starting from your can spy to build my little code that is reading a single can channel from a car.
Right now my problem is that the car has and uge number of id wich i don’t actually need and i know all the can ic can filter and allow in the buffer only certein id.
I know from the MCP2515 that i can set CAN.init_Filt(0, 0, 0x04); to set filter 0 to receive only id 0x04 but i haven’t seen anything similar in your code.
Thanks for your help.
Cheers.
Sorry, I haven’t played with filters. I am just ignoring the messages that I don’t need. If you get it working, please post back here with your findings. Thanks.
I think the answer is in
//!< STD ID TAG writing
#define Can_set_std_id(identifier)
{ CANIDT1 = CAN_SET_STD_ID_10_4(identifier); \
CANIDT2 = CAN_SET_STD_ID_3_0( identifier); \
CANCDMOB &= (~(1<<IDE)) ; }
I've tryed to simply put
Can_set_std_id(0x576); //line 88
but i would have been too simple 😀
I got a compile error
Code_60_Display_v03.ino: In function 'void CANinit()':
Code_60_Display_v03:88: error: lvalue required as unary '&' operand
Code_60_Display_v03:88: error: lvalue required as unary '&' operand
Code_60_Display_v03:88: error: lvalue required as unary '&' operand
Code_60_Display_v03.ino: In function 'void setup()':
Code_60_Display_v03.ino:114: warning: only initialized variables can be placed into program memory area
Code_60_Display_v03.ino:123: warning: only initialized variables can be placed into program memory area
Code_60_Display_v03.ino:126: warning: only initialized variables can be placed into program memory area
Code_60_Display_v03.ino:130: warning: only initialized variables can be placed into program memory area
Code_60_Display_v03.ino: In function 'void loop()':
Code_60_Display_v03.ino:242: warning: only initialized variables can be placed into program memory area
Code_60_Display_v03.ino:160: warning: unused variable 'i'
I sorted out the message filtering, i had to read a bit the library and it was straight forward.
Looking in the can_lib.cpp there is the CMD_RX_MASKED, changing the the command from CMD_RX to CMD_RX_MASKED and settinng the appropiate mask made it working, i’m not sure i the best way to do it since in many other libraries for AVRStudio the masks are set up for each MOB during initialization.
With this way we set the mask on the first avilable MOB.
st_cmd_t msg;
uint8_t buffer[8];
uint8_t i,tmp;
//- CAN ECHO: WAIT FOR RECEIVED
// — Init Rx data
msg.pt_data = &buffer[0];
memset(buffer,sizeof(buffer),0);
// — Rx Command
// i setup the dlc id.std ide and rt
msg.id.std = 0x0146;
msg.dlc=8;
msg.ctrl.ide = 0;
msg.ctrl.rtr = 0;
msg.cmd = CMD_RX_MASKED;
// — Enable Rx
while(CAN.cmd(&msg) != CAN_CMD_ACCEPTED);
// — Wait for Rx completed
while(1) {
tmp = CAN.get_status(&msg);
if (tmp != CAN_STATUS_NOT_COMPLETED) break;
}
if (tmp == CAN_STATUS_ERROR)
{
// do something
}
Cool, thanks for sharing.
Hi, i was trying to use the adafruit library to drive the cheap nokia LCD with the at90can but as soon as i try to compile the sketch i run into this error:
C:\Users\Dario\Documents\Arduino\libraries\Adafruit-PCD8544-Nokia-5110-LCD-library-master\Adafruit_PCD8544.cpp: In member function ‘void Adafruit_PCD8544::begin(uint8_t, uint8_t)’:
C:\Users\Dario\Documents\Arduino\libraries\Adafruit-PCD8544-Nokia-5110-LCD-library-master\Adafruit_PCD8544.cpp:187: error: ‘digitalPinToPort’ was not declared in this scope
C:\Users\Dario\Documents\Arduino\libraries\Adafruit-PCD8544-Nokia-5110-LCD-library-master\Adafruit_PCD8544.cpp:187: error: ‘portOutputRegister’ was not declared in this scope
C:\Users\Dario\Documents\Arduino\libraries\Adafruit-PCD8544-Nokia-5110-LCD-library-master\Adafruit_PCD8544.cpp:188: error: ‘digitalPinToBitMask’ was not declared in this scope
Having a look to the adafruit library i find this piece of code :
// Set software SPI ports and masks.
clkport = portOutputRegister(digitalPinToPort(_sclk));
clkpinmask = digitalPinToBitMask(_sclk);
mosiport = portOutputRegister(digitalPinToPort(_din));
mosipinmask = digitalPinToBitMask(_din);
Is it there a quick and dirty solution for this ? Sorry to bother you but this is way too tough to solve for my knowledge.
Thanks.
digitalPinToBitMask() converts the stupid arduino pin number to its offset within its hardware register. So assuming _sclk refers to the SCK = PB1 pin, then clkpinmask would be (1 << number) = (1 << 1) = 2 (for say, pin PF4, you would use (1 << 4)). portOutputRegister() returns the PORTx register... so for PB1, it would return PORTB, PF3 -> PORTF, etc…
MOSI = PB2
so.. I’m guessing..
clkport = &PORTB;
clkpinmask = (1 << 1); mosiport = &PORTB; mosipinmask = (1 << 2); If that doesn't work, find out what _sclk and _din are set to, and you can look up the proper pin from pins_arduino.c. Let me know if you get it working.
Supercool project. One question, does the can bus output charge data while the car is powered off, but charging? I.e. can i try to use this to get % charge to my OpenEVSE build?
Yes. It stays on for the duration of charging. I was thinking of using it to make OpenEVSE stop charge after a certain SOC, but I never got around to it. If you make some progress, please keep me updated.
Ciao Lincomatic, i had a small question you may help to find an answer.
I did a code on the AT90CAN platform from olimex and if i keep the debugice connected (just powered) all looks ok if i feed the board trough the vin of the board the sw freezes, power source is ok, no ripples checked with oshiloscope.
The other strange thing is that the boars tends to beave randomly on this matter one may work flales the other hangs.
Cheers !
Any clever idea ?